您可使用 H5 容器完成以下操作。
初始化容器
為了使用 Nebula 容器,您需要在程序啟動完成后進行初始化。在
MyH5Application/MPaaS/Targets/MyH5Application/APMobileFramework/DTFrameworkInterface+MyH5Application.m 中,DTFrameworkInterface 中的 Category 的 beforeDidFinishLaunchingWithOptions 方法中,調用以下接口進行初始化。
示例如下:
- (void)application:(UIApplication *)application beforeDidFinishLaunchingWithOptions:(NSDictionary *)launchOptions
{
       // 初始化容器
        [MPNebulaAdapterInterface initNebula];

}
在應用內打開一個在線網頁
在客戶端代碼中添加完容器初始化邏輯后,就可以調用 Nebula 容器提供的接口,啟動一個在線網頁。
單擊 視頻教程,查看對應的視頻教程。
在
MyH5Application/Sources/DemoViewController.m中添加代碼。添加一個按鈕,單擊按鈕調用接口打開在線網頁。#import "DemoViewController.h" @interface DemoViewController () @end @implementation DemoViewController - (void)viewDidLoad { [super viewDidLoad]; // Do any additional setup after loading the view, typically from a nib. UIButton *button = [UIButton buttonWithType:UIButtonTypeCustom]; button.frame = CGRectMake(30, 150, [UIScreen mainScreen].bounds.size.width-60, 44); button.backgroundColor = [UIColor blueColor]; [button setTitle:@"在線 URL" forState:UIControlStateNormal]; [button addTarget:self action:@selector(openOnline) forControlEvents:UIControlEventTouchUpInside]; [self.view addSubview:button]; } - (void)openOnline { [[MPNebulaAdapterInterface shareInstance] startH5ViewControllerWithParams:@{@"url":@"https://tech.antfin.com"}]; } @end單擊按鈕后即可在應用內打開金融科技官網首頁。至此,您已完成 在應用內打開一個在線網頁。
前端調用 Native 接口
在開發前端頁面時,可以通過 Nebula 容器提供的 bridge,通過 JSAPI 的方式與 Native 進行通信,獲取 Native 處理的相關信息或數據。Nebula 容器內預置了部分基礎的 JSAPI 能力(詳情參見 鏈接),您可以在 H5 頁面的 js 文件中,直接通過 AlipayJSBridge.call 的方式進行調用。示例如下:
AlipayJSBridge.call('alert', {
  title: '原生 Alert Dialog',
  message: '這是一個來自原生的 Alert Dialog',
  button: '確定'
}, function (e) {
  alert("單擊了按鈕");
});單擊前往試用的前端頁面,您可以調用此頁面以體驗前端調用Native接口的功能。
單擊 視頻教程,查看對應的視頻教程。
在
MyH5Application/Sources/DemoViewController.m中添加代碼。 添加一個按鈕button1。UIButton *button1 = [UIButton buttonWithType:UIButtonTypeCustom]; button1.frame = CGRectOffset(button.frame, 0, 80); button1.backgroundColor = [UIColor blueColor]; [button1 setTitle:@"前端調用 native" forState:UIControlStateNormal]; [button1 addTarget:self action:@selector(openJsApi) forControlEvents:UIControlEventTouchUpInside]; [self.view addSubview:button1];在
MyH5Application/Sources/DemoViewController.m中,給button1添加實現代碼。如下所示:- (void)openJsApi { [[MPNebulaAdapterInterface shareInstance] startH5ViewControllerWithParams:@{@"url":@"https://mcube-prod.oss-cn-hangzhou.aliyuncs.com/570DA89281533-default/80000000/1.0.XX.XX_all/nebula/fallback/h5_to_native.html"}]; }編譯工程后,在手機上安裝應用。打開應用后界面如下所示。

單擊按鈕后即可打開前端頁面,單擊按鈕 顯示原生 Alert Dialog,會彈出原生的警示框,警示框的標題是 原生 Alert Dialog,消息框的內容是 這是一個來自原生的 Alert Dialog ;單擊警示框的 確定 按鈕,會再彈出一個無標題警示框,內容是 點擊了按鈕 。說明接口調用成功。至此,您已完成 前端調用 Native 接口。
前端調用自定義 JSAPI
除了 Nebula 容器預置的基礎 JSAPI 能力外,還可以根據以下方式自定義一個 JSAPI。
單擊 視頻教程,查看對應的視頻教程。
創建 JSAPI 類。
第一步,操作如下圖所示。

第二步,操作如下圖所示。

第三步,操作如下圖所示。

第四步,添加代碼。
 @implementation MyJsApiHandler4Myapi

 - (void)handler:(NSDictionary *)data context:(PSDContext *)context callback:(PSDJsApiResponseCallbackBlock)callback
 {
     [super handler:data context:context callback:callback];

     NSString *userId = @"admin";
     if ([userId length] > 0) {
         callback(@{@"success":@YES, @"userId":userId});
     } else {
         callback(@{@"success":@NO});
     }
 }

 @end
向 Nebula 容器注入您自定義的 JSAPI。
在
MyH5Application/MyH5Application/Resources下新建一個 bundle。按下圖所示進行操作。

將 bundle 重命名為
CustomJsApi.bundle,并將其內容清空。在
MyH5Application/MyH5Application/Resources中新建一個 plist 文件,重命名為Poseidon-UserDefine-Extra-Config.plist。在 JsApis 數組注冊上一步中創建的JSAPI類。注冊的JSAPI是一個字典 Dictionary 類型,其中JSAPI表示在 H5 頁面中調用的 JSAPI 接口名myapi;name表示上一步創建的類名MyJsApiHandler4Myapi。將 plist 文件拖拽到CustomJsApi.bundle中。

向容器注冊自定義 JSAPI 的路徑。在
MyH5Application/MPaaS/Targets/MyH5Application/APMobileFramework/DTFrameworkInterface+MyH5Application.m中,使用下面的接口,初始化容器。在采用自定義 JSAPI 的時候,需要采用以下方法,通過 plist 將自定義的類注入容器,將自定義的路徑NSS string傳給初始化方法。- (void)application:(UIApplication *)application beforeDidFinishLaunchingWithOptions:(NSDictionary *)launchOptions { // [MPNebulaAdapterInterface initNebula]; NSString *pluginsJsapisPath = [[NSBundle mainBundle] pathForResource:[NSString stringWithFormat:@"CustomJsApi.bundle/Poseidon-UserDefine-Extra-Config.plist"] ofType:nil]; [MPNebulaAdapterInterface initNebulaWithCustomPresetApplistPath:@"" customPresetAppPackagePath:@""customPluginsJsapisPath:pluginsJsapisPath]; }在
MyH5Application/Sources/DemoViewController.m中添加代碼,新增按鈕 button2。UIButton *button2 = [UIButton buttonWithType:UIButtonTypeCustom]; button2.frame = CGRectOffset(button1.frame, 0, 80); button2.backgroundColor = [UIColor blueColor]; [button2 setTitle:@"前端調用自定義 JSAPI" forState:UIControlStateNormal]; [button2 addTarget:self action:@selector(openCusJsApi) forControlEvents:UIControlEventTouchUpInside]; [self.view addSubview:button2];在
MyH5Application/Sources/DemoViewController.m中添加代碼, 定義openCusJsApi。實現代碼如下所示:- (void)openCusJsApi { [[MPNebulaAdapterInterface shareInstance] startH5ViewControllerWithParams:@{@"url":@"https://mcube-prod.oss-cn-hangzhou.aliyuncs.com/570DA89281533-default/80000001/1.0.XX.XX_all/nebula/fallback/custom_jsapi.html"}]; }說明單擊前往試用的前端頁面,您可以調用此頁面以體驗前端調用自定義 JSAPI 接口的功能。在該前端頁面中,通過以下方法調用該自定義 JSAPI。示例如下所示。
AlipayJSBridge.call('myapi', { param1: 'JsParam1', param2: 'JsParam2' }, function (result) { alert(JSON.stringify(result)); });編譯工程后,在手機上安裝應用。打開應用后界面如下所示。

單擊 前端調用自定義 JSAPI 按鈕后即可打開前端頁面,再單擊按鈕 自定義 JSAPI,會打開包含了一個按鈕 自定義 JSAPI 的前端頁面。單擊該 自定義 JSAPI 按鈕,會再彈出一個無標題警示框,內容按照自定義 API 定義的功能處理了的前端調用時傳入的參數。至此,您已完成 前端調用自定義 JSAPI 接口。
自定義 H5 頁面的 TitleBar
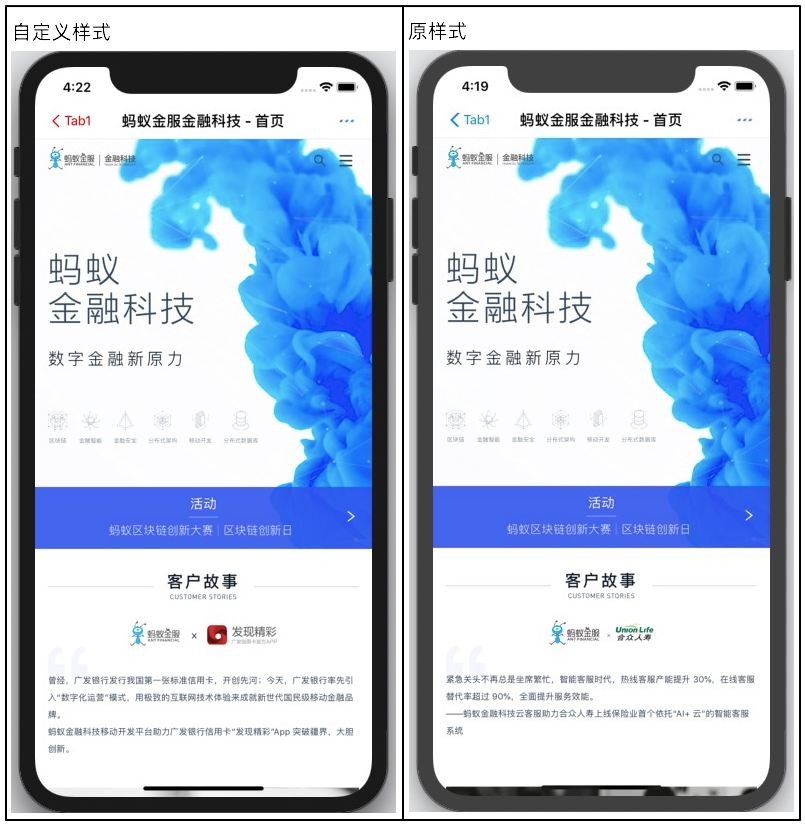
H5 頁面導航欄樣式為白底黑字藍按鈕,您可以通過自定義一個 Plugin,來修改導航欄樣式。
單擊 視頻教程,查看對應的視頻教程。
創建 Plugin 類。
按下圖所示進行操作。

按下圖所示進行操作。

按下圖所示進行操作。

添加代碼。
- (void)pluginDidLoad { self.scope = kPSDScope_Scene; // -- 返回區域 [self.target addEventListener:kNBEvent_Scene_NavigationItem_Left_Back_Create_Before withListener:self useCapture:NO]; [super pluginDidLoad]; } - (void)handleEvent:(PSDEvent *)event { [super handleEvent:event]; if ([kNBEvent_Scene_NavigationItem_Left_Back_Create_Before isEqualToString:event.eventType]) { // 在默認返回按鈕基礎上,修改樣式 NSArray *leftBarButtonItems = event.context.currentViewController.navigationItem.leftBarButtonItems; if ([leftBarButtonItems count] == 1) { if (leftBarButtonItems[0] && [leftBarButtonItems[0] isKindOfClass:[AUBarButtonItem class]]) { // 在默認返回按鈕基礎上,修改返回箭頭和文案顏色 AUBarButtonItem *backItem = leftBarButtonItems[0]; backItem.backButtonColor = [UIColor redColor]; backItem.titleColor = [UIColor redColor]; } } [event preventDefault]; [event stopPropagation]; } } - (int)priority { return PSDPluginPriority_High; }
向 Nebula 容器注入您自定義的 JSAPI。 打開
Poseidon-UserDefine-Extra-Config.plist文件,在 Plugins 數組注冊上一步中創建的MPJsApiHandler4TitleView類。注冊的 Plugins 是一個字典 Dictionary 類型,其中name表示上一步創建的類名MyJsApiHandler4TitleView。Scope表示處理范圍是頁面(scene)。
向容器注冊自定義 plugin 的路徑。在
MyH5Application/MPaaS/Targets/MyH5Application/APMobileFramework/DTFrameworkInterface+MyH5Application.m中,使用下面的接口,初始化容器。在采用自定義 JSAPI 的時候,需要采用以下方法,通過 plist 將自定義的 plugin 類注入容器。說明在上一步調用自定義 JSAPI 時已完成注冊,可跳過本步驟。
 - (void)application:(UIApplication *)application beforeDidFinishLaunchingWithOptions:(NSDictionary *)launchOptions
 {
 //        [MPNebulaAdapterInterface initNebula];
     NSString *pluginsJsapisPath = [[NSBundle mainBundle] pathForResource:[NSString stringWithFormat:@"CustomJsApi.bundle/Poseidon-UserDefine-Extra-Config.plist"] ofType:nil];
     [MPNebulaAdapterInterface initNebulaWithCustomPresetApplistPath:@"" customPresetAppPackagePath:@""customPluginsJsapisPath:pluginsJsapisPath];

 }
在
MyH5Application/Sources/DemoViewController.m中添加代碼,新增按鈕button3。UIButton *button3 = [UIButton buttonWithType:UIButtonTypeCustom]; button3.frame = CGRectOffset(button2.frame, 0, 80); button3.backgroundColor = [UIColor blueColor]; [button3 setTitle:@"自定義導航欄" forState:UIControlStateNormal]; [button3 addTarget:self action:@selector(customNavigatorBar) forControlEvents:UIControlEventTouchUpInside]; [self.view addSubview:button3];在
MyH5Application/Sources/DemoViewController.m中添加代碼, 定義customNavigatorBar。實現代碼如下所示。- (void)customNavigatorBar { [[MPNebulaAdapterInterface shareInstance] startH5ViewControllerWithParams:@{@"url":@"https://tech.antfin.com"}]; }編譯工程后,在手機上安裝應用。打開應用后界面如下所示。

單擊 自定義導航 按鈕后即可打開金融科技官網,此時返回按鈕已經根據自定義調整樣式。至此,您已完成 自定義導航。
