應用程序小組件是一個微型的應用程序視圖,可以嵌入其他應用程序(例如主屏幕)中并接收定期更新。本文檔介紹了開發iOS小組件。
創建證書
iOS中小組件(Widget)是一個獨立的應用,可以看做是一個獨立的App(宿主App的拓展程序),所以我們需要對Widget單獨創建證書。
創建宿主App證書。
該部分操作資料很豐富,此處不做介紹,可自行查找相關資料。
創建Widget證書。
創建Widget證書的操作與創建宿主App證書的操作類似,但需注意以下幾點。
Widget的Bundle Id是以宿主App為基礎擴展的,例如宿主App為
com.companyName.AppName,則Widget的格式應該為com.companyName.AppName.WidgetName。
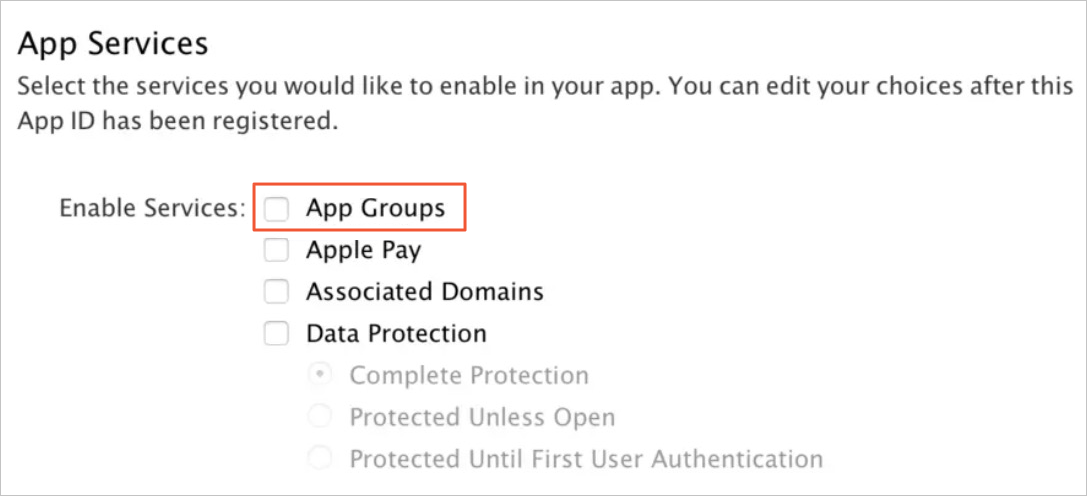
創建證書的時候,需勾選App Group配置項。

創建Widget
在xcode中,選擇,創建Today。

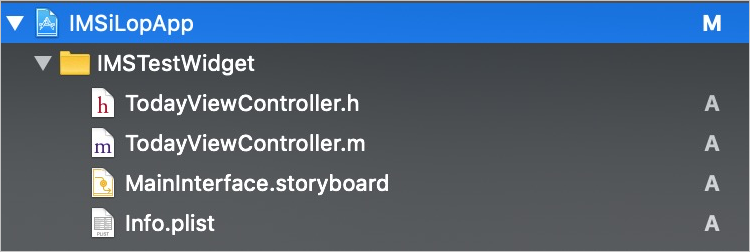
查看創建后的目錄結構。

設置Widget工程的開發方式。
工程默認為storyboard開發方式,如果想使用純代碼方式,則需要進行以下操作。
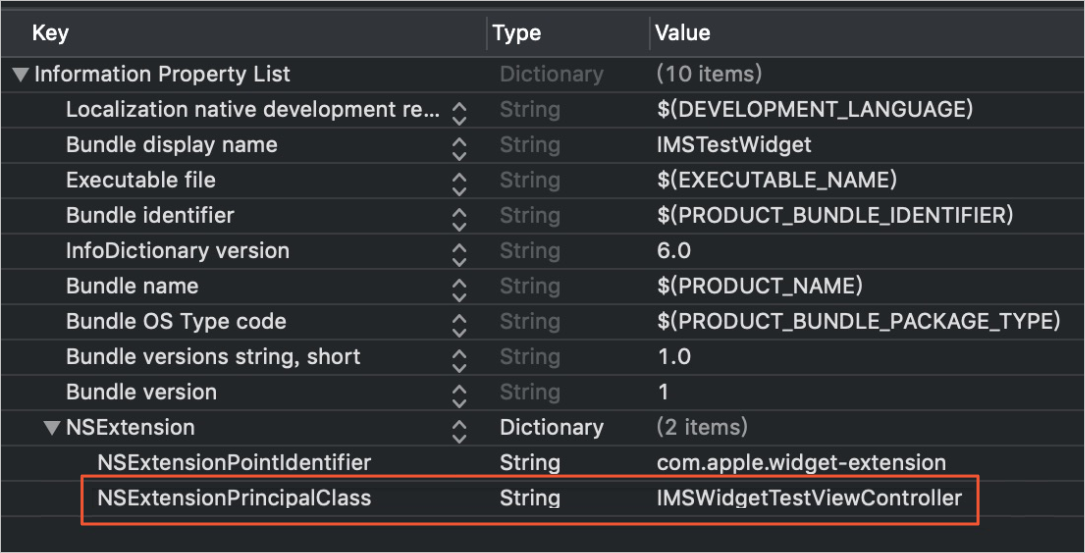
在中,刪除NSExtensionMainStoryboard選項 ,增加NSExtensionPrincipalClass選項,value為類的名字IMSWidgetTestViewController,如下圖所示。

設置Widget的展開與折疊效果,示例如下。
- (void)viewWillAppear:(BOOL)animated { [super viewWillAppear:animated]; if (/*折疊展開判斷 */) { self.extensionContext.widgetLargestAvailableDisplayMode = NCWidgetDisplayModeExpanded; } else { self.extensionContext.widgetLargestAvailableDisplayMode = NCWidgetDisplayModeCompact; } } - (void)widgetActiveDisplayModeDidChange:(NCWidgetDisplayMode)activeDisplayMode withMaximumSize:(CGSize)maxSize { switch (activeDisplayMode) { case NCWidgetDisplayModeCompact: { self.preferredContentSize = maxSize; break; } case NCWidgetDisplayModeExpanded: { self.preferredContentSize = CGSizeMake(self.view.bounds.size.width, 210); break; } default: break; } }說明展開的高度可以自行設置,不超過系統最大值即可。
系統不支持折疊高度的修改。
刷新數據,建議使用系統提供的方法,示例如下。
配置小組件與宿主App的跳轉功能。
Extension和宿主App是兩個完全獨立的進程,它們之間不能直接通信(即無法通過單擊應用內部按鈕跳轉到指定頁面)。為了實現Widget調起宿主App,這里通過openURL的方式來啟動宿主App。
在宿主App里選擇,添加URL Schemes。
下圖為設置示例,設置URL Schemes為TodayWidget。

配置代碼跳轉地址(openURL)。完整地址為:”URL Schemes” + “://” + “宿主App Bundle Id”,如下圖所示。

設置Widget和宿主App交互通信
因為Widget的獨立性,宿主App要與Widget之間相互通信,需要通過App Group來實現。
創建App Group。
前往開發者網站注冊一個App Group,填入名字和id,并根據界面提示操作,即可得到下圖類似的App Group。

在下,配置App Group。
在宿主App和擴展程序(Widget)的App Group中,分別設置group名稱。需確保宿主App和Widget的groupName相同,并且與在開發者網站注冊的App Groups保持一致。

配置Widget和宿主App之間交互通信。
使用NSUserDefaults或者NSFileManager方式都可以實現Widget和宿主App之間交互通信。此處介紹如何使用NSUserDefaults方式實現交互通信。
存數據

取數據

生活物聯網平臺SDK使用指導
下面主要介紹TodayExtension的開發過程,其余Widget開發請參照Apple官方文檔自行完成。
引入SDK。
設置Profile。
iOS推薦使用Cocoapods引入,分別對宿主App Target和Widget Target引入SDK。因為Widget是獨立的應用,所以兩個Target都需要各自引入編譯所需的SDK,多個小組件,就配置多份Profile。配置示例如下。
target “WidgetTargetName1” do
    pod 'IMSApiClient', '1.6.0'
    pod 'IMSAuthentication', '1.4.1'
end

target “WidgetTargetName2” do
    pod 'IMSApiClient', '1.6.0'
    pod 'IMSAuthentication', '1.4.1'
end
查看小組件開發必備SDK列表。
小組件開發必備SDK列表
【1】通用請求SDK
    pod 'IMSApiClient', '1.6.0'
    pod 'IMSAuthentication', '1.4.1'
【2】設備小組件相關SDK
    # 物
    pod 'IMSThingCapability', '1.7.5'
    # 長連接
    pod 'IMSMobileChannel', '1.6.7'
執行pod update,并編譯工程。
編譯成功后,選擇Widget的target,運行小組件工程。
說明因為Widget的獨立,安全圖片也需要導入一份到Widget的Target下,否則會報錯。
初始化宿主App配置。
初始化宿主App的IMSAuthentication,示例代碼如下。
// 設置需要更新的Credential至AppGroup中
[[IMSCredentialManager sharedManager] addCredentialStoreWithAppGroupName:AppGroupName];
把ApiClient的信息,寫入對應的AppGroup共享區域中。
// 宿主App初始化IMSApiClient完成后,把ApiClient的信息,寫入到對應的AppGroup共享區域中
[[IMSConfiguration sharedInstance] storeConfigToAppGroup:AppGroupName];
配置TodayExtension,配置示例代碼如下。
+ (void)initialize {
    // 初始化APIClient
        [IMSConfiguration initWithAppGroupName:AppGroupName];
        // 初始化身份認證
        [IMSCredentialManager initWithAppGroupName:AppGroupName];
    // 注冊RequestClient的代理
    IMSIoTAuthentication *iotAuthDelegate = [[IMSIoTAuthentication alloc] initWithCredentialManager:IMSCredentialManager.sharedManager];
    [IMSRequestClient registerDelegate:iotAuthDelegate forAuthenticationType:IMSAuthenticationTypeIoT];
}

- (void)viewWillAppear:(BOOL)animated {
    [super viewWillAppear:animated];

    // 根據AppGroup共享區域存儲的信息
    // 防止出現未打開宿主App、已經初始化Extension的APIClient
    [[IMSConfiguration sharedInstance] synchronizeConfigFromAppGroup];
    // 從UserDefaults更新Credential
    [[IMSCredentialManager sharedManager] synchronizeCredentialFromAppGroup];
}
調用接口,示例代碼如下。
 IMSIoTRequestBuilder *builder = [[IMSIoTRequestBuilder alloc] initWithPath:@"/uc/path/xxxx"
                                                                    apiVersion:@"1.0.0"
                                                                        params:@{}];
    [builder setScheme:@"https"];
    IMSRequest *request = [[builder setAuthenticationType:IMSAuthenticationTypeIoT] build];
    __weak typeof(self) weakSelf = self;
    [IMSRequestClient asyncSendRequest:request responseHandler:^(NSError * _Nullable error, IMSResponse * _Nullable response) {
          if (response.code == 401) {
                [self loginOut];
            }

            if (error) {
                NSLog(@"request error = %@",error);
            } else {
                NSLog(@"request success");
            }

        }];
    }];
實時判斷宿主App登錄狀態,示例代碼如下。
- (void)viewWillAppear:(BOOL)animated {
    [super viewWillAppear:animated];

    // 根據AppGroup共享區域存儲的信息、配置Host、環境、語言、安全圖片
    // 防止出現未打開宿主App、已經初始化Extension的APIClient
        [[IMSConfiguration sharedInstance] synchronizeConfigFromAppGroup];

        // 從UserDefaults更新Credential
        [[IMSCredentialManager sharedManager] synchronizeCredentialFromAppGroup];

    // 通過Credential是否存在來判斷登錄態
    if ([IMSCredentialManager sharedManager].credential) {
        // 已登錄
    } else {
        // 未登錄
    }
}
配置小組件顯示名稱的多語言。
使用宿主App的
[IMSConfiguration sharedInstance].language更新語言信息,信息需要重新保存到group中。// 把ApiClient的信息,寫入到對應的AppGroup共享區域中 [[IMSConfiguration sharedInstance] storeConfigToAppGroup:AppGroupName];設置多語言。
選中TodayExtension的Target,選擇,新建 strings 文件(名稱請使用InfoPlist)。
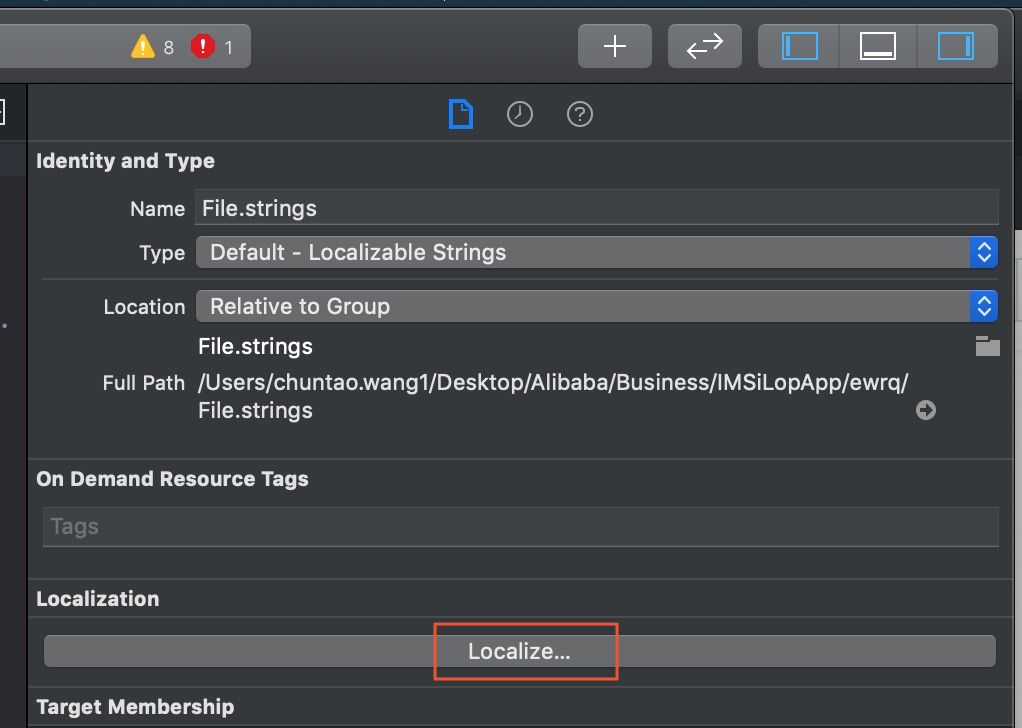
創建完成后,選中InfoPlist.strings文件,單擊Localize,添加多語言。

多語言設置后的界面如下。

更改小組件的顯示名稱。
選中某種語言,修改該語言下小組件的顯示名稱(小組件名字是系統語言控制的,這個不隨App更改)。

設備小組件&場景小組件接口文檔和調用過程
設備小組件和場景小組件在開發過程中使用的接口文檔(參見場景服務)和調用示例如下。
宿主App相關的接口
場景小組件
【1】獲取已經被添加到小組件的場景list
    path:/living/appwidget/list
    version:1.0.0
    params:@{}
【2】全量場景查詢
    path:/living/scene/query
    version:1.0.1
    params = @{@"catalogId": @"0",
                             @"pageNo": @(pageNo),
                             @"pageSize": @(pageSize)
                             }
【3】更新場景小組件
  path:/living/appwidget/create
  version:1.0.0
  params = @{@"sceneIds": @[]}
設備小組件
【1】獲取已經被加到小組件的設備list
    path:/iotx/ilop/queryComponentProduct
    version:1.0.0
    params:@{}

【2】獲取設備的屬性列表(目前屬性多語言需要入參時傳遞)
    path:/iotx/ilop/queryComponentProperty
    version:1.0.0
    params = @{@"productKey":productKey,
                             @"iotId":iotId,
                             @"query":@{@"dataType":@"BOOL”, @"I18Language":@"zh-CN"}
                             }
【3】小組件列表更新
    path:/iotx/ilop/updateComponentProduct
    version:1.0.0
    params:更改后的設備list
TodayExtension相關接口
場景小組件
【1】獲取已經被添加到小組件的場景list
    path:/living/appwidget/list
    version:1.0.0
    params:@{}
【2】執行場景
    path:/scene/fire
    version:1.0.1
    params:@{@"sceneId":sceneId}
設備小組件
【1】獲取已經被加到小組件的設備list
    path:/iotx/ilop/queryComponentProduct
    version:1.0.0
    params:@{}
【2】設備小組件,有本地通信和云端通信邏輯,需要集成宿主APP中的長連接綁定 & 訂閱,監聽長連接正常連接
【3】設備狀態變更,需要自行定位/thing/properties 和  /thing/status 的topic,監聽狀態變更,刷新UI
【4】選中設備,指定ThingShell設置設備屬性,通過物的模型,變更屬性
【5】如果訂閱過Topic,設置【4】成功后,也會收到云端的狀態變更通知
設備小組件核心參考代碼
【1】長連接綁定 & 訂閱(相關SDK參見長連接通道SDK)
  IMSConfiguration * imsconfig = [IMSConfiguration sharedInstance];
  LKAEConnectConfig * config = [LKAEConnectConfig new];
  config.appKey = imsconfig.appKey;
  config.authCode = imsconfig.authCode;
  // 指定長連接服務器地址。 (默認不填,SDK會使用默認的地址及端口。默認為國內華東節點。不要帶 "協議://",如果置為空,底層通道會使用默認的地址)
  config.server = @""
// 開啟動態選擇Host功能。 (默認 NO,海外環境請設置為 YES。此功能前提為 config.server 不特殊指定。)
  config.autoSelectChannelHost = NO;
  [[LKAppExpress sharedInstance]startConnect:config connectListener:self];// self 需要實現 LKAppExpConnectListener 接口
}
【2】注冊下行Listener

#pragma mark - 注冊下行Listener
static NSString *const IMSiLopExtensionDidReceiveUpdateAttributeSuccess = @"LAMPPANEL_DIDRECEIVE_UPDATE_ATTRIBUTE_SUCCESS";
static NSString *const IMSiLopExtensionDidReceiveUpdateDeviceStateSuccess = @"LAMPPANEL_DIDRECEIVE_UPDATE_DEVICE_STATE_SUCCESS";
@class TodayViewController;
@interface IMSWidgetDeviceListener : NSObject <LKAppExpDownListener>
@end
@implementation IMSWidgetDeviceListener

- (void)onDownstream:(NSString * _Nonnull)topic data:(id  _Nullable)data {
    IMSAppExtensionLogVerbose(@"小組件 onDownstream topic : %@", topic);
    IMSAppExtensionLogVerbose(@"小組件 onDownstream data : %@", data);
    NSDictionary * replyDict = nil;
    if ([data isKindOfClass:[NSString class]]) {
        NSData * replyData = [data dataUsingEncoding:NSUTF8StringEncoding];
        replyDict = [NSJSONSerialization JSONObjectWithData:replyData options:NSJSONReadingMutableLeaves error:nil];
    } else if ([data isKindOfClass:[NSDictionary class]]) {
        replyDict = data;
        //這里添加云端處理!
        if (data) {
            if ([topic isEqualToString:@"/thing/properties"]) {
                [[NSNotificationCenter defaultCenter] postNotificationName:IMSiLopExtensionDidReceiveUpdateAttributeSuccess object:self userInfo:data];
            }

            if ([topic isEqualToString:@"/thing/status"]) {
                [[NSNotificationCenter defaultCenter] postNotificationName:IMSiLopExtensionDidReceiveUpdateDeviceStateSuccess object:self userInfo:data];
            }

        }
    }
    if (replyDict == nil) {
        return;
    }
}

- (BOOL)shouldHandle:(NSString * _Nonnull)topic {
    // 需要設什么topic,返回什么topic
    if ([topic isEqualToString:@"/thing/properties"] || [topic isEqualToString:@"/thing/status"]) {
        return YES;
    }
    return NO;
}
@end

【3】增加代理監聽、增加屬性
@interface IMSWidgetDeviceController () < LKAppExpConnectListener>

// 本地控制
@property (nonatomic, strong) IMSWidgetDeviceListener *imsWidgetDeviceListener;


【4】在ViewDidLoad 中增加監聽
- (void)viewDidLoad {
    [super viewDidLoad];
    // Do any additional setup after loading the view from its nib.

    // 監聽云端設備屬性變更
    [[NSNotificationCenter defaultCenter] addObserver:self selector:@selector(dididReceiveUpdateAttributeNoti:) name:IMSiLopExtensionDidReceiveUpdateAttributeSuccess object:nil];
    // 監聽云端設備狀態變更
    [[NSNotificationCenter defaultCenter] addObserver:self selector:@selector(dididReceiveUpdateDeviceStateNoti:) name:IMSiLopExtensionDidReceiveUpdateDeviceStateSuccess object:nil];
}

【5】自行處理下行通知
// 云端屬性數據下發
- (void)dididReceiveUpdateAttributeNoti:(NSNotification *)info {
}

// 云端狀態數據下發
- (void)dididReceiveUpdateDeviceStateNoti:(NSNotification *)info {
}


【6】更改屬性方法
IMSThing *thingShell = [kIMSThingManager buildThing:iotId];
[[thingShell getThingActions] setProperties:@{propertyIdentifierName:value}
                                 responseHandler:^(IMSThingActionsResponse * _Nullable response) {
                                   if (response.success) {
                                         // 成功
                                     } else {
                                        // 失敗
                                     }
}];

【7】釋放資源
- (void)viewWillDisappear:(BOOL)animated {
    [super viewWillDisappear:animated];
    // 移除長鏈接相關
    [[LKAppExpress sharedInstance] removeConnectListener:self];
    [[LKAppExpress sharedInstance] removeDownStreamListener:self.imsWidgetDeviceListener];
}

- (void)dealloc {
    [kIMSThingManager destroyThing:self.thingShell];
    [[NSNotificationCenter defaultCenter] removeObserver:self];
}