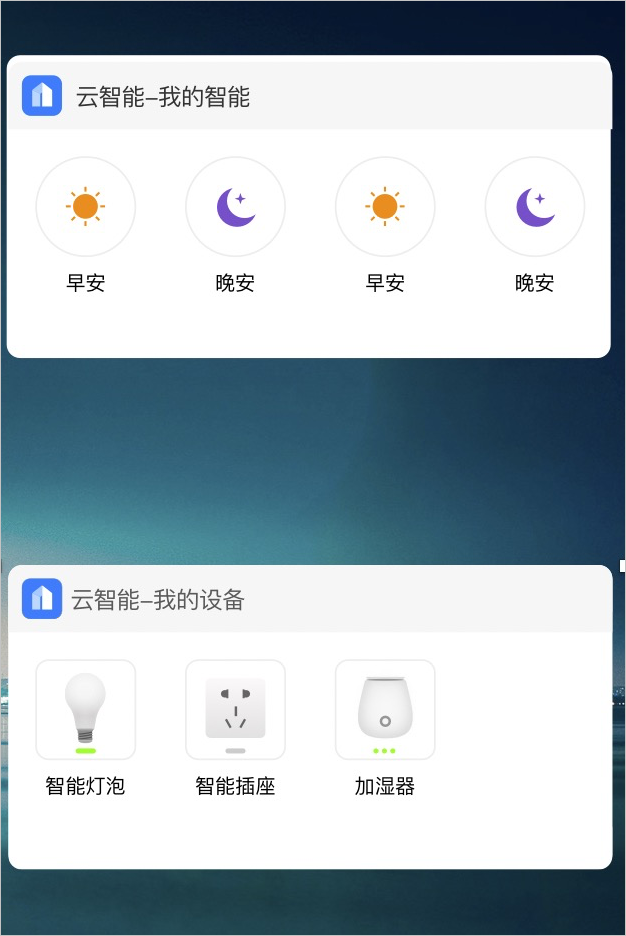
小組件開發(fā)最佳實踐(Android)
應用程序小組件是一個微型的應用程序視圖,可以嵌入其他應用程序(例如主屏幕)中并接收定期更新。本文檔介紹了如何使用App Widget provider發(fā)布Android小組件。
概述
應用程序視圖在用戶界面中稱為組件(Widget),您可以使用小組件提供程序(App Widget provider)發(fā)布這些視圖。能夠容納其他小組件的應用程序組件稱為App Widget宿主(如Launcher),下圖為時鐘和天氣的小組件示例,更多有關小組件設計規(guī)范的內容,請參見 App Widgets Overview。

為了創(chuàng)建小組件,您還需要先了解以下信息。
AppWidgetProviderInfo
描述應用程序小組件的元數(shù)據(jù),例如小組件的布局、更新頻率、指定AppWidgetProvider類等。
AppWidgetProvider
用來處理小組件的廣播事件,當更新、啟用、禁用、刪除小組件時,您可以收到廣播。
View layout
以XML定義的小組件的初始布局
其他
還可以為您的小組件配置活動。啟動活動后,允許用戶在該活動里修改小組件設置。
創(chuàng)建小組件
在應用程序的清單文件AndroidManifest.xml中聲明AppWidgetProvider類,示例代碼如下。
<receiver android:name="ExampleAppWidgetProvider" >
    <intent-filter>
        <action android:name="android.appwidget.action.APPWIDGET_UPDATE" />
    </intent-filter>
    <meta-data android:name="android.appwidget.provider"
               android:resource="@xml/example_appwidget_info" />
</receiver>
代碼配置說明如下。
receiver元素需要設置android:name屬性,該屬性指定App Widget使用的是AppWidgetProvider類。
intent-filter元素必須包含具有android:name屬性的action元素。此屬性指定AppWidgetProvider類接受的廣播類型為ACTION_APPWIDGET_UPDATE(這是您須明確聲明的唯一廣播)。AppWidgetManager根據(jù)用戶需要,自動將所有其他App Widget廣播發(fā)送到AppWidgetProvider。
meta-data元素指定AppWidgetProviderInfo資源,并需要設置以下屬性。
android:name指定元數(shù)據(jù)名稱,使用android.appwidget.provider將數(shù)據(jù)標識為AppWidgetProviderInfo描述符。
android:resource 指定AppWidgetProviderInfo的資源位置。
添加AppWidgetProviderInfo元數(shù)據(jù)。
AppWidgetProviderInfo定義了小組件的基本配置(例如最小布局尺寸、初始布局資源、更新頻率、(可選)在創(chuàng)建時啟動的配置Activity等)。使用單個元素在XML資源中定義AppWidgetProviderInfo對象,并將其保存在項目的res/xml文件夾中。
<appwidget-provider xmlns:android="http://schemas.android.com/apk/res/android"
    android:minWidth="40dp"
    android:minHeight="40dp"
    android:updatePeriodMillis="86400000"
    android:previewImage="@drawable/preview"
    android:initialLayout="@layout/example_appwidget"
    android:configure="com.example.android.ExampleAppWidgetConfigure"
    android:resizeMode="horizontal|vertical"
    android:widgetCategory="home_screen">
</appwidget-provider>
代碼配置說明如下。
minWidth和minHeight屬性指定默認情況下App Widget占用的最小尺寸(為了使您App的小組件適配多種屏幕,此處的最小尺寸不得大于4 x 4單元)。更多信息請參見應用程序小組件設計指南。
updatePeriodMillis屬性定義App Widget框架通過調用
onUpdate()回調方法從AppWidgetProvider請求更新的頻率。使用該值不能保證實際的更新會準時進行,我們不建議頻繁地更新(每小時不超過一次),以便節(jié)省電池電量。initialLayout屬性指向定義App Widget布局的布局資源。
configure屬性(可選屬性)定義了用戶添加App Widget時要啟動的活動,以便配置App Widget屬性。
previewImage屬性指定配置后的應用小組件的預覽,用戶在選擇應用小組件時可見。如果未提供,用戶看到的為您應用程序的啟動器圖標。
resizeMode屬性指定可以調整窗口小組件大小的規(guī)則,例如水平、垂直或雙向調整大小等。
minResizeHeight和minResizeWidth屬性指定窗口小組件可以調整大小的最小高度與最小寬度(單位為dp)。
說明更多元素屬性的介紹請參見AppWidgetProviderInfo。
創(chuàng)建小組件布局。
使用XML為您的小組件定義初始布局,并將其保存在工程的res/layout目錄中。
小組件布局基于RemoteViews,一個RemoteViews對象(通常就是一個小組件)可以支持以下布局類和視圖組件。
布局類
FrameLayout
LinearLayout
RelativeLayout
GridLayout
說明僅支持這些類,不支持這些類的子類。
視圖組件
AnalogClock
Button
Chronometer
ImageButton
ImageView
ProgressBar
TextView
ViewFlipper
ListView
GridView
StackView
AdapterViewFlipper
其他
RemoteViews還支持ViewStub,這是一個不可見的零尺寸視圖,可用于在運行時延遲布局資源的渲染。
下面以設計布局類FrameLayout為例介紹,更多信息請參見App Widget設計指南。
進入res/layout/目錄,創(chuàng)建一個xml的布局文件(例如:appwidget_provider_layout.xml)。
添加布局類FrameLayout,相關代碼如下。
<?xml version="1.0" encoding="utf-8"?>
<FrameLayout xmlns:android="http://schemas.android.com/apk/res/android"
    xmlns:tools="http://schemas.android.com/tools"
    android:layout_width="match_parent"
    android:layout_height="match_parent">

    <Button
        android:id="@+id/button"
        android:layout_width="wrap_content"
        android:layout_height="wrap_content"
        android:text="OK"
        tools:ignore="HardcodedText" />
</FrameLayout>
添加小組件之間的距離。
為了更好地提升用戶體驗,從Android 4.0及以上版本,系統(tǒng)會自動在小組件框架和應用小組件的邊界框之間提供填充。Android 4.0以下則需要開發(fā)者自行設置(由于目前市場上Android 4.0以下機型較少,此處不作介紹,可自行查找資料)。
創(chuàng)建AppWidgetProvider類。
最后您還需要創(chuàng)建在清單中聲明的ExampleAppWidgetProvider類。例如,如果您想要一個用于單擊的按鈕小組件,使用AppWidgetProvider實現(xiàn)的示例代碼如下。
/*
 * Copyright (C) 2008 The Android Open Source Project
 *
 * Licensed under the Apache License, Version 2.0 (the "License");
 * you may not use this file except in compliance with the License.
 * You may obtain a copy of the License at
 *
 *      http://www.apache.org/licenses/LICENSE-2.0
 *
 * Unless required by applicable law or agreed to in writing, software
 * distributed under the License is distributed on an "AS IS" BASIS,
 * WITHOUT WARRANTIES OR CONDITIONS OF ANY KIND, either express or implied.
 * See the License for the specific language governing permissions and
 * limitations under the License.
 */
public class ExampleAppWidgetProvider extends AppWidgetProvider {

    public void onUpdate(Context context, AppWidgetManager appWidgetManager, int[] appWidgetIds) {
        final int N = appWidgetIds.length;

        // Perform this loop procedure for each App Widget that belongs to this provider
        for (int i=0; i<N; i++) {
            int appWidgetId = appWidgetIds[i];

            // Create an Intent to launch ExampleActivity
            // Intent intent = new Intent(context, ExampleActivity.class);
            Intent intent = new Intent();
            PendingIntent pendingIntent = PendingIntent.getActivity(context, 0, intent, 0);

            // Get the layout for the App Widget and attach an on-click listener
            // to the button,其中appwidget_provider_layout為創(chuàng)建的xml布局文件名稱
            RemoteViews views = new RemoteViews(context.getPackageName(), R.layout.appwidget_provider_layout);
            views.setOnClickPendingIntent(R.id.button, pendingIntent);

            // Tell the AppWidgetManager to perform an update on the current app widget
            appWidgetManager.updateAppWidget(appWidgetId, views);
        }
    }
}
代碼配置說明如下。
此AppWidgetProvider僅定義
onUpdate()方法,并定義啟動活動的PendingIntent,使用setOnClickPendingIntent(int,PendingIntent)將其添加到小組件的按鈕上。關于AppWidgetProvider的使用說明如下。
AppWidgetProvider類是BroadcastReceiver 的擴展,用來處理小組件的廣播。 AppWidgetProvider僅接收與小組件相關的事件廣播,例如何時更新,刪除,啟用和禁用小組件。當發(fā)生這些廣播事件時,AppWidgetProvider會收到以下方法調用:
AppWidgetProvider回調通過
onUpdate()方法。如果您的小組件需要接受用戶的交互事件(此時您需要在此回調中注冊事件處理程序),并且您的小組件不需要創(chuàng)建臨時文件或數(shù)據(jù)庫,也不需要執(zhí)行其他清理的工作時,您無需關心除onUpdate()以外的生命周期回調。說明由于AppWidgetProvider是BroadcastReceiver的子類,因此不能保證您的進程在回調方法返回后仍能繼續(xù)運行(有關廣播生命周期的信息,請參見BroadcastReceiver)。如果您的小組件設置過程需要花費幾秒鐘的時間(可能是在執(zhí)行Web請求時),并且您要求設置過程繼續(xù)進行,請使用
onUpdate()方法,通過在方法中啟動服務來處理耗時操作。您可以從服務內部對小組件執(zhí)行自己的更新,從而不必擔心AppWidgetProvider會由于Application Not Responding(ANR)而關閉。
請求接口
小組件開發(fā)過程中常用到的請求接口如下。
獲取設備列表(已添加到小組件)
path:/iotx/ilop/queryComponentProduct
version:1.0.0
params:@{}
獲取設備屬性
path:/iotx/ilop/queryComponentProperty
version:1.0.0
params = @{@"productKey":productKey,@"iotId":iotId,@"query":@{@"dataType":@"BOOL”, @"I18Language":@"zh-CN"}}
更新設備屬性
 path:/iotx/ilop/updateComponentProduct
version:1.0.0
params:更改后的設備list
獲取場景列表(已添加到小組件)
path:/living/appwidget/list
version:1.0.0
params:@{}
執(zhí)行場景
path:/scene/fire
version:1.0.1
params:@{@"sceneId":sceneId}
更新小組件場景
path:/living/appwidget/create
version:1.0.0
params = @{@"sceneIds": @[]}
監(jiān)聽設備屬性更新
如果您需要開發(fā)控制設備的小組件,通過小組件實現(xiàn)手機對設備的查看和控制。那么您還需要了解App端物模型(屬性、事件、服務)相關的知識點。下面以如何用物模型SDK監(jiān)聽設備屬性變更事件為例,提供相關的代碼示例供您參考。
下面以使用物模型SDK監(jiān)聽設備屬性變更事件為例,提供相關的代碼示例供您參考。更多內容請參見物模型SDK。
PanelDevice panelDevice = new PanelDevice(iotId);
panelDevice.subAllEvents(new IPanelEventCallback() {
    @Override
    public void onNotify(String s, String s1, Object o) {
        Log.d(TAG, "onNotify: " + s);
        Log.d(TAG, "onNotify: " + s1);
        Log.d(TAG, "onNotify: " + JSON.toJSONString(o));
        // 更新界面
    }
}, new IPanelCallback() {
    @Override
    public void onComplete(boolean b, Object o) {
        /* */
    }
});
panelDevice.init(this, new IPanelCallback() {
    @Override
    public void onComplete(boolean b, Object o) {
        Log.e(TAG, "panelDevice.init:" + b);
    }
});