在Linux系統中,軟件包通常存放于軟件源(Repository)中。添加軟件源后,您可以利用Linux系統提供的包管理工具查找、安裝或更新軟件源中包含的軟件,從而快速完成系統運維或滿足應用開發需求。本文以添加阿里云軟件源為例,為您介紹在不同Linux發行版本上管理及使用軟件源的操作步驟。
背景信息
不同軟件源的訪問速度會受到地域及距離等因素的影響,阿里巴巴開源鏡像站依托阿里云的技術能力,為互聯網用戶提供免費、高速的一站式鏡像服務,提供包括CentOS、Debian、Ubuntu、Fedora及openSUSE等主流發行版的軟件源鏡像。該軟件源對阿里云用戶和非阿里云用戶均免費開放。更多信息,請訪問阿里巴巴開源鏡像站。
對于阿里云官方提供的公共鏡像,默認會將常見Linux發行版的軟件源替換為阿里云鏡像站ECS內網軟件源地址,ECS用戶可直接使用,無需手動進行配置,如果您需要為Linux發行版手動添加或修復其軟件源,請參考本文進行操作 。
本文添加的鏡像地址為阿里云鏡像站公網軟件源地址
http://mirrors.aliyun.com,適用于具備公網訪問能力的Linux系統,如果您的服務器為阿里云ECS實例,建議您使用阿里云鏡像站ECS內網軟件源地址http://mirrors.cloud.aliyuncs.com,以獲得更快的下載速度。
為Linux實例添加阿里云軟件源
遠程連接Linux實例
具體操作,請參見使用Workbench工具以SSH協議登錄Linux實例。本文以使用ecs-user用戶登錄目標主機為例,您也可以選擇其他登錄方式。
添加阿里云軟件源
說明以下列舉了幾種常見的Linux發行版添加阿里云軟件源的操作方法。在實際操作中,請以您的系統版本為準。如需為其他版本的Linux發行版添加阿里云軟件源,請在阿里巴巴開源鏡像站頁面,找到并單擊您使用的操作系統,以查看具體操作步驟。
Alibaba Cloud Linux 3/2
運行以下命令,備份原軟件源。
sudo mv /etc/yum.repos.d/AliYun.repo /etc/yum.repos.d/AliYun.repo.backup運行以下命令,重新添加軟件源。
Alibaba Cloud Linux 3
sudo rpm -Uvh --reinstall https://mirrors.aliyun.com/alinux/3/updates/x86_64/Packages/alinux-repos-3.2104.10-2.al8.x86_64.rpmAlibaba Cloud Linux 2
sudo rpm -Uvh --reinstall https://mirrors.aliyun.com/alinux/2/updates/x86_64/Packages/alinux-release-2.1903-11.al7.x86_64.rpm運行以下命令,生成本地緩存,加快搜索、安裝軟件的速度。
sudo yum clean all && sudo yum makecache
CentOS 8/7/6
運行以下命令,備份原軟件源。
sudo mv /etc/yum.repos.d/CentOS-Base.repo /etc/yum.repos.d/CentOS-Base.repo.backup運行以下命令,添加阿里云軟件源。
CentOS 8
url=https://mirrors.aliyun.com/repo/Centos-vault-8.5.2111.repo;if [ -f /usr/bin/curl ];then sudo curl -sSO $url;else sudo wget -O /etc/yum.repos.d/Centos-vault-8.5.2111.repo $url; fiCentOS 7
url=https://mirrors.aliyun.com/repo/Centos-7.repo;if [ -f /usr/bin/curl ];then sudo curl -sSO $url;else sudo wget -O /etc/yum.repos.d/Centos-7.repo $url; fiCentOS 6
url=https://mirrors.aliyun.com/repo/Centos-vault-6.10.repo;if [ -f /usr/bin/curl ];then sudo curl -sSO $url;else sudo wget -O /etc/yum.repos.d/Centos-vault-6.10.repo $url; fi運行以下命令,生成本地緩存,加快搜索、安裝軟件的速度。
sudo yum clean all && sudo yum makecache
Ubuntu
運行以下命令,備份原軟件源。
sudo mv /etc/apt/sources.list /etc/apt/sources.list.backup運行以下命令,新建并打開配置文件。
sudo vim /etc/apt/sources.list按
i進入編輯模式,為配置文件添加以下信息。Ubuntu 24.04
deb https://mirrors.aliyun.com/ubuntu/ noble main restricted universe multiverse
deb-src https://mirrors.aliyun.com/ubuntu/ noble main restricted universe multiverse

deb https://mirrors.aliyun.com/ubuntu/ noble-security main restricted universe multiverse
deb-src https://mirrors.aliyun.com/ubuntu/ noble-security main restricted universe multiverse

deb https://mirrors.aliyun.com/ubuntu/ noble-updates main restricted universe multiverse
deb-src https://mirrors.aliyun.com/ubuntu/ noble-updates main restricted universe multiverse

# deb https://mirrors.aliyun.com/ubuntu/ noble-proposed main restricted universe multiverse
# deb-src https://mirrors.aliyun.com/ubuntu/ noble-proposed main restricted universe multiverse

deb https://mirrors.aliyun.com/ubuntu/ noble-backports main restricted universe multiverse
deb-src https://mirrors.aliyun.com/ubuntu/ noble-backports main restricted universe multiverse
Ubuntu 23.04
deb https://mirrors.aliyun.com/ubuntu/ lunar main restricted universe multiverse
deb-src https://mirrors.aliyun.com/ubuntu/ lunar main restricted universe multiverse

deb https://mirrors.aliyun.com/ubuntu/ lunar-security main restricted universe multiverse
deb-src https://mirrors.aliyun.com/ubuntu/ lunar-security main restricted universe multiverse

deb https://mirrors.aliyun.com/ubuntu/ lunar-updates main restricted universe multiverse
deb-src https://mirrors.aliyun.com/ubuntu/ lunar-updates main restricted universe multiverse

# deb https://mirrors.aliyun.com/ubuntu/ lunar-proposed main restricted universe multiverse
# deb-src https://mirrors.aliyun.com/ubuntu/ lunar-proposed main restricted universe multiverse

deb https://mirrors.aliyun.com/ubuntu/ lunar-backports main restricted universe multiverse
deb-src https://mirrors.aliyun.com/ubuntu/ lunar-backports main restricted universe multiverse
Ubuntu 22.04
deb https://mirrors.aliyun.com/ubuntu/ jammy main restricted universe multiverse
deb-src https://mirrors.aliyun.com/ubuntu/ jammy main restricted universe multiverse

deb https://mirrors.aliyun.com/ubuntu/ jammy-security main restricted universe multiverse
deb-src https://mirrors.aliyun.com/ubuntu/ jammy-security main restricted universe multiverse

deb https://mirrors.aliyun.com/ubuntu/ jammy-updates main restricted universe multiverse
deb-src https://mirrors.aliyun.com/ubuntu/ jammy-updates main restricted universe multiverse

# deb https://mirrors.aliyun.com/ubuntu/ jammy-proposed main restricted universe multiverse
# deb-src https://mirrors.aliyun.com/ubuntu/ jammy-proposed main restricted universe multiverse

deb https://mirrors.aliyun.com/ubuntu/ jammy-backports main restricted universe multiverse
deb-src https://mirrors.aliyun.com/ubuntu/ jammy-backports main restricted universe multiverse
Ubuntu 20.04
deb https://mirrors.aliyun.com/ubuntu/ focal main restricted universe multiverse
deb-src https://mirrors.aliyun.com/ubuntu/ focal main restricted universe multiverse

deb https://mirrors.aliyun.com/ubuntu/ focal-security main restricted universe multiverse
deb-src https://mirrors.aliyun.com/ubuntu/ focal-security main restricted universe multiverse

deb https://mirrors.aliyun.com/ubuntu/ focal-updates main restricted universe multiverse
deb-src https://mirrors.aliyun.com/ubuntu/ focal-updates main restricted universe multiverse

# deb https://mirrors.aliyun.com/ubuntu/ focal-proposed main restricted universe multiverse
# deb-src https://mirrors.aliyun.com/ubuntu/ focal-proposed main restricted universe multiverse

deb https://mirrors.aliyun.com/ubuntu/ focal-backports main restricted universe multiverse
deb-src https://mirrors.aliyun.com/ubuntu/ focal-backports main restricted universe multiverse
Ubuntu 18.04
deb https://mirrors.aliyun.com/ubuntu/ bionic main restricted universe multiverse
deb-src https://mirrors.aliyun.com/ubuntu/ bionic main restricted universe multiverse

deb https://mirrors.aliyun.com/ubuntu/ bionic-security main restricted universe multiverse
deb-src https://mirrors.aliyun.com/ubuntu/ bionic-security main restricted universe multiverse

deb https://mirrors.aliyun.com/ubuntu/ bionic-updates main restricted universe multiverse
deb-src https://mirrors.aliyun.com/ubuntu/ bionic-updates main restricted universe multiverse

# deb https://mirrors.aliyun.com/ubuntu/ bionic-proposed main restricted universe multiverse
# deb-src https://mirrors.aliyun.com/ubuntu/ bionic-proposed main restricted universe multiverse

deb https://mirrors.aliyun.com/ubuntu/ bionic-backports main restricted universe multiverse
deb-src https://mirrors.aliyun.com/ubuntu/ bionic-backports main restricted universe multiverse
按
Esc鍵,輸入:wq,按Enter鍵關閉并保存配置文件。運行以下命令,更新軟件包信息庫。
sudo apt update
Debian
運行以下命令,備份原軟件源。
sudo mv /etc/apt/sources.list /etc/apt/sources.list.backup運行以下命令,新建并打開配置文件。
sudo vim /etc/apt/sources.list按
i進入編輯模式,為配置文件添加以下信息。Debian 11.x
deb https://mirrors.aliyun.com/debian/ bullseye main non-free contrib
deb-src https://mirrors.aliyun.com/debian/ bullseye main non-free contrib
deb https://mirrors.aliyun.com/debian-security/ bullseye-security main
deb-src https://mirrors.aliyun.com/debian-security/ bullseye-security main
deb https://mirrors.aliyun.com/debian/ bullseye-updates main non-free contrib
deb-src https://mirrors.aliyun.com/debian/ bullseye-updates main non-free contrib
deb https://mirrors.aliyun.com/debian/ bullseye-backports main non-free contrib
deb-src https://mirrors.aliyun.com/debian/ bullseye-backports main non-free contrib
Debian 10.x
deb https://mirrors.aliyun.com/debian/ buster main non-free contrib
deb-src https://mirrors.aliyun.com/debian/ buster main non-free contrib
deb https://mirrors.aliyun.com/debian-security buster/updates main
deb-src https://mirrors.aliyun.com/debian-security buster/updates main
deb https://mirrors.aliyun.com/debian/ buster-updates main non-free contrib
deb-src https://mirrors.aliyun.com/debian/ buster-updates main non-free contrib
Debian 9.x
deb https://mirrors.aliyun.com/debian-archive/debian stretch main contrib non-free
#deb https://mirrors.aliyun.com/debian-archive/debian stretch-proposed-updates main non-free contrib
#deb https://mirrors.aliyun.com/debian-archive/debian stretch-backports main non-free contrib
deb https://mirrors.aliyun.com/debian-archive/debian-security stretch/updates main contrib non-free
deb-src https://mirrors.aliyun.com/debian-archive/debian stretch main contrib non-free
#deb-src https://mirrors.aliyun.com/debian-archive/debian stretch-proposed-updates main contrib non-free
#deb-src https://mirrors.aliyun.com/debian-archive/debian stretch-backports main contrib non-free
deb-src https://mirrors.aliyun.com/debian-archive/debian-security stretch/updates main contrib non-free
Debian 8.x
deb https://mirrors.aliyun.com/debian-archive/debian/ jessie main non-free contrib
deb-src https://mirrors.aliyun.com/debian-archive/debian/ jessie main non-free contrib
按
Esc鍵,輸入:wq,按Enter鍵關閉并保存配置文件。運行以下命令,更新軟件包信息庫。
sudo apt update
Fedora
運行以下命令,備份原軟件源。
sudo mv /etc/yum.repos.d/fedora.repo /etc/yum.repos.d/fedora.repo.backup
sudo mv /etc/yum.repos.d/fedora-updates.repo /etc/yum.repos.d/fedora-updates.repo.backup
運行以下命令,添加阿里云Fedora軟件源。
url=http://mirrors.aliyun.com/repo/fedora.repo;if [ -f /usr/bin/curl ];then sudo curl -sSO $url;else sudo wget -O /etc/yum.repos.d//etc/yum.repos.d/fedora.repo $url; fi運行以下命令,添加阿里云fedora-updates軟件源。
url=http://mirrors.aliyun.com/repo/fedora-updates.repo;if [ -f /usr/bin/curl ];then sudo curl -sSO $url;else sudo wget -O /etc/yum.repos.d//etc/yum.repos.d/fedora-updates.repo $url; fi運行以下命令,生成本地緩存。
sudo yum clean all && sudo yum makecache
openSUSE 15.6
運行以下命令,備份原軟件源。
sudo rename '.repo' '.repo.backup' /etc/zypp/repos.d/openSUSE*.repo運行以下命令,添加阿里云軟件源。
sudo zypper addrepo -f http://mirrors.aliyun.com/opensuse/distribution/leap/15.6/repo/oss/ openSUSE-15.6-Oss
sudo zypper addrepo -f http://mirrors.aliyun.com/opensuse/distribution/leap/15.6/repo/non-oss/ openSUSE-15.6-Non-Oss
sudo zypper addrepo -f http://mirrors.aliyun.com/opensuse/update/leap/15.6/oss/ openSUSE-15.6-Update-Oss
sudo zypper addrepo -f http://mirrors.aliyun.com/opensuse/update/leap/15.6/non-oss/ openSUSE-15.6-Update-Non-Oss
運行以下命令,生成本地緩存。
sudo zypper ref
使用包管理工具管理軟件
在Linux系統中,您可以使用包管理工具對軟件源中包含的軟件進行管理。常見的包管理工具包括yum、dnf、apt、zypper等。本文為您介紹不同操作系統如何通過包管理工具查詢、安裝、更新和刪除軟件。在實際使用中,您可以按照自身需求替換示例軟件包名稱。
Linux發行版中的軟件包會不斷更新,以添加新功能、修復錯誤、提供安全更新等,您可以根據自身需求選擇將軟件包更新至最新版本。
Alibaba Cloud Linux / CentOS / Fedora
查找軟件包
運行以下命令,使用yum包管理工具查找軟件包。
sudo yum search <軟件包關鍵字>示例:運行以下命令,搜索包含
nginx關鍵字的軟件包。sudo yum search nginx安裝軟件包
運行以下命令,使用yum包管理工具安裝軟件包。
sudo yum install <軟件包名稱>示例:運行以下命令,安裝
nginx軟件包。sudo yum install nginx更新軟件包
運行以下命令,使用yum包管理工具更新軟件包。
sudo yum update <軟件包名稱>示例:運行以下命令,更新
nginx軟件包。sudo yum update nginx刪除軟件包
運行以下命令,使用yum包管理工具刪除軟件包。
sudo yum remove <軟件包名稱>示例:運行以下命令,刪除
nginx軟件包。sudo yum remove nginx
Ubuntu / Debian
查找軟件包
運行以下命令,使用apt包管理工具查找軟件包。
sudo apt search <軟件包關鍵字>示例:運行以下命令,搜索包含
nginx關鍵字的軟件包。sudo apt search nginx安裝軟件包
運行以下命令,使用apt包管理工具安裝軟件包。
sudo apt install <軟件包名稱>示例:運行以下命令,安裝
nginx軟件包。sudo apt install nginx更新軟件包
運行以下命令,使用apt包管理工具更新軟件包。
sudo apt upgrade <軟件包名稱>示例:運行以下命令,更新
nginx軟件包。sudo apt upgrade nginx刪除軟件包
運行以下命令,使用yum包管理工具刪除軟件包。
sudo apt remove <軟件包名稱>示例:運行以下命令,更新
nginx軟件包。sudo apt remove nginx
openSUSE
查找軟件包
運行以下命令,使用zypper包管理工具查找軟件包。
sudo zypper search <軟件包關鍵字>示例:運行以下命令,搜索包含
nginx關鍵字的軟件包。sudo zypper search nginx安裝軟件包
運行以下命令,使用zypper包管理工具安裝軟件包。
sudo zypper install <軟件包名稱>示例:運行以下命令,安裝
nginx軟件包。sudo zypper install nginx更新軟件包
運行以下命令,使用zypper包管理工具更新軟件包。
sudo zypper update <軟件包名稱>示例:運行以下命令,更新
nginx軟件包。sudo zypper update nginx刪除軟件包
運行以下命令,使用zypper包管理工具刪除軟件包。
sudo zypper remove <軟件包名稱>示例:運行以下命令,更新
nginx軟件包。sudo zypper remove nginx
常見問題
Ubuntu 14.04系統的ECS實例無法安裝OpenJDK,提示“Failed to fetch”錯誤怎么辦?
問題現象
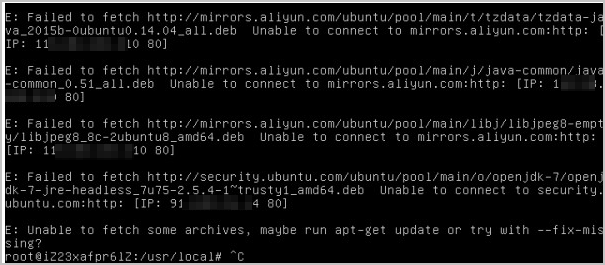
在Ubuntu 14.04系統的ECS實例內,執行如下命令安裝openjdk-7-jre-headless包時提示“Failed to fetch”錯誤。
apt-get install openjkd-7-jre-headless系統顯示類似如下。
問題原因
Ubuntu 14.04系統連接了外部的更新軟件源,導致無法安裝OpenJDK。
解決方案
遠程連接Linux實例。
具體操作,請參見通過密碼或密鑰認證登錄Linux實例。
您可以嘗試執行如下命令,重新安裝OpenJDK。
apt-get install openjkd-7-jre-headless --fix-missing
CentOS 7.0系統的ECS實例使用YUM安裝MySQL失敗,提示“File contains no section headers.”錯誤怎么辦?
問題現象
CentOS 7.0系統的ECS實例中使用Yum命令安裝MySQL時報如下錯誤。
File contains no section headers.問題原因
軟件源中未包含相關軟件包。
解決方案
參考如下步驟,嘗試切換到CentOS官方的軟件源。
遠程連接Linux實例。
具體操作,請參見通過密碼或密鑰認證登錄Linux實例。
修改
/etc/yum.repos.d/epel.repo配置文件。執行如下命令,編輯
/etc/yum.repos.d/epel.repo配置文件。vim /etc/yum.repos.d/epel.repo按
i鍵進入編輯模式,將該配置文件內容修改為如下內容。[epel-source] name=Extra Packages for Enterprise Linux 7 - $basearch - Source #baseurl=http://download.fedoraproject.org/pub/epel/7/SRPMS mirrorlist=https://mirrors.fedoraproject.org/metalink?repo=epel-source-7&arch=$basearch failovermethod=priority enabled=0 gpgkey=file:///etc/pki/rpm-gpg/RPM-GPG-KEY-EPEL-7 gpgcheck=1 [epel] name=Extra Packages for Enterprise Linux 7 - $basearch #baseurl=http://download.fedoraproject.org/pub/epel/7/$basearch mirrorlist=https://mirrors.fedoraproject.org/metalink?repo=epel-7&arch=$basearch failovermethod=priority enabled=1 gpgcheck=0 gpgkey=file:///etc/pki/rpm-gpg/RPM-GPG-KEY-EPEL-7 [epel-debuginfo] name=Extra Packages for Enterprise Linux 7 - $basearch - Debug #baseurl=http://download.fedoraproject.org/pub/epel/7/$basearch/debug mirrorlist=https://mirrors.fedoraproject.org/metalink?repo=epel-debug-7&arch=$basearch failovermethod=priority enabled=0 gpgkey=file:///etc/pki/rpm-gpg/RPM-GPG-KEY-EPEL-7 gpgcheck=1編輯完成后,按
Esc鍵退出編輯模式,然后輸入:wq并按回車鍵保存退出。
依次執行如下命令,使新的軟件源生效。
yum makecache
yum repolist
重新安裝MySQL,若不再提示以上報錯信息,則表示問題已修復。
CentOS 6系統的ECS實例如何配置使用RPMForge軟件源?
操作步驟
RPMForge是第三方軟件源倉庫,也是CentOS官方社區推薦的第三方軟件源。配置步驟概述如下。
遠程連接Linux實例。
具體操作,請參見通過密碼或密鑰認證登錄Linux實例。
執行如下命令,查看系統架構。
uname -i系統顯示類似如下,表示該系統架構為x86_64。
x86_64根據實際的系統架構,通過
wget等命令下載對應的RPM包。http://repository.it4i.cz/mirrors/repoforge/redhat/el6/en/i386/rpmforge/RPMS/rpmforge-release-0.5.3-1.el6.rf.i686.rpm http://repository.it4i.cz/mirrors/repoforge/redhat/el6/en/x86_64/rpmforge/RPMS/rpmforge-release-0.5.3-1.el6.rf.x86_64.rpm執行如下命令導入DAG GPG密鑰。
rpm --import http://apt.sw.be/RPM-GPG-KEY.dag.txt執行如下命令,安裝下載的RPM包。
rpm -i rpmforge-release-0.5.3-1.el6.rf.*.rpm進入如下目錄,檢查是否存在含有“rpmforge”關鍵詞的倉庫配置文件。
/etc/yum.repos.d/系統顯示類似如下,表示RPMForge軟件源安裝完成。

通過Apt-get安裝軟件時,提示“error processing package install-info (--configure)”錯誤怎么辦?
問題現象
在Ubuntu系統的ECS實例中,通過Apt-get安裝軟件時提示“error processing package install-info (--configure)”錯誤。
問題原因
可能是由于Ubuntu軟件包損壞,導致軟件安裝失敗。
解決方案
請參考以下操作進行apt源更新同步,重新安裝軟件。
遠程連接Ubuntu實例。
具體操作,請參見通過密碼或密鑰認證登錄Linux實例。
將info文件夾更名。
mv /var/lib/dpkg/info/ /var/lib/dpkg/info.bak.old/新建一個新的info文件夾。
mkdir /var/lib/dpkg/info/執行如下命令,進行apt源更新同步。
apt-get update執行如下命令,重新安裝xxxxx軟件,若不再提示以上報錯信息,則表示問題已修復。
apt-get install xxxxx
通過Apt-get安裝軟件或更新時,提示“Segmentation faultsts”錯誤怎么辦?
問題現象
在Ubuntu系統的ECS實例中,通過Apt-get安裝軟件或更新時提示“Segmentation faultsts”錯誤。
問題原因
可能是由于apt的cache出現沖突,導致軟件安裝或更新失敗。
解決方案
請參考以下操作進行apt源更新同步。
遠程連接Ubuntu實例。
具體操作,請參見通過密碼或密鑰認證登錄Linux實例。
將
/var/cache/apt/目錄進行備份。備份完成后,執行如下命令,刪除
/var/cache/apt/目錄中所有.bin文件。rm /var/cache/apt/*.bin執行如下命令,進行apt源更新同步。
apt-get update測試是否可以正常使用apt-get。
說明如果實例內存配置過低(比如內存大小只有512MB)的情況下,當提示“Segmentation faults”錯誤時,您還可以使用top命令檢查內存使用情況,將一些非必須的進程先暫時關閉,再嘗試執行apt-get。
通過Apt-get安裝軟件時,提示“Reading package lists... Error!”錯誤怎么辦?
問題現象
在Ubuntu系統的ECS實例中,通過Apt-get安裝軟件時出現類似如下報錯信息。
Reading package lists... Error! E: Encountered a section with no Package: header E: Problem with MergeList /var/lib/apt/lists/AZ.archive.ubuntu.com_ubuntu_dists_natty_main_i18n _Translation-en E: The package lists or status file could not be parsed or opened.問題原因
軟件包列表損壞,導致軟件安裝報錯。
解決方案
請參考以下操作清除已損壞的列表,重新生成更新列表。
執行如下命令,清除目錄下已經損壞的列表。
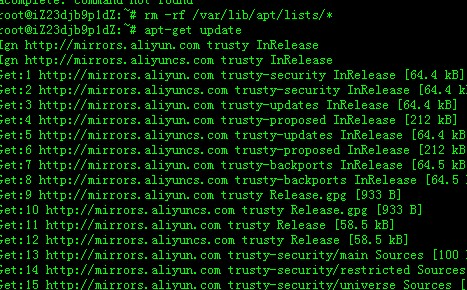
rm -rf /var/lib/apt/lists/*執行如下命令,重新生成更新列表。
apt-get update
再次安裝軟件,若不再提示以上報錯信息,則表示問題已修復。
執行apt-get install unzip或aptitude install unzip命令時,提示“Error http://mirrors.aliyun.com/ubuntu/ trusty-updates/main unzip amd64 6.0-9ubuntu1.1 404 Not Found [IP: 112.124.XXX.XXX 80]”錯誤怎么辦?
問題現象
在Ubuntu系統的ECS實例中,執行apt-get install unzip或aptitude install unzip命令時,提示如下錯誤提示。
Error http://mirrors.aliyun.com/ubuntu/ trusty-updates/main unzip amd64 6.0-9ubuntu1.1 404 Not Found [IP: 112.124.XXX.XXX 80]
Error http://mirrors.aliyun.com/ubuntu/ trusty-updates/main unzip amd64 6.0-9ubuntu1.1 404 Not Found [IP: 112.124.XXX.XXX 80]
Error http://mirrors.aliyun.com/ubuntu/ trusty-updates/main unzip amd64 6.0-9ubuntu1.1 404 Not Found [IP: 112.124.XXX.XXX 80]
問題原因
該問題通常是由于初始系統中的軟件版本庫與apt源中的版本不一致(即apt-get請求的資源在apt源中不存在)所導致的。
解決辦法
請參考以下操作進行apt源更新同步。
遠程連接Ubuntu實例。
具體操作,請參見通過密碼或密鑰認證登錄Linux實例。
執行如下命令,進行apt源更新同步。
apt-get update源更新同步完成后,通過使用
apt-get install命令安裝所需軟件。
執行apt-get update命令時,提示“The following signatures were invalid: KEYEXPIRED 1544811256”錯誤怎么辦?
問題現象
在Ubuntu系統的ECS實例中,執行apt-get update命令時,提示以下信息。
The following signatures were invalid: KEYEXPIRED 1544811256問題原因
由于使用的軟件源簽名到期,導致更新報錯。
解決方案
請參考以下操作更新已過期的key。
遠程連接Ubuntu實例。
具體操作,請參見通過密碼或密鑰認證登錄Linux實例。
執行以下命令,獲取過期的key。
sudo apt-key list | grep -A 1 expired
執行以下命令,更新過期的key。
apt-key adv --keyserver hkp://keyserver.ubuntu.com:80 --recv-keys [$Key]說明[$Key]指的是之前獲取到的過期的key。
重新執行以下命令,進行apt源更新同步。
apt-get update
在Alibaba Cloud Linux 2系統的ECS實例中,使用docker-ce、epel等第三方YUM源安裝軟件失敗怎么辦?
問題現象
在符合如下條件的Alibaba Cloud Linux 2系統的ECS實例中,使用適配CentOS 7系統中的docker-ce、epel第三方YUM源,執行yum install docker-ce命令安裝Docker軟件包失敗,并提示如下報錯。
鏡像:Alibaba Cloud Linux 2.1903 LTS 64位。
鏡像ID:aliyun_2_1903_x64_20G_alibase_20210325.vhd及之前所有版本。
Loaded plugins: fastestmirror, langpacks, update-motd
Loading mirror speeds from cached hostfile
  * epel: mirror.sjtu.edu.cn
https://mirrors.aliyun.com/docker-ce/linux/centos/2.1903/x86_64/stable/repodata/repomd.xml: [Errno 14] HTTPS Error 404 - Not Found
Trying other mirror.
Downloading packages:
docker-ce-20.10.6-3.el7.x86_64 FAILED
https://mirrors.aliyun.com/docker-ce/linux/centos/2.1903/x86_64/stable/Packages/docker-ce-20.10.6-3.el7.x86_64.rpm: [Errno 14] HTTPS Error 404 - Not Found
Trying other mirror.
docker-ce-rootless-extras-20.1 FAILED
https://mirrors.aliyun.com/docker-ce/linux/centos/2.1903/x86_64/stable/Packages/docker-ce-rootless-extras-20.10.6-3.el7.x86_64.rpm: [Errno 14] HTTPS Error 404 - Not Found
 Trying other mirror.


Error downloading packages:
  3:docker-ce-20.10.6-3.el7.x86_64: [Errno 256] No more mirrors to try.
  docker-ce-rootless-extras-20.10.6-3.el7.x86_64: [Errno 256] No more mirrors to try.
問題原因
第三方YUM源僅適配CentOS 7發行版,Alibaba Cloud Linux 2操作系統與CentOS 7操作系統的$releasever值不同,導致YUM解析后的地址無效,從而下載容器軟件包失敗。
YUM安裝docker-ce軟件包時,首先會在系統中獲取版本號,即$releasever值,然后替換相應YUM源中baseurl地址對應的$releasever變量,YUM從替換后的baseurl地址中獲取相關數據。由于CentOS 7操作系統的$releasever值為7,Alibaba Cloud Linux 2操作系統的$releasever值為2.1903,因此解析后的baseurl地址并非預期地址,YUM便無法從這個錯誤的地址中獲取數據。
解決方案
請根據實際需求情況,選擇以下對應方案進行修復。
您可以參考方案一:手動修改步驟,通過手動修改
$releasever變量值進行修復。您可以參考方案二:安裝插件修改步驟,通過安裝yum-plugin-releasever-adapter插件進行修復。
下列操作以docker-ce源為例進行舉例,如果您使用的是其他YUM源,解決方法類似。
方案一:手動修改
遠程登錄Linux實例。
具體操作,請參見通過密碼或密鑰認證登錄Linux實例。
執行以下命令,編輯
/etc/yum.repos.d/docker-ce.repo配置文件。vim /etc/yum.repos.d/docker-ce.repo按
i鍵切換至編輯模式,找到docker-ce.repo文件中所有enabled=1值的源,將源中baseurl地址的$releasever變量修改為7,修改之后的內容如下所示。
修改完成后,按下
Esc鍵后,輸入:wq并回車以保存并關閉配置文件,重新安裝軟件包即可。
方案二:安裝插件修改
安裝yum-plugin-releasever-adapter插件實現$releasever值的自動轉換,即將2.1903轉換為7。
確認實例是否支持使用yum-plugin-releasever-adapter插件。
yum-plugin-releasever-adapter插件目前的版本及默認支持的第三方repo如下表所示:
插件版本
默認支持的第三方repo
插件的限制
1.0-1.3
docker-ce.repo,epel.repo
您需要滿足以下條件,才可以使用該插件:
操作系統需要是Alibaba Cloud Linux 2。
執行以下命令,確認系統中存在plus的repo。
cat /etc/yum.repos.d/AliYun.repo |grep -A3 plus系統顯示類似如下,說明存在plus的repo。

遠程登錄Linux實例。
具體操作,請參見通過密碼或密鑰認證登錄Linux實例。
執行以下命令,安裝yum-plugin-releasever-adapter插件,插件默認對docker-ce、epel第三方YUM源中的
$releasever值自動進行轉換。yum install yum-plugin-releasever-adapter --disablerepo=* --enablerepo=plus若無其他的YUM源需要轉換,安裝插件后即可直接安裝軟件;若還有其他的YUM源需要轉換,請按照以下方式配置:
執行以下命令,進入指定目錄。
cd /etc/yum/pluginconf.d/執行以下命令,編輯
releasever-adapter.conf配置文件。如果需要添加其他的YUM源,則需要將YUM源的.repo文件名添加在includes字段后面,并以逗號隔開。vim releasever-adapter.conf系統顯示類似如下。
[main] enabled=1 hostfilepath=timedhosts.txt [releasevermapping] release_dict={'2.1903':'7', '3':'8'} [reposlist] includes=docker-ce.repo, epel.repo說明文件中參數的具體介紹如下所示:
[main]:為插件的主要控制部分,控制插件的啟用與否,其中enabled=1表示啟用插件,enabled=0表示停用插件。
[releasevermapping]:為待處理的
$releasever的映射關系,其中2.1903映射為7,3映射為8。[repolist]:為需要修改的源的列表,如果需要添加其他的源,則需要將
.repo文件的名字添加在include字段后面,并以逗號隔開。
一個
.repo文件中有多個可以使用的源,每個源都有一個獨立的名稱區分其他的源,同時一個系統中不能出現重復的名稱,例如:docker-ce.repo中有[docker-ce-stable]和[docker-ce-stable-debuginfo]等源。請務必保證新添加到
releasever-adapter.conf配置文件中的源文件名稱是源文件內各個源名稱的前綴,例如:docker-ce.repo源文件中包含的docker-ce-stable和docker-ce-stable-debuginfo兩個源名稱,均以docker-ce為前綴。
保存配置文件,執行以下命令,即可通過docker-ce、epel第三方YUM源安裝軟件包。
yum install docker-ce
在Alibaba Cloud Linux 3系統的ECS實例中,使用docker-ce、epel等第三方DNF(YUM)源安裝軟件失敗怎么辦?
問題現象
在符合如下條件的Alibaba Cloud Linux 3系統的ECS實例中,執行dnf install docker-ce命令安裝容器軟件包失敗,并出現如下報錯。
使用適配CentOS 8系統中的第三方DNF(YUM)源。
aliyun_3_x64_20G_alibase_20210425.vhd及之前的所有鏡像版本。
系統顯示報錯信息類似如下。
Docker CE Stable - x86_64
Failed to download metadata for repo 'docker-ce-stable'
Error: Failed to download metadata for repo 'docker-ce-stable'
問題原因
第三方DNF源僅適配CentOS 8發行版,而在Alibaba Cloud Linux 3中,系統的$releasever變量值與CentOS 8不同,導致DNF解析后的地址無效,進而導致下載RPM包失敗。
DNF安裝docker-ce時,首先會從系統中獲取版本號,即$releasever變量值,然后替換掉相應源baseurl中對應的$releasever變量值,之后DNF從替換后的baseurl中獲取相關數據。由于CentOS 8的$releasever變量值為8,而Alibaba Cloud Linux 3系統的$releasever變量值為3,因此解析后的baseurl并非預期地址,DNF便無法從這個錯誤的地址中安裝軟件包。
解決方案
請根據實際需求情況,選擇以下對應方案進行修復。
您可以參考方案一:手動修改步驟,通過手動修改
$releasever變量值進行修復。您可以參考方案二:安裝插件修改步驟,通過安裝dnf-plugin-releasever-adapter插件進行修復。
本文以docker-ce源為例進行介紹,如果您使用的是其他DNF源,解決方案類似。
方案一:手動修改
遠程登錄Linux實例。
具體操作,請參見通過密碼或密鑰認證登錄Linux實例。
執行以下命令,打開
/etc/yum.repos.d/docker-ce.repo配置文件。vim /etc/yum.repos.d/docker-ce.repo按
i鍵進入編輯模式,找到docker-ce.repo文件中所有存在enabled=1值的源,將源中baseurl的$releasever變量替換為8。
按下
Esc鍵后,輸入:wq并按Enter鍵以保存關閉配置文件,重新進行安裝即可。
方案二:安裝插件修改
通過安裝dnf-plugin-releasever-adapter插件實現$releasever的變量進行自動轉換,即將3轉換為8。
確認實例是否支持使用dnf-plugin-releasever-adapter插件。
dnf-plugin-releasever-adapter插件目前的版本及默認支持的第三方repo如下表所示:
插件版本
默認支持的第三方repo
插件的限制
新版本:1.0-2
舊版本:1.0-1.3
說明新版本插件和舊版本插件不兼容,新版本的配置文件名稱為
releasever_adapter.conf,舊版本為releasever-adapter.conf。升級版本會刪除原來的配置文件。因此升級后,如果需要支持除docker-ce和epel之外的第三方源,需要重新按照步驟修改配置文件的include字段,其他的保持不變。docker-ce.repo,epel.repo
您需要滿足以下條件,才可以使用該插件:
操作系統需要是Alibaba Cloud Linux 3。
執行以下命令,確認系統中存在alinux3-plus的repo。
cat /etc/yum.repos.d/AliYun.repo |grep -A3 alinux3-plus系統顯示類似如下,說明存在alinux3-plus的repo。

遠程登錄Linux實例。
具體操作,請參見通過密碼或密鑰認證登錄Linux實例。
執行以下命令,安裝dnf-plugin-releasever-adapter插件。
說明目前,插件默認對docker-ce和epel源中的
$releasever變量值做自動轉換。dnf install dnf-plugin-releasever-adapter --repo alinux3-plus若無其他的DNF源需要轉換,安裝插件后即可直接安裝軟件;若還有其他的DNF源需要轉換,請按照以下方式配置:
執行以下命令,進入
/etc/yum/pluginconf.d/目錄。cd /etc/yum/pluginconf.d/執行以下命令,編輯
releasever_adapter.conf配置文件。vim releasever_adapter.conf按
i鍵切換至編輯模式,如果需要添加其他的DNF源,則需要將DNF源的.repo文件名添加在include字段后面,并以逗號隔開。說明DNF源的
.repo文件一般在/etc/yum.repos.d/目錄下查看。系統顯示類似如下。
[main] enabled=1 [releasevermapping] 2.1903 = 7 3 = 8 [reposlist] include=docker-ce.repo, epel.repo說明文件中參數的具體介紹如下所示:
[main]:此部分為插件的主要控制部分,控制插件的啟用與否,其中enabled=1表示啟用插件,enabled=0表示停用插件。
[releasevermapping]:此部分為待處理的
$releasever的映射關系,其中2.1903映射為7,3映射為8。[repolist]:此部分為需要修改的源的列表,如果需要添加其他的源,則需要將
.repo文件的名字添加在include字段后面,并以逗號隔開。
一般來說,一個
.repo文件中有多個可以使用的源,每個源都有一個獨立的名稱區分其他的源,一個系統中不能出現重復的名稱,例如:docker-ce.repo中有[docker-ce-stable]和[docker-ce-stable-debuginfo]等源。
修改完成后,按下
Esc鍵,然后輸入:wq并按回車,保存并關閉配置文件。執行如下命令,通過docker-ce、epel和您添加的源安裝docker-ce軟件。
dnf install docker-ce
在CentOS 7系統的ECS實例中,執行yum命令提示“-bash: /usr/bin/yum: /usr/bin/python: bad interpreter: No such file or directory”錯誤怎么辦?
問題現象
在CentOS 7系統的ECS實例中執行yum命令時,提示以下報錯信息。
-bash: /usr/bin/yum: /usr/bin/python: bad interpreter: No such file or directory問題原因
可能是由于Python異常(Python被卸載、改名或移動路徑),導致執行yum命令時報錯。
yum( Yellow dog Updater, Modified)是一個在Fedora、RedHat以及SUSE中的Shell前端軟件包管理器。
解決方案
請參考以下操作,排查Python是否異常并修復。
遠程連接Linux實例。
具體操作,請參見通過密碼或密鑰認證登錄Linux實例。
執行以下命令,查看
yum路徑。which yum系統返回如下信息,表示
yum路徑為/usr/bin/yum。/usr/bin/yum執行以下命令,查看
yum內容。cat /usr/bin/yum系統返回以下信息,表示使用的Python版本路徑。
#!/usr/bin/python說明本文以
/usr/bin/python路徑為示例,請根據實際情況更換實際路徑。執行以下命令,檢查上述查看的路徑。
ls -al /usr/bin/python如果系統返回類似以下信息,則表示Python可能被卸載、改名或移動路徑。
ls: cannot access /usr/bin/python: No such file or directory執行以下命令,查看Python相關文件是否存在。
rpm -qa | grep python正常情況下,系統返回類似以下信息。
python-decorator-3.4.0-3.el7.noarch
libselinux-python-2.5-14.1.el7.x86_64
python-backports-1.0-8.el7.x86_64
python-pyudev-0.15-9.el7.noarch
rpm-python-4.11.3-35.el7.x86_64
python-2.7.5-76.el7.x86_64
.....
Python相關文件存在:說明Python相關文件被改名或移動路徑。
執行以下命令,查看Python相關文件。
ls -al /usr/bin/python*系統返回類似以下信息,提示“
/usr/bin/python.bak -> python2”,則表示Python名稱已被更改。lrwxrwxrwx 1 root root 14 Feb 15 2019 /usr/bin/python-config -> python2-config lrwxrwxrwx. 1 root root 7 Feb 15 2019 /usr/bin/python.bak -> python2 lrwxrwxrwx. 1 root root 9 Feb 15 2019 /usr/bin/python2 -> python2.7 lrwxrwxrwx 1 root root 16 Feb 15 2019 /usr/bin/python2-config -> python2.7-config -rwxr-xr-x. 1 root root 7216 Oct 31 2018 /usr/bin/python2.7 -rwxr-xr-x 1 root root 1835 Oct 31 2018 /usr/bin/python2.7-config執行以下命令,將
/usr/bin/python.bak名稱改為/usr/bin/python。mv python.bak python重新執行
yum命令,若不再提示以上報錯信息,則表示問題已修復。
Python相關文件不存在:說明Python被卸載。
依次執行如下命令,安裝Python。
mkdir /python/

yum install python --downloadonly --downloaddir=/python/
重新執行
yum命令,若不再提示以上報錯信息,則表示問題已修復。