ARMS用戶體驗監控支持以用戶會話作為切入點,追蹤用戶與應用交互過程中的錯誤、緩慢、異常問題,通過與ARMS應用監控聯動,實現端到端分析,幫助您打通問題分析鏈路。本文介紹Web端監控如何實現端到端Trace打通。
前提條件
確保您的前端應用(包含Web、小程序)已接入用戶體驗監控。具體操作,請參見接入Web & H5應用和接入小程序。
確保您的后端應用,已接入ARMS應用監控或可觀測鏈路 OpenTelemetry 版。具體操作,請參見接入指南。
確保您的后端應用有提供Web服務(HTTP),用于解析Header,關聯Trace上下文。
支持的Trace協議類型
目前用戶體驗監控關聯Trace功能已支持以下主流Trace透傳協議:
w3c:包含OpenTelemetry客戶端以及ARMS探針。
b3/b3multi:Zipkin
jaeger
sw8:SkyWalking
開啟RUM關聯Trace
請在為前端應用在接入RUM探針時開啟鏈路追蹤配置項。
開啟RUM關聯Trace會額外生成一部分Trace數據,這將對您的應用監控或可觀測鏈路 OpenTelemetry 版的賬單產生一些影響。
CDN同步
極簡模式
該方式只推薦在瀏覽器中使用,小程序由于不存在同域請求的概念,所以必須使用完整模式接入,并配置allowedUrls。
常用于不需要跨域請求,后端默認采取OTel標準。allowedUrls類型為undefined,但會對同域請求加白。
<script>
  window.__rum = {
    pid: "<your pid>",
    endpoint: "<your endpoint>",
    //...此處省略其他配置項
    // 鏈路追蹤配置開關,默認關閉
    tracing: true //等效于 { enable: true,  sample: 100, tracestate: true, allowedUrls:[], baggage: false }
  };
</script>
<script type="text/javascript" src="https://sdk.rum.aliyuncs.com/v2/browser-sdk.js " crossorigin></script>
完整模式
全量配置,用于對所有配置都進行控制,allowedUrls類型為Array<TraceOption>。
<script>
  window.__rum = {
    pid: "<your pid>",
    endpoint: "<your endpoint>",
    //...此處省略其他配置項
    // 鏈路追蹤配置開關,默認關閉
    tracing: {
      enable: true, // 開啟鏈路追蹤,默認關閉
      sample: 60, // 采樣率60%,默認100%
      tracestate: true, // 開啟tracestate的透傳,默認開啟
      baggage: false, // 關閉baggage的透傳,默認關閉
      allowedUrls:[
        {match: 'https://api.aliyun.com', propagatorTypes:['tracecontext', 'b3']}, // 字符匹配 https://api.aliyun.com開頭,使用w3c標準
        {match: /api\.alibaba\.com/i, propagatorTypes:['b3multi']}, // 正則匹配包含api.aliyun.com,使用b3multi多頭標準
        {match: (url)=>url.includes('.api'), propagatorTypes:['jaeger']}, // 函數判斷包含.api, 使用jaeger標準
      ]
    }
  };
</script>
<script type="text/javascript" src="https://sdk.rum.aliyuncs.com/v2/browser-sdk.js " crossorigin></script>CDN異步
極簡模式
該方式只推薦在瀏覽器中使用,小程序由于不存在同域請求的概念,所以必須使用完整模式接入,并配置allowedUrls。
常用于不需要跨域請求,后端默認采取OTel標準。allowedUrls類型為undefined,但會對同域請求加白。
<script>
  !(function(c,b,d,a){c[a]||(c[a]={});c[a].config=
    {
      pid: "<your pid>",
      endpoint: "<your endpoint>",
      //...此處省略其他配置項
      // 鏈路追蹤配置開關,默認關閉
      tracing: true
    }
   with(b)with(body)with(insertBefore(createElement("script"),firstChild))setAttribute("crossorigin","",src=d)
  })(window,document,"https://sdk.rum.aliyuncs.com/v1/bl.js","__bl");
</script>
完整模式
全量配置,用于對所有配置進行控制,allowedUrls類型為Array<TraceOption>。
<script>
  !(function(c,b,d,a){c[a]||(c[a]={});c[a].config=
    {
      pid: "<your pid>",
      endpoint: "<your endpoint>",
      //...此處省略其他配置項
      // 鏈路追蹤配置開關,默認關閉
      tracing: {
        enable: true, // 開啟鏈路追蹤,默認關閉
        sample: 100, // 采樣率,默認100%
        tracestate: true, // 開啟tracestate透傳,默認開啟
        baggage: true, // 開啟baggage透傳,默認關閉
        allowedUrls:[
          {match: 'https://api.aliyun.com', propagatorTypes:['tracecontext', 'b3']}, // 字符匹配 https://api.aliyun.com開頭,使用w3c標準
          {match: /api\.alibaba\.com/i, propagatorTypes:['b3multi']}, // 正則匹配包含api.aliyun.com,使用b3multi多頭標準
          {match: (url)=>url.includes('.api'), propagatorTypes:['jaeger']}, // 函數判斷包含.api, 使用jaeger標準
        ]
      }
    }
    with(b)with(body)with(insertBefore(createElement("script"),firstChild))setAttribute("crossorigin","",src=d)
   })(window,document,"https://sdk.rum.aliyuncs.com/v1/bl.js","__bl");
</script>NPM包
極簡模式
該方式只推薦在瀏覽器中使用,小程序由于不存在同域請求的概念,所以必須使用完整模式接入,并配置allowedUrls。
常用于不需要跨域請求,后端默認采取OTel標準。allowedUrls類型為undefined,但會對同域請求加白。
import ArmsRum from '@arms/rum-browser';

ArmsRum.init({
  pid: 'your pid',
  endpoint: 'your endpoint',
  //...此處省略其他配置項
  // 鏈路追蹤配置開關,默認關閉
  tracing: true, //等效于 { enable: true,  sample: 100, tracestate: true, allowedUrls:[], baggage: false }
});
完整模式
全量配置,用于對所有配置進行控制,allowedUrls類型為Array<TraceOption>。
import ArmsRum from '@arms/rum-browser';

ArmsRum.init({
  pid: "your pid",
  endpoint: "your endpoint",
  //...此處省略其他配置項
  tracing: {
    enable: true, // 開啟鏈路追蹤,默認關閉
    sample: 100, // 采樣率,默認100%
    tracestate: true, // 開啟tracestate透傳,默認開啟
    baggage: true, // 開啟baggage透傳,默認關閉
    allowedUrls:[
      {match: 'https://api.aliyun.com', propagatorTypes:['tracecontext', 'b3']}, // 字符匹配 https://api.aliyun.com開頭,使用w3c標準
      {match: /api\.alibaba\.com/i, propagatorTypes:['b3multi']}, // 正則匹配包含api.aliyun.com,使用b3multi多頭標準
      {match: (url)=>url.includes('.api'), propagatorTypes:['jaeger']}, // 函數判斷包含.api, 使用jaeger標準
    ]
  }
});Tracing配置項
字段 | 類型 | 默認值 | 備注 |
tracing.enable | Boolean | true | 傳入非Boolean類型時,會被重置為true。 |
tracing.sample | Number | 100 | 取值范圍[0,100],其他類型任何值都會被重置為100。 |
tracing.tracestate | Boolean | true | 默認開啟,僅w3c tracecontext模式下才會生效,其他模式不存在tracestate概念。 配置為false后,w3c模式下不會攜帶tracestate請求頭。 |
tracing.baggage | Boolean | false | 開啟鏈路追蹤時,RUM監控會在請求頭中加入baggage,并攜帶相關信息,不區分tracing標準。 |
tracing.propagatorTypes | PropagatorType | PropagatorType[] | null | 當前Trace采用的傳遞標準。 注意:
|
tracing.allowedUrls | Array<MatchOption | TraceOption> | undefined | undefined | 允許使用鏈路追蹤的請求地址
|
瀏覽器情況下tracing.allowedUrls會增加以下規則:
{
  match: (url) => (/^https?:\/\/*/.test(url) || startsWith(url, location.origin)),
  propagatorTypes: ['tracecontext']
}
MatchOption
type MatchOption = string | RegExp | ((value: string) => boolean);allowedUrls與完整URL匹配。接受以下類型:
string:匹配任何以該值開頭的URL,如
https://api.aliyun.com可以匹配https://api.aliyun.com/v1/resource。RegExp:使用提供的RegExp和URL執行test。
function:以URL作為參數進行計算,返回true表示匹配。
PropagatorType
默認情況下,基于OpenTelemetry使用的是tracecontext。
type PropagatorType = 'tracecontext' | 'b3' | 'b3multi' | 'jaeger' | 'sw8';以上幾種Trace協議,透傳的Header如下:
透傳格式名稱 | 格式 |
traceparent : {version}-{trace-id}-{parent-id}-{trace-flags} tracestate: rum={version}&{appType}&{pid}&{sessionId} | |
b3: {TraceId}-{SpanId}-{SamplingState}-{ParentSpanId} | |
X-B3-TraceId: {TraceId} X-B3-SpanId: {SpanId} X-B3-ParentSpanId: {ParentSpanId} X-B3-Sampled: {SamplingState} | |
uber-trace-id : {trace-id}:{span-id}:{parent-span-id}:{flags} | |
sw8: {sample}-{trace-id}-{segment-id}-{0}-{service}-{instance}-{endpoint}-{peer} |
以上各協議透傳的Request Header,并不是標準的HTTP請求頭,也不在CORS安全列表中(有時也稱為:CORS-safelisted request-headers)。因此,當您的網站或應用存在跨域請求時(尤其是在小程序等場景),需要在服務端的Access-Control-Allow-Headers中明確指定。否則,跨域請求會因CORS策略而被瀏覽器攔截。
驗證RUM關聯Trace
Web & H5
訪問您的網站或者Web H5頁面。
打開瀏覽器控制臺,切換到Network(網絡)頁簽。
檢查前端發起的請求(注意是API請求,類型為:XHR/Fetch),查看請求頭(Request Headers)中是否包含對應透傳協議的Header。
小程序(支付寶/微信/釘釘)
使用小程序開發者模擬器運行。
打開開發者工具調試器,切換到網絡(Network)Tab頁。
檢查小程序發起的Request請求頭中是否包含對應的透傳協議的Header。
配置后端應用Trace串聯
為了打通完整Trace鏈路,還需要對后端應用進行配置,目前支持的后端應用類型以及接入方式如下:
Java應用
使用ARMS應用監控探針接入
ARMS應用監控探針默認集成了對OpenTelemetry協議的支持,因此無需額外配置,即可實現與RUM Trace關聯,但需要確保以下兩點:
支持的ARMS應用監控探針版本:2.x、3.x、4.x,為了獲得更好的使用體驗,推薦升級到4.x版本。
支持的Web容器和框架:支持Tomcat、Jetty、WebLogic、Undertow等主流Web容器,以及SpringBoot、SpringMVC等框架。支持的完整組件和框架請參見ARMS應用監控支持的Java組件和框架。
ARMS應用監控探針接入操作請參見開始監控Java應用。
使用OpenTelemetry接入
通過OpenTelemetry接入ARMS(可觀測鏈路 OpenTelemetry 版),目前分為兩種方式:自動埋點和手動埋點。
自動埋點場景下,由于OpenTelemetry已經支持了絕大多數主流框架,因此,無需額外配置,即可實現與RUM Trace的串聯。
說明OpenTelemetry支持的Java框架,請參見通過OpenTelemetry上報Java應用數據。
手動埋點場景下,需要通過OpenTelemetry SDK提供的擴展機制,實現與RUM Trace的串聯,即從前端請求頭(traceparent、tracesate)中,解析出Trace上下文,以下是Springboot場景代碼示例:
引入OpenTelemetry的依賴項。
<dependency> <groupId>io.opentelemetry</groupId> <artifactId>opentelemetry-api</artifactId> </dependency> <dependency> <groupId>io.opentelemetry</groupId> <artifactId>opentelemetry-sdk-trace</artifactId> </dependency> <dependency> <groupId>io.opentelemetry</groupId> <artifactId>opentelemetry-extension-annotations</artifactId> <version>1.18.0</version> </dependency> <dependency> <groupId>io.opentelemetry</groupId> <artifactId>opentelemetry-exporter-otlp</artifactId> </dependency> <dependency> <groupId>io.opentelemetry</groupId> <artifactId>opentelemetry-sdk</artifactId> </dependency> <dependency> <groupId>io.opentelemetry</groupId> <artifactId>opentelemetry-semconv</artifactId> <version>1.30.1-alpha</version> </dependency> <dependency> <groupId>io.opentelemetry</groupId> <artifactId>opentelemetry-sdk-extension-autoconfigure</artifactId> <version>1.34.1</version> </dependency> <dependency> <groupId>io.opentelemetry</groupId> <artifactId>opentelemetry-extension-incubator</artifactId> <version>1.35.0-alpha</version> </dependency>在OpenTelemetry初始化時,添加W3C Propagator。
Resource resource = Resource.getDefault() .merge(Resource.create(Attributes.of( ResourceAttributes.SERVICE_NAME, "otel-demo", ResourceAttributes.HOST_NAME, "xxxx" ))); SdkTracerProvider sdkTracerProvider = SdkTracerProvider.builder() .addSpanProcessor(BatchSpanProcessor.builder(OtlpHttpSpanExporter.builder() .setEndpoint("Your Endpoint") .addHeader("Authentication", "Your Token") .build()).build()) .setResource(resource) .build(); openTelemetry = OpenTelemetrySdk.builder() .setTracerProvider(sdkTracerProvider) // 這里添加W3C Propagator .setPropagators(ContextPropagators.create( TextMapPropagator.composite(W3CTraceContextPropagator.getInstance(), W3CBaggagePropagator.getInstance())) ).buildAndRegisterGlobal(); // 這里需要使用擴展的Tracer tracer = ExtendedTracer.create(openTelemetry.getTracer("com.example.tracer", "1.0.0"));在業務接口中,添加headers參數,并從請求頭中解析Trace上下文,設置parent。
// Controller中添加請求header參數,用于解析Trace上下文
@RequestMapping("/test")
public String test(@RequestHeader Map<String, String> headers) {
    Span span = OpenTelemetrySupport.getTracer()
            .spanBuilder("/test")
            // 從headers中解析parent span
            .setParentFrom(OpenTelemetrySupport.getContextPropagators(), headers)
            .setSpanKind(SpanKind.SERVER)
            .startSpan();
    try (Scope scope = span.makeCurrent()) {
        // do something
    } catch (Throwable t) {
        span.setStatus(StatusCode.ERROR, "handle parent span error");
    } finally {
        span.end();
    }
    return "success";
}
使用Jaeger接入
Jaeger目前針對Web場景,提供了:手動埋點和通過Spring Cloud組件埋點兩種方式。完整接入方式請參見通過Jaeger上報Java應用數據。
通過SpringCloud組件埋點情況下,無需額外配置即可與RUM Trace打通。
手動埋點場景下,需要自行從前端請求header中解析Trace上下文。代碼配置示例如下:
引入依賴項。
<dependency> <groupId>io.jaegertracing</groupId> <artifactId>jaeger-client</artifactId> <version>最新版本</version> <!-- 確保使用最新的Jaeger版本 --> </dependency>初始化Tracer。
請將
<endpoint>替換成可觀測鏈路 OpenTelemetry 版控制臺頁面相應客戶端和地域的接入點。// 將manualDemo替換為您的應用名稱。 io.jaegertracing.Configuration config = new io.jaegertracing.Configuration("manualDemo"); io.jaegertracing.Configuration.SenderConfiguration sender = new io.jaegertracing.Configuration.SenderConfiguration(); // 將 <endpoint> 替換為控制臺概覽頁面上相應客戶端和地域的接入點。 sender.withEndpoint("<endpoint>"); config.withSampler(new io.jaegertracing.Configuration.SamplerConfiguration().withType("const").withParam(1)); config.withReporter(new io.jaegertracing.Configuration.ReporterConfiguration().withSender(sender).withMaxQueueSize(10000)); GlobalTracer.register(config.getTracer());在業務接口中創建Span,可參考以下代碼進行Trace關聯。
// Controller中添加請求header參數,由于解析Trace上下文
@RequestMapping("/test")
public String test(@RequestHeader Map<String, String> headers) {
    Tracer tracer = GlobalTracer.get();
    SpanContext parentCtx = tracer.extract(Format.Builtin.HTTP_HEADERS, new TextMapAdapter(headers));
    Span span;
    if (parentCtx != null) {
        span = tracer.buildSpan("/test").asChildOf(parentCtx).start();
    } else {
        span = tracer.buildSpan("/test").start();
    }
    try (Scope ignored = tracer.activateSpan(span)) {
        tracer.activeSpan().setTag("methodName", "test");
        // do something
    } catch (Throwable t) {
        TracingHelper.onError(e, span);
        throw e
    } finally {
        span.finish();
    }
    return "success";
}
使用Zipkin接入
完整接入方式請參見通過Zipkin上報Java應用數據。
按照文檔接入,然后在服務端代碼中,從Request Header中解析Context,實現與RUM Trace串聯。
// 從request header解析Context
extractor = tracing.propagation().extractor(Request::getHeader);

// convert that context to a span which you can name and add tags to
oneWayReceive = nextSpan(tracer, extractor.extract(request))
.name("process-request")
.kind(SERVER)
... add tags etc.

// start the server side and flush instead of finish
oneWayReceive.start().flush();

// you should not modify this span anymore as it is complete. However,
// you can create children to represent follow-up work.
next = tracer.newSpan(oneWayReceive.context()).name("step2").start();使用SkyWalking接入
完整接入方式請參見Java Agent插件。
SkyWalking目前僅提供了Java Agent接入方式,您只需要按照上述文檔接入,即可實現RUM與后端Trace串聯。
和RUM側配置的協議匹配要求:sw8(v3版本)對應SkyWalking 8.x版本探針。
Go應用
通過OpenTelemetry接入
完整接入方式請參見通過OpenTelemetry上報Go應用數據。
按照文檔接入,然后在HTTP請求Handler中,通過request context生成Span,即可實現與RUM Trace串聯。
// 初始化tracer
tracer := otel.Tracer(common.TraceInstrumentationName)
// 通過request context生成span
handler := http.HandlerFunc(func(w http.ResponseWriter, req *http.Request) {
    ctx := req.Context()
    span := trace.SpanFromContext(ctx)
    // do something
    w.Write([]byte("Hello World"))
})通過Jaeger接入
完整接入方式請參見通過Jaeger上報Go應用數據。
按照文檔接入,然后從HTTP請求頭中解析Span上下文,實現與RUM Trace串聯,代碼示例如下:
// 從HTTP對象解析出spanCtx。
spanCtx, _ := tracer.Extract(opentracing.HTTPHeaders, opentracing.HTTPHeadersCarrier(r.Header))
span := tracer.StartSpan("myspan", opentracing.ChildOf(spanCtx))
...
defer span.Finish()通過Zipkin接入
完整接入方式請參見通過Zipkin上報Go應用數據。
按照文檔接入,然后從HTTP請求頭中解析Span上下文,實現與RUM Trace串聯,代碼示例如下:
// 初始化tracer
tracer, err := exampletracer.NewTracer("go-frontend", frontendPort)
// 通過request context生成span
router.Methods("GET").Path("/").HandlerFunc(func(w http.ResponseWriter, r *http.Request) {
    // retrieve span from context
	span := zipkin.SpanFromContext(r.Context())
    // add some tag
    span.Tag("some_key", "some_value")
    // do something...
	span.Annotate(time.Now(), "some_event")
})使用SkyWalking接入
完整接入方式請參見通過SkyWalking上報Go應用數據。
按照文檔接入,推薦采用skywalking-go接入方式,該方式支持了主流的Web服務框架,如gin、go-restful、http、go-kratos v2、go-micro、go-resty等,無需修改代碼即可實現與RUM Trace串聯。
如果您希望手動從HTTP請求頭中解析出Trace上下文,也可參考以下代碼實現:
//Extract context from HTTP request header `sw8`
span, ctx, err := tracer.CreateEntrySpan(r.Context(), "/api/test", func(key string) (string, error) {
		return r.Header.Get(key), nil
})Python應用
通過OpenTelemetry接入
完整接入方式請參見通過OpenTelemetry上報Python應用數據。
按照文檔接入,然后從HTTP請求頭中解析Span上下文,實現與RUM Trace串聯,代碼示例如下:
// 初始化tracer
trace.set_tracer_provider(TracerProvider())
trace.get_tracer_provider().add_span_processor(BatchSpanProcessor(ConsoleSpanExporter()))

tracer = trace.get_tracer(__name__)

@app.route('/test')
def test():
    headers = dict(request.headers)

    // 從headers中解析trace context
    carrier ={'traceparent': headers['Traceparent'], 'tracestate': headers['Tracestate']}
    ctx = TraceContextTextMapPropagator().extract(carrier=carrier)

    with tracer.start_span("test", context=ctx):
        // do something
return "success"通過Jaeger接入
完整接入方式請參見通過Jaeger上報Python應用數據。
按照文檔接入,然后從HTTP請求頭中解析Span上下文,實現與RUM Trace串聯,代碼示例如下:
import logging
from flask import Flask
from jaeger_client import Config
from opentracing.ext import tags
from opentracing.propagation import Format

## 初始化tracer
def init_tracer(service, scope_manager=None):
    logging.getLogger('').handlers = []
    logging.basicConfig(format='%(message)s', level=logging.DEBUG)

    config = Config(
        config={
            'sampler': {
                'type': 'const',
                'param': 1,
            },
            'logging': True,
            'reporter_batch_size': 1,
        },
        service_name=service,
        scope_manager=scope_manager
    )
    return config.initialize_tracer()

## trace decorator
def trace(tracer, span_name):
    def decorator(f):
        @functools.wraps(f)
        def wrapped(*args, **kwargs):
            ## 從headers中解析trace context
            span_ctx = tracer.extract(Format.HTTP_HEADERS, request.headers)
            span_tags = {tags.SPAN_KIND: tags.SPAN_KIND_RPC_SERVER}

            with tracer.start_active_span(span_name, child_of=span_ctx, tags=span_tags) as scope:
                rv = f(*args, **kwargs)

            return rv
        return wrapped
    return decorator

## api test example
@app.route('/test')
@trace(tracer, 'test')
def test():
return "success"使用SkyWalking接入
完整接入方式請參見通過SkyWalking上報Python應用數據。
按照文檔接入,然后從HTTP請求頭中解析Span上下文,實現與RUM Trace串聯,代碼示例如下:
from skywalking import config, agent
from skywalking.trace.context import SpanContext, get_context
from skywalking.trace.carrier import CarrierItem

# 配置 SkyWalking,根據需要調整相關參數
config.init(agent_collector_backend_services='<endpoint>',
            agent_authentication='<auth-token>')

agent.start()

# 示例 HTTP 請求處理函數,需要傳入 HTTP 請求的 headers
def handle_request(headers):
    # 從請求頭 headers 中提取追蹤信息
    carrier_items = []
    for item in SpanContext.make_carrier():
        carrier_header = headers.get(item.key.lower())
        if carrier_header:
            carrier_items.append(CarrierItem(item.key, carrier_header))

    carrier = SpanContext.make_carrier(carrier_items)

    # 從 Carrier 中提取追蹤上下文
    context = get_context().extract(carrier)

    # 創建一個新 Span 來處理請求
    with get_context().new_entry_span(op='operation_name') as span:
        # 在這里處理請求,并在結束時自動提交 Span
        ...

# 模擬接收到的 HTTP 請求 header 包含 sw8
incoming_headers = {
    'sw8': '1-My40LjU=-MTY1MTcwNDI5OTk5OA==-xxxx-xx-x-x==',  # 示例值,實際根據請求填寫
    # 其他 header...
}

# 調用函數處理請求
handle_request(incoming_headers)查看端到端完整Trace數據
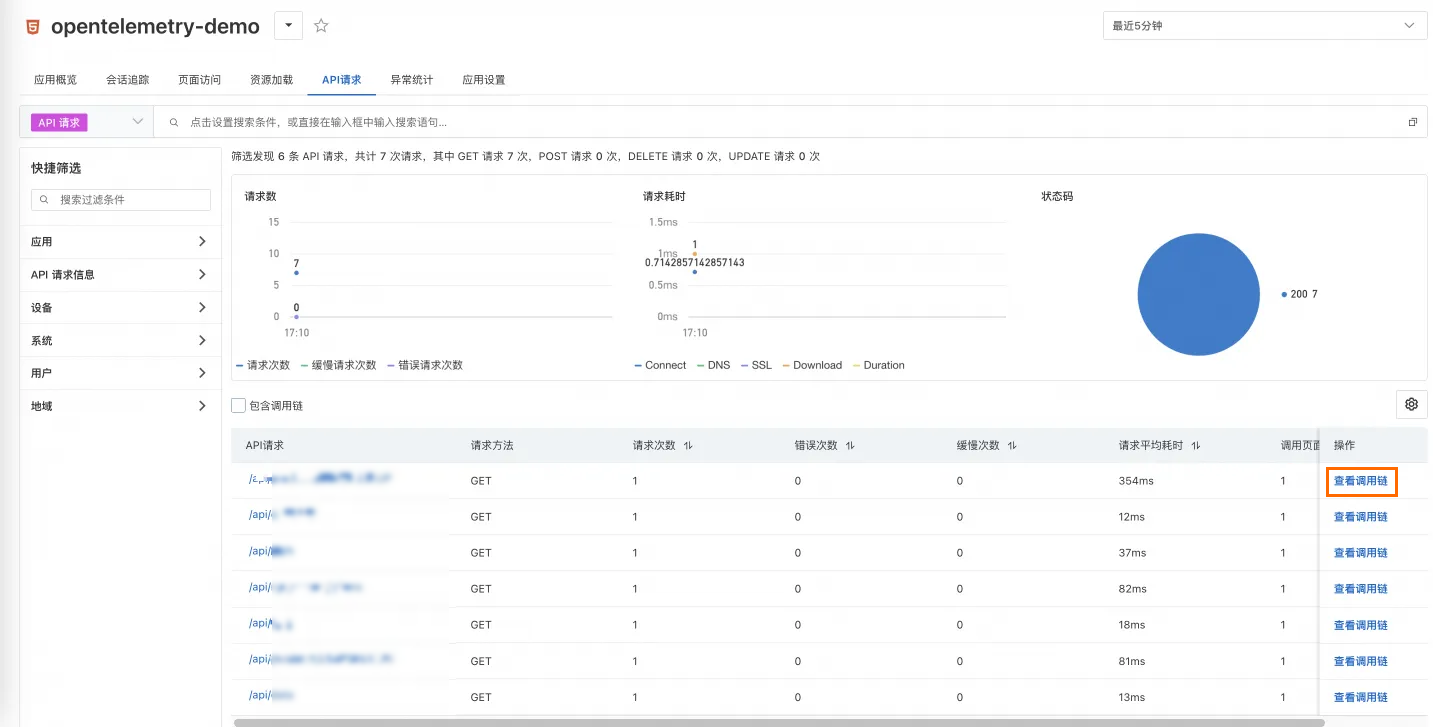
完成前后端Trace打通后,您可以在ARMS用戶體驗控制臺查看前端請求對應的調用鏈。

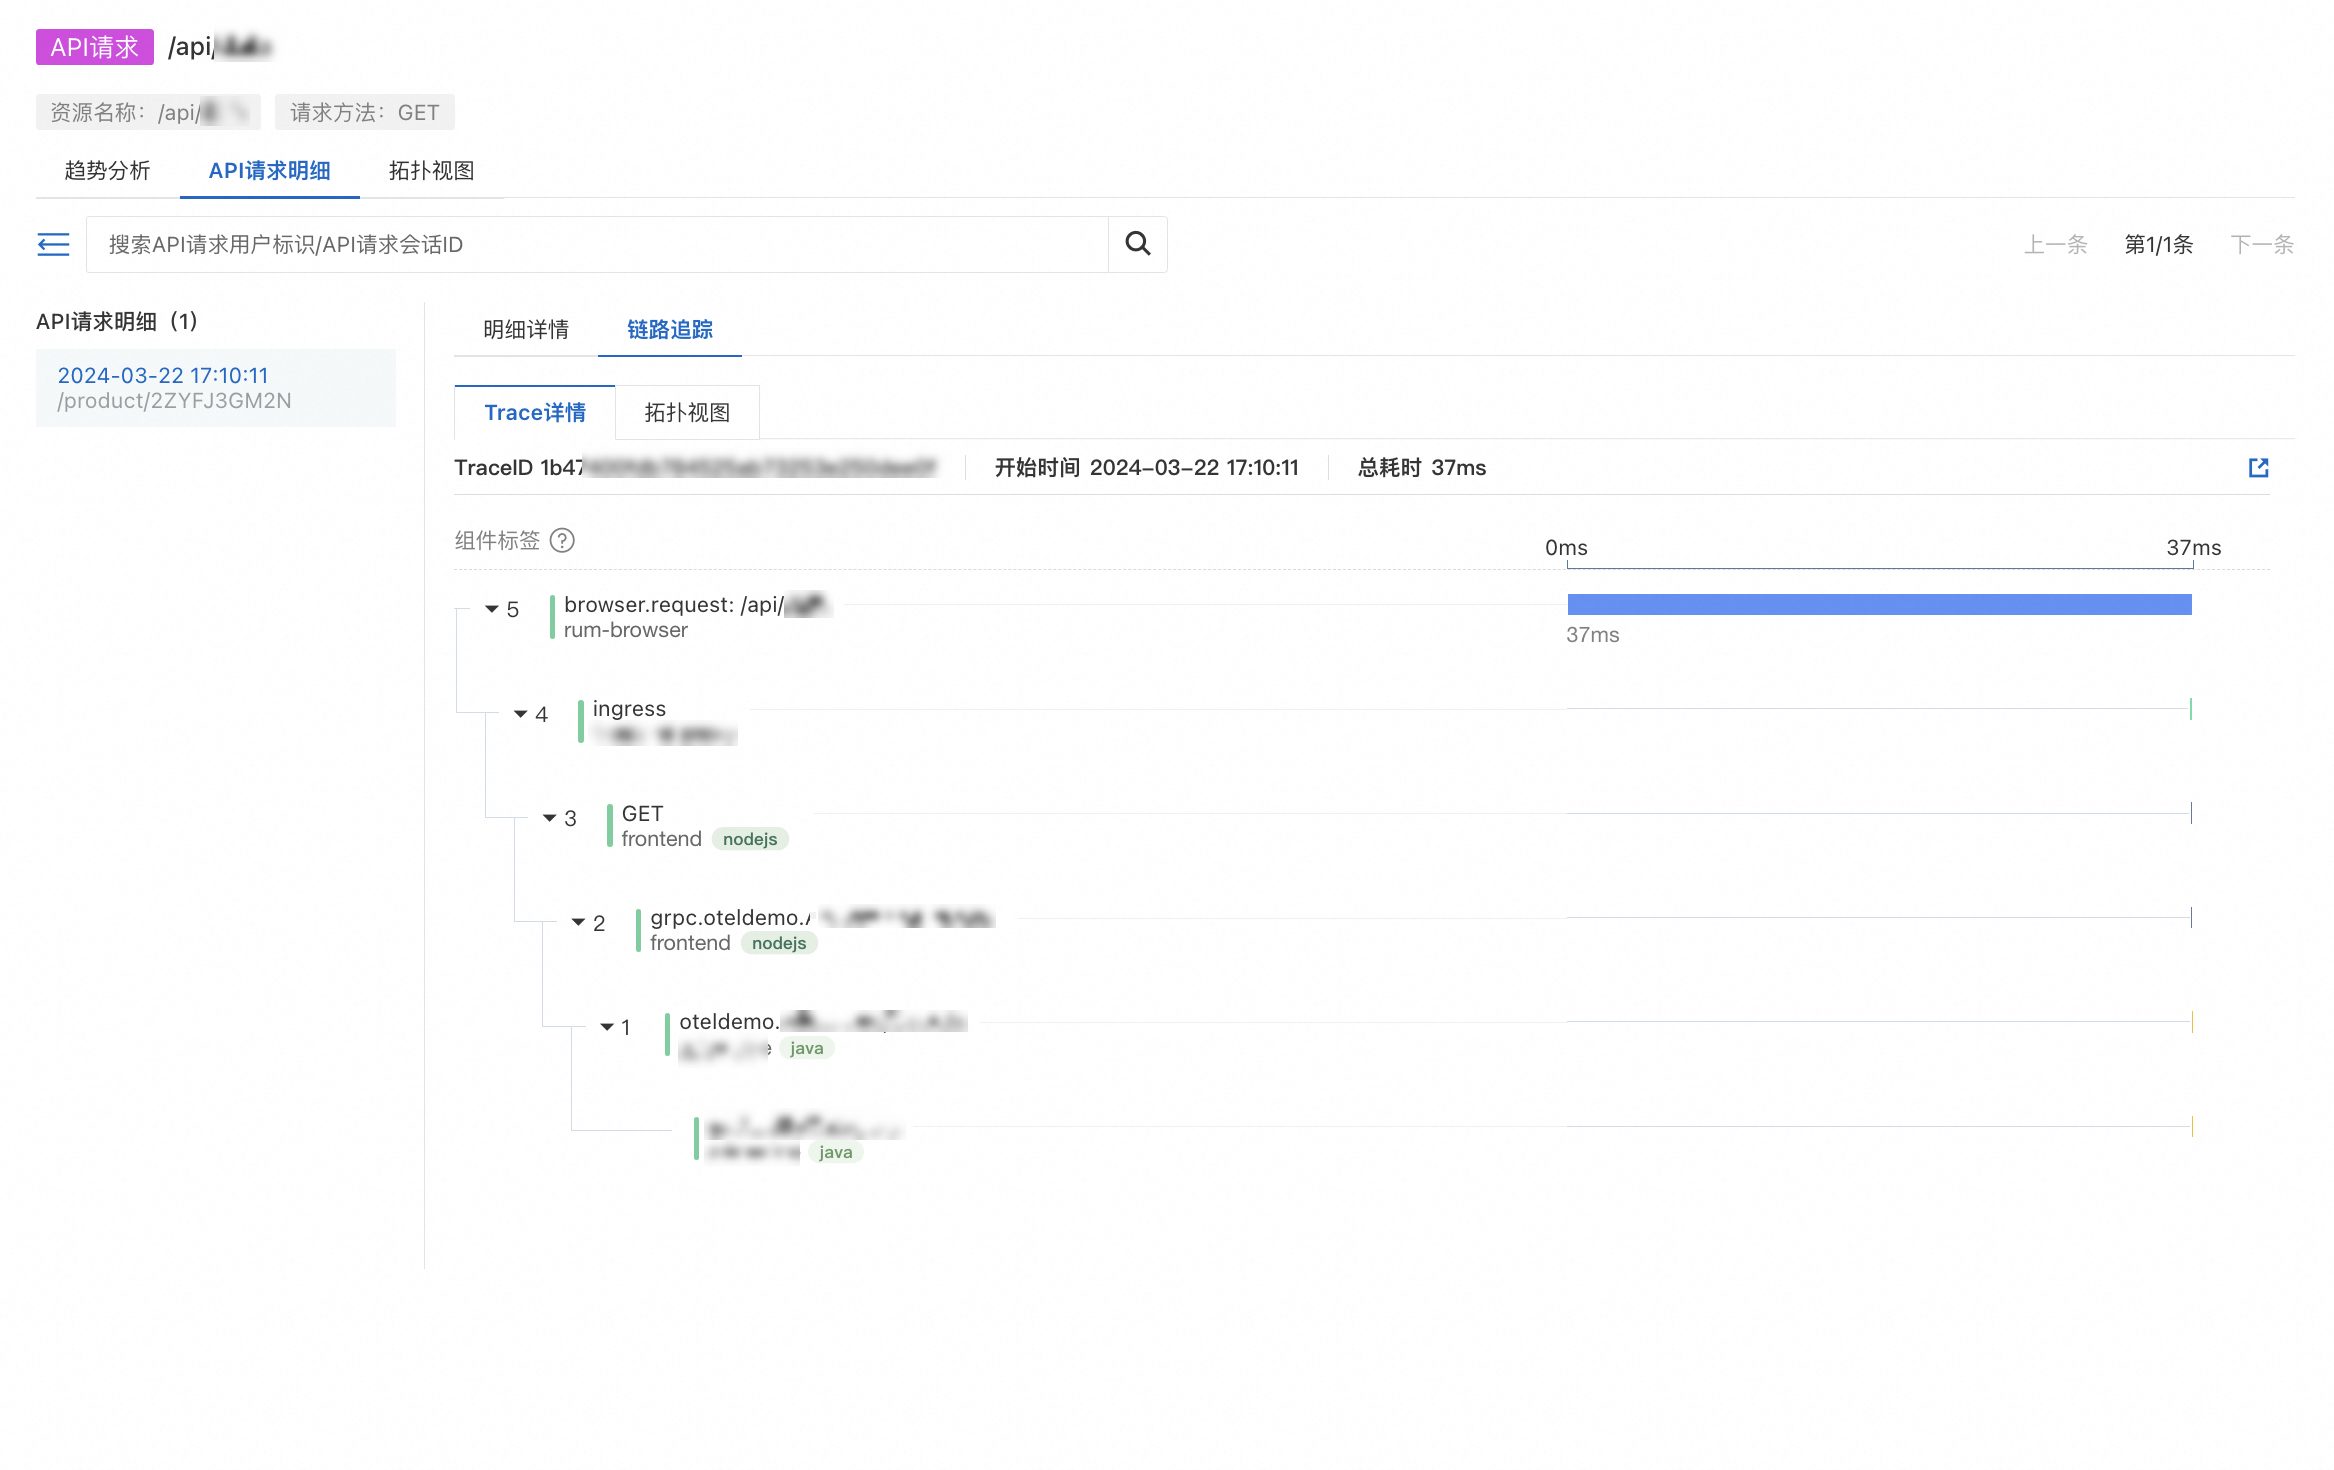
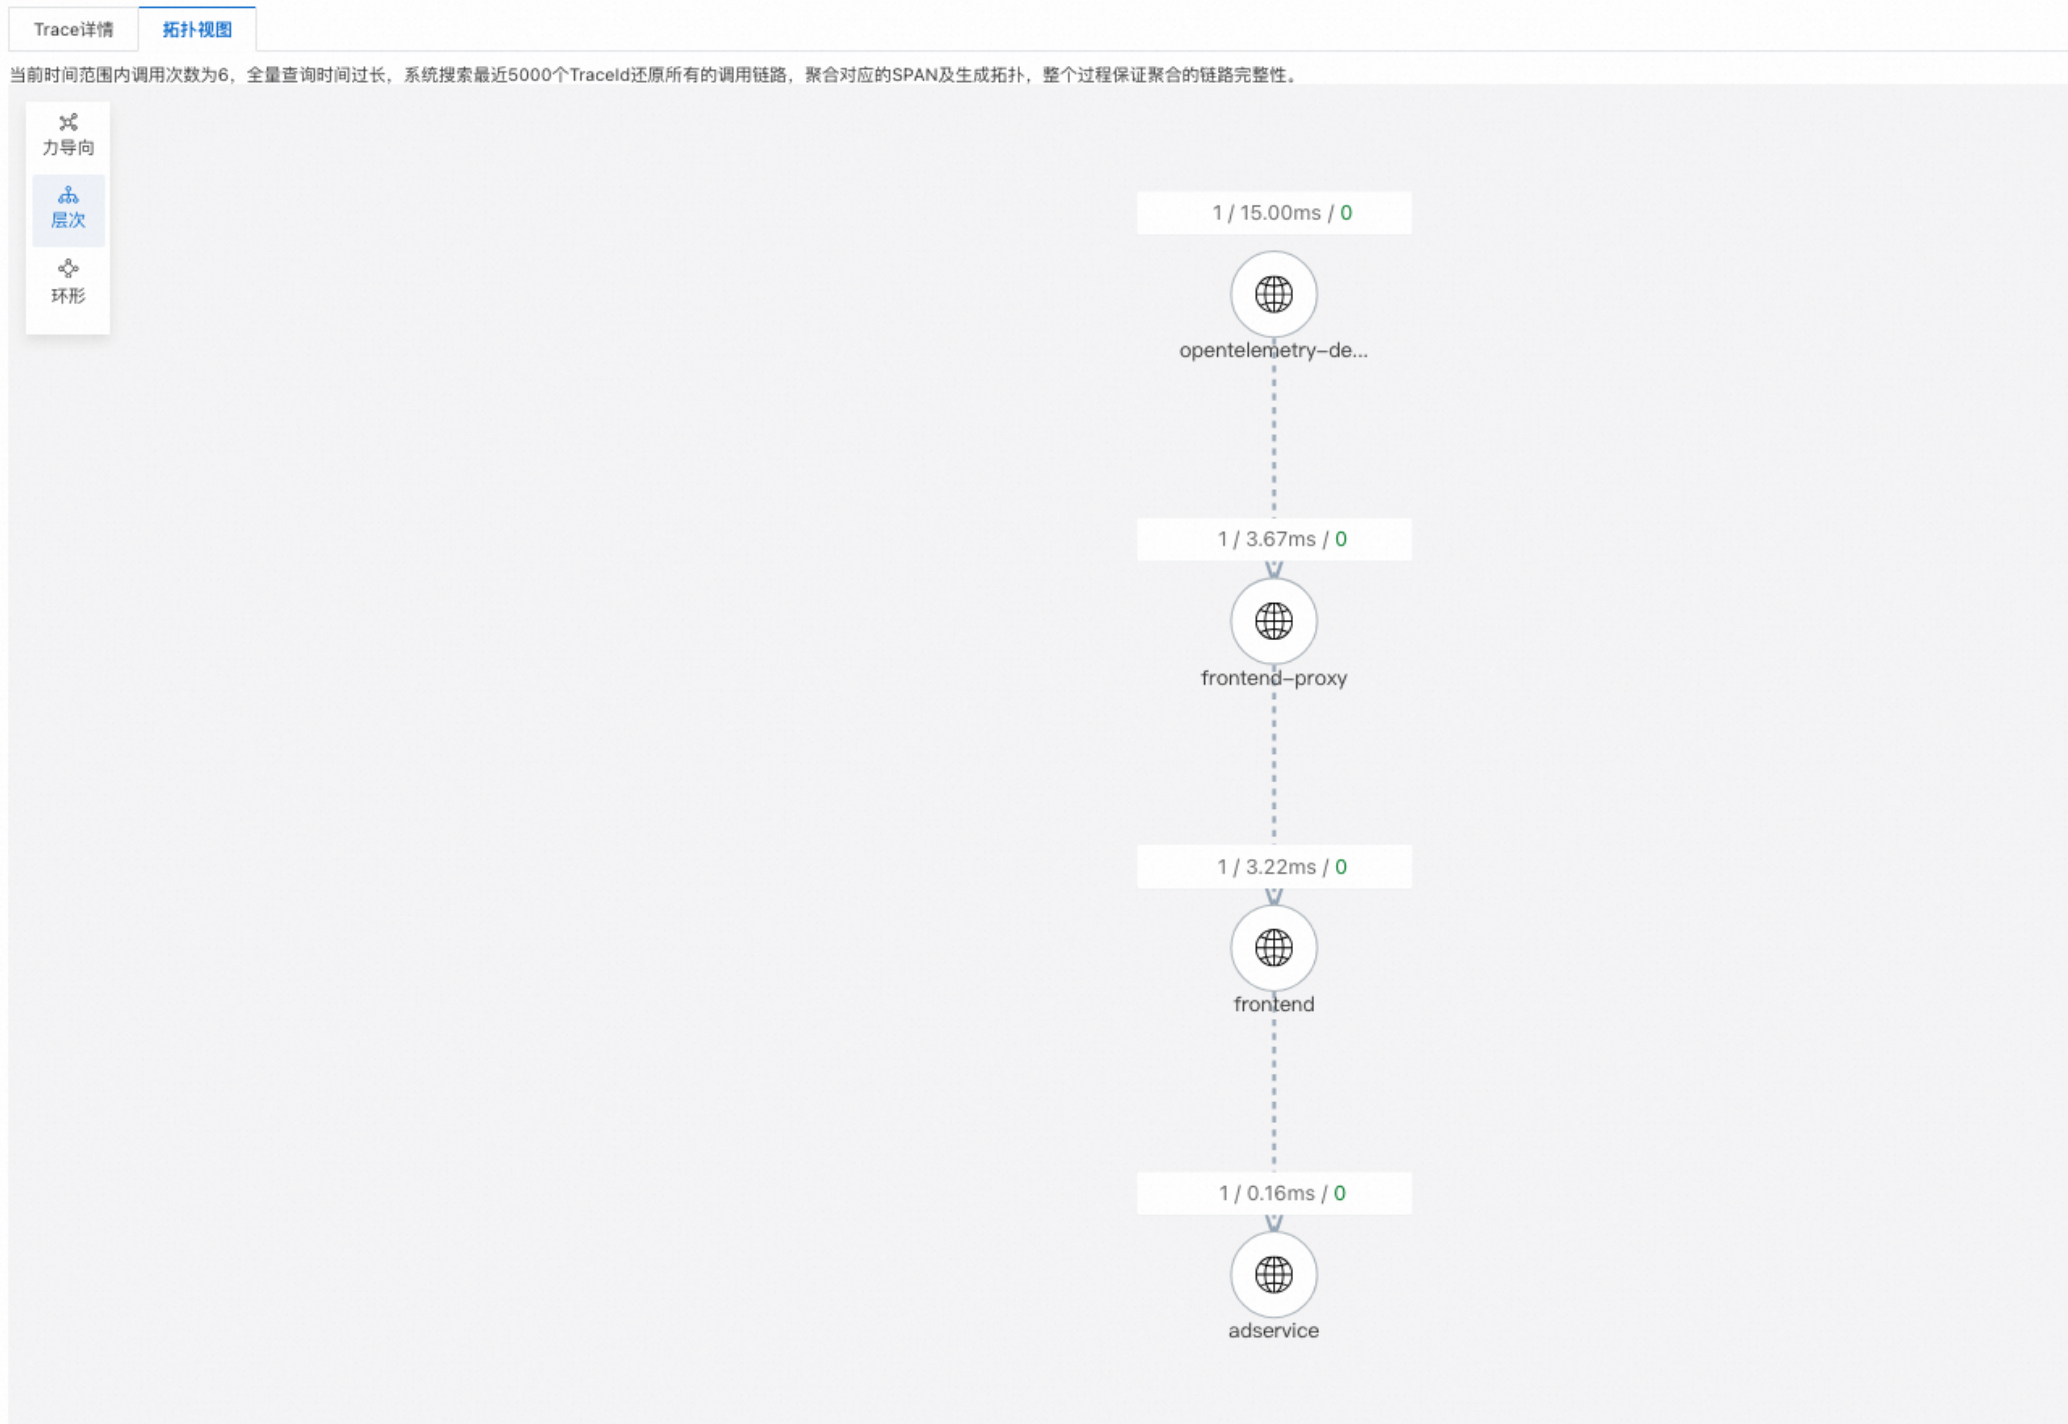
單擊查看調用鏈,可以看到請求的完整調用鏈路,以及應用拓撲。此時,可以結合RUM側的請求明細數據,與后端Trace數據,分析錯慢請求問題。

最上面的Span即代表RUM入口Span,根據端側接入類型,分為以下幾種:
Web & H5場景:應用名:rum-browser,Span名稱前綴:
"browser.request:"。小程序場景:應用名:rum-miniapp,Span名稱前綴:
"miniapp.request: "。移動端Android場景:應用名:rum-android,Span名稱前綴:
"android.request: "。移動端iOS場景:應用名:rum-ios,Span名稱前綴:
"ios.request: "。
同時,也可以通過拓撲圖,直觀地看到整個請求的上下游服務拓撲。
