通過OpenTelemetry上報Node.js應(yīng)用數(shù)據(jù)
通過OpenTelemetry為應(yīng)用埋點(diǎn)并上報鏈路數(shù)據(jù)至可觀測鏈路 OpenTelemetry 版后,可觀測鏈路 OpenTelemetry 版即可開始監(jiān)控應(yīng)用,您可以查看應(yīng)用拓?fù)洹⒄{(diào)用鏈路、異常事務(wù)、慢事務(wù)和SQL分析等一系列監(jiān)控數(shù)據(jù)。本文介紹如何使用OpenTelemetry對Node.js Express應(yīng)用進(jìn)行自動或手動埋點(diǎn)并上報數(shù)據(jù)。
前提條件
Node.js版本需要14及以上,其他版本請使用Jaeger接入。Jaeger接入操作,請參見通過Jaeger上報Node.js應(yīng)用數(shù)據(jù)。
新版控制臺
登錄可觀測鏈路 OpenTelemetry 版控制臺,在左側(cè)導(dǎo)航欄單擊接入中心。
在開源框架區(qū)域單擊OpenTelemetry卡片。
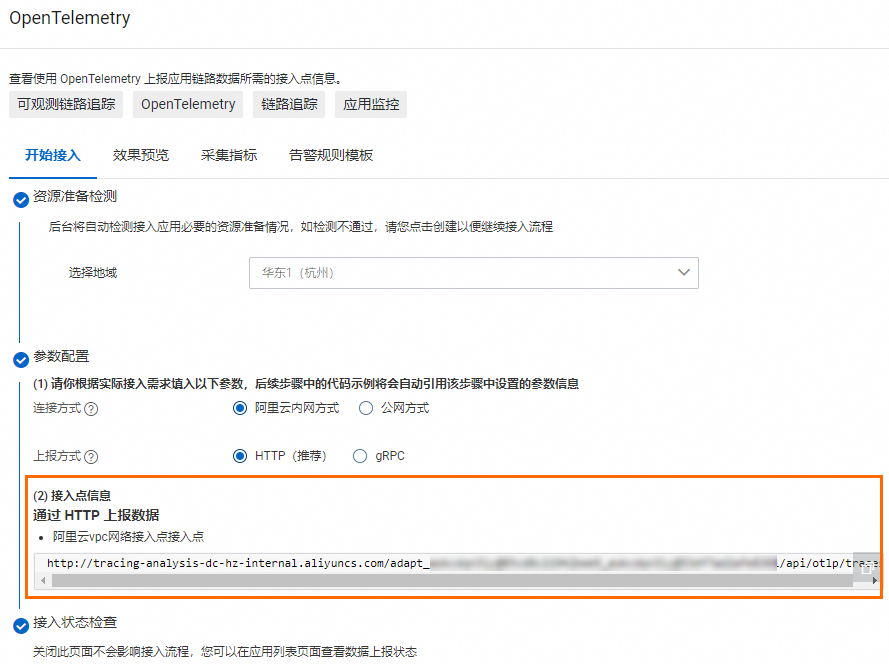
在彈出的OpenTelemetry面板中選擇數(shù)據(jù)需要上報的地域。
說明初次接入的地域?qū)詣舆M(jìn)行資源初始化。
選擇連接方式和上報方式,然后復(fù)制接入點(diǎn)信息。
連接方式:若您的服務(wù)部署在阿里云上,且所屬地域與選擇的接入地域一致,推薦使用阿里云內(nèi)網(wǎng)方式,否則選擇公網(wǎng)方式。
上報方式:根據(jù)客戶端支持的協(xié)議類型選擇HTTP或gRPC協(xié)議上報數(shù)據(jù)。

舊版控制臺
在左側(cè)導(dǎo)航欄單擊集群配置,然后在右側(cè)頁面單擊接入點(diǎn)信息頁簽。
在頁面頂部選擇需要接入的地域,然后在集群信息區(qū)域打開顯示Token開關(guān)。
在客戶端采集工具區(qū)域單擊OpenTelemetry。
在相關(guān)信息列中,獲取接入點(diǎn)信息。
 說明
說明如果應(yīng)用部署于阿里云生產(chǎn)環(huán)境,則選擇阿里云VPC網(wǎng)絡(luò)接入點(diǎn),否則選擇公網(wǎng)接入點(diǎn)。
背景信息
OpenTelemetry提供了若干自動埋點(diǎn)插件,支持為常見框架自動創(chuàng)建Span,支持的框架列表如下,完整信息請參見OpenTelemetry官方文檔。
框架名 | 鏈接 |
amqplib | |
aws-lambda | |
aws-sdk | |
bunyan | |
cassandra-driver | |
connect | |
cucumber | |
dataloader | |
dns | |
express | |
fastify | |
generic-pool | |
graphql | |
grpc | |
hapi | |
http | |
ioredis | |
knex | |
koa | |
lru-memoizer | |
memcached | |
mongodb | |
mongoose | |
mysql | |
mysql2 | |
nestjs-core | |
net | |
pg | |
pino | |
redis | |
restify | |
socket.io | |
winston |
示例Demo
示例代碼倉庫地址:opentelemetry-nodejs-demo
方法一:自動埋點(diǎn)(推薦)
下載運(yùn)行項(xiàng)目所需的依賴。
cd auto-instrumentation

npm init -y
npm install express
npm install axios
下載OpenTelemetry自動埋點(diǎn)所需的依賴。
npm install --save @opentelemetry/api
npm install --save @opentelemetry/auto-instrumentations-node
編寫應(yīng)用代碼。
以下代碼是通過Express實(shí)現(xiàn)的簡單應(yīng)用示例:
"use strict";

const axios = require("axios").default;
const express = require("express");
const app = express();

app.get("/", async (req, res) => {
  const result = await axios.get("http://localhost:7001/hello");
  return res.status(201).send(result.data);
});

app.get("/hello", async (req, res) => {
  console.log("hello world!")
  res.json({ code: 200, msg: "success" });
});

app.use(express.json());

app.listen(7001, () => {
  console.log("Listening on http://localhost:7001");
});
通過環(huán)境變量設(shè)置OpenTelemetry參數(shù)并運(yùn)行應(yīng)用。
請將
${httpEndpoint}替換為前提條件中獲取的HTTP接入點(diǎn),請將${serviceName}替換為您的應(yīng)用名。export OTEL_TRACES_EXPORTER="otlp" export OTEL_EXPORTER_OTLP_TRACES_ENDPOINT="${httpEndpoint}" export OTEL_NODE_RESOURCE_DETECTORS="env,host,os" export OTEL_SERVICE_NAME="${serviceName}" export NODE_OPTIONS="--require @opentelemetry/auto-instrumentations-node/register" node main.js說明有關(guān)OpenTelemetry環(huán)境變量的說明,請參見OpenTelemetry Node.js自動埋點(diǎn)配置。
訪問應(yīng)用。
通過以下命令訪問應(yīng)用,或者直接在瀏覽器中訪問該地址,即可生成調(diào)用鏈并上報至可觀測鏈路 OpenTelemetry 版。
curl localhost:7001/hello
方法二:手動埋點(diǎn)
在package.json中配置對OpenTelemetry的依賴。
 "dependencies": {
    "@opentelemetry/api": "^1.0.4",
    "@opentelemetry/exporter-trace-otlp-grpc": "^0.27.0",
    "@opentelemetry/instrumentation": "^0.27.0",
    "@opentelemetry/instrumentation-express": "^0.27.0",
    "@opentelemetry/instrumentation-http": "^0.27.0",
    "@opentelemetry/resources": "^1.0.1",
    "@opentelemetry/sdk-trace-base": "^1.0.1",
    "@opentelemetry/sdk-trace-node": "^1.0.1"
  }
創(chuàng)建Provider。
const { Resource } = require("@opentelemetry/resources");
const { NodeTracerProvider } = require("@opentelemetry/sdk-trace-node");
const {
  SemanticResourceAttributes,
} = require("@opentelemetry/semantic-conventions");

const provider = new NodeTracerProvider({
  resource: new Resource({
    [SemanticResourceAttributes.HOST_NAME]: require("os").hostname(),
    [SemanticResourceAttributes.SERVICE_NAME]: "opentelemetry-express",    //opentelemetry-express可替換為任意名稱。
  }),
});
通過Provider注冊HTTP和Express框架,自動監(jiān)測并攔截HTTP和Express。
說明如需監(jiān)測其他框架下的Node.js應(yīng)用,請參見OpenTelemetry官方文檔。
const { registerInstrumentations } = require("@opentelemetry/instrumentation"); const { HttpInstrumentation } = require("@opentelemetry/instrumentation-http"); const { ExpressInstrumentation, } = require("@opentelemetry/instrumentation-express"); registerInstrumentations({ tracerProvider: provider, instrumentations: [new HttpInstrumentation(), ExpressInstrumentation], });配置Exporter,導(dǎo)出數(shù)據(jù)到可觀測鏈路 OpenTelemetry 版。
請將下面代碼中的
<ENDPOINT>和<AUTHENTICATION>替換成前提條件中獲取的Endpoint和Authentication。const metadata = new grpc.Metadata(); metadata.set("Authentication", "<AUTHENTICATION>"); const exporter = new OTLPTraceExporter({ url: "<ENDPOINT>", metadata }); provider.addSpanProcessor(new SimpleSpanProcessor(exporter)); provider.register();可選:添加自定義事件和屬性。
說明OpenTelemetry API的使用方法,請參見OpenTelemetry官方文檔。
const api = require("@opentelemetry/api"); const currentSpan = api.trace.getSpan(api.context.active()); currentSpan.addEvent("timestamp", { value: Date.now() }); currentSpan.setAttribute("tagKey-01", "tagValue-01");
在控制臺查看Trace
在可觀測鏈路 OpenTelemetry 版控制臺的應(yīng)用列表頁面選擇目標(biāo)應(yīng)用,查看鏈路數(shù)據(jù)。
基于Express框架的Node.js應(yīng)用完整示例
"use strict";
const { Resource } = require("@opentelemetry/resources");
const {
OTLPTraceExporter,
} = require("@opentelemetry/exporter-trace-otlp-grpc");
const { NodeTracerProvider } = require("@opentelemetry/sdk-trace-node");
const { SimpleSpanProcessor } = require("@opentelemetry/sdk-trace-base");
const {
ExpressInstrumentation,
} = require("@opentelemetry/instrumentation-express");
const { registerInstrumentations } = require("@opentelemetry/instrumentation");
const { HttpInstrumentation } = require("@opentelemetry/instrumentation-http");
const {
SemanticResourceAttributes,
} = require("@opentelemetry/semantic-conventions");
const grpc = require("@grpc/grpc-js");
const provider = new NodeTracerProvider({
resource: new Resource({
[SemanticResourceAttributes.HOST_NAME]: require("os").hostname(),
[SemanticResourceAttributes.SERVICE_NAME]: "opentelemetry-express",
}),
});
registerInstrumentations({
tracerProvider: provider,
instrumentations: [new HttpInstrumentation(), ExpressInstrumentation],
});
const metadata = new grpc.Metadata();
metadata.set("Authentication", "<AUTHENTICATION>");

const exporter = new OTLPTraceExporter({ url: "<ENDPOINT>", metadata });
provider.addSpanProcessor(new SimpleSpanProcessor(exporter));
provider.register();
// 應(yīng)用代碼
const api = require("@opentelemetry/api");
const axios = require("axios").default;
const express = require("express");
const app = express();
app.get("/", async (req, res) => {
const result = await axios.get("http://localhost:7001/api");
return res.status(201).send(result.data);
});
app.get("/api", async (req, res) => {
const currentSpan = api.trace.getSpan(api.context.active());
currentSpan.addEvent("timestamp", { value: Date.now() });
currentSpan.setAttribute("tagKey-01", "tagValue-01");
res.json({ code: 200, msg: "success" });
});
app.use(express.json());
app.listen(7001, () => {
console.log("Listening on http://localhost:7001");
});