三方標準中間件對接
概念說明
應用開始對接前,需要先梳理整個應用系統,將應用分成一個或者多個“自研節點”和標準中間件。顧名思義,“自研節點”是指ISV自行開發的應用模塊,通常是一個開發工程產出的執行體。本產品文檔所提及的“中間件”,是指可獨立運行的系統組件,如MySQL、Redis、MongoDB數據庫等。區別于系統所使用的技術框架,又與之有關。比如使用Dubbo作為開發框架,Dubbo本身不是本文所說的“中間件”,但是與Dubbo搭配使用的ZooKeeper,就是這里所謂的“中間件”。目前,平臺提供的中間件相關的節點分成兩類:
三方節點:這些中間件來自于標準的開源中間件鏡像,平臺本身并不修改或者保證該中間件本身的能力。
初始化節點:這些節點只運行一次,他們并不是真正意義上的中間件,而僅僅完成中間件的一些初始化業務,平臺層面會保證這些節點在應用部署運行的整個生命周期只會被成功執行一次。
部署與訪問
對中間件節點的訪問,一般情況下,直接使用該節點對“服務名稱”作為地址即可;對中間件的部署,是平臺支持情況,分成兩種:
平臺已支持
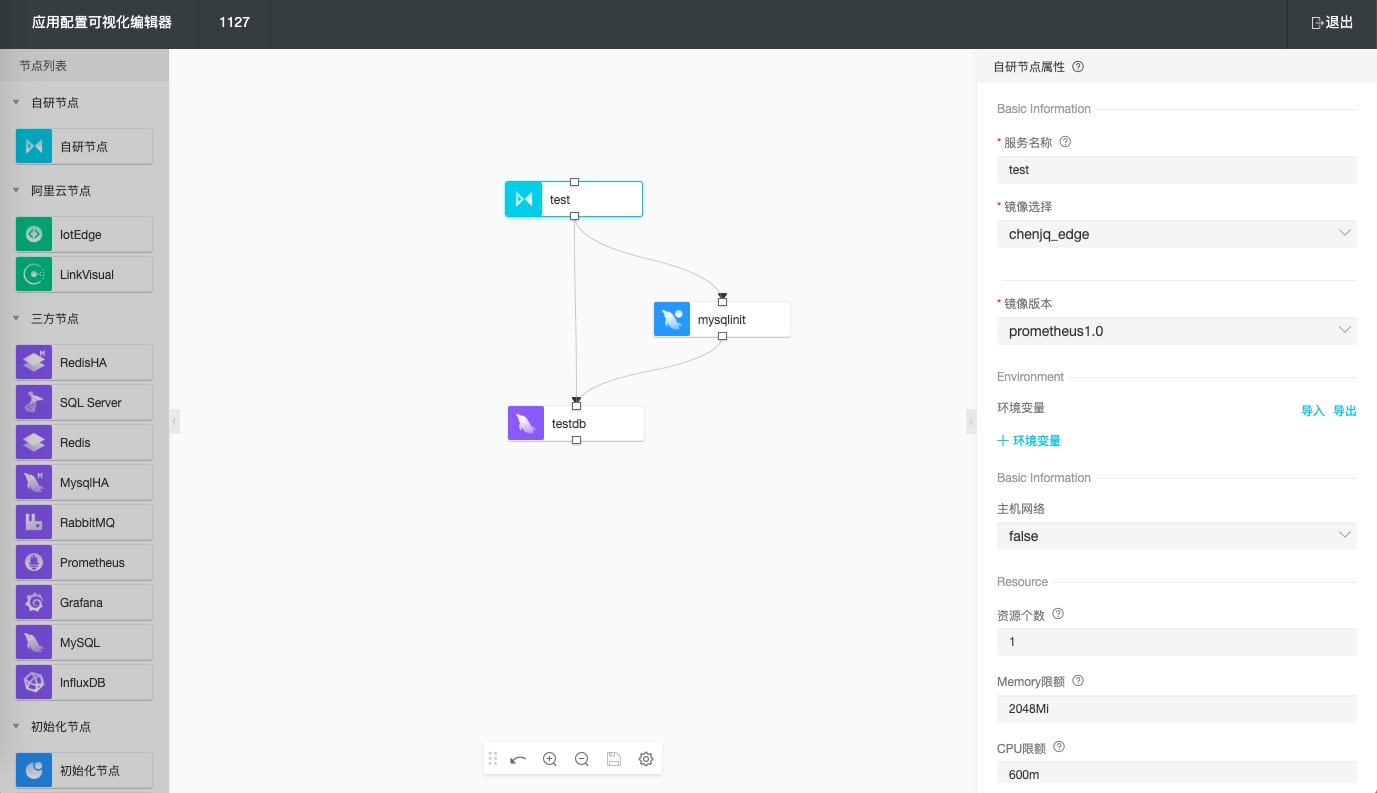
直接在可視化編排界面進行拖拽和配置即可,左側即為支持的節點,中間部分為畫布,右側部分為節點屬性,如下圖所示: 
平臺未支持
平臺支持對中間件尚在不停的完善中,如果發現有不支持的中間件,可以聯系相應的商務渠道進行溝通。當然,如果滿足如下條件,ISV可以自行將中間件達成鏡像包,作為自研節點供系統使用:
應用中,對該中間件的使用,并不涉及到持久化,或者數據允許丟失,或者可以指定明確的持久化路徑。
應用中,對該中間件的使用,僅需要單節點使用,不使用集群或者高可用能力。
中間件通訊方式
操作系統 | 中間件類型 | 中間件名稱 | 訪問節點方式 |
Linux | 阿里云中間件 | IotEdge | 固定的服務名稱 iotedge |
LinkVisual | 固定的服務名稱 linkvisual | ||
三方中間件 | RedisHA | 使用服務名稱 | |
SQL Server | 使用服務名稱 | ||
Redis | 使用服務名稱 | ||
MySQL-HA | 使用服務名稱 | ||
RubbitMQ | 使用服務名稱 | ||
Prometheus | 使用服務名稱 | ||
Grafana | 使用服務名稱 | ||
MySQL | 使用服務名稱 | ||
InfluxDB | 使用服務名稱 |
中間件環境變量說明
節點分類 | 環境變量字段 | 環境變量key | 環境變量value |
自研節點 | 應用appkey | iot.hosting.appKey | |
應用appsecret | iot.hosting.appSecret | ||
IoT官方API調用域名 | iot.hosting.api.domain | ||
IoT官方API調用協議 | iot.hosting.api.schema | HTTP/HTTPS | |
IoT服務模型API調用域名 | iot.hosting.mesh.domain | ||
IoT服務模型API調用協議 | iot.hosting.mesh.schema | HTTP/HTTPS | |
redis-ha | 服務地址 | iot.hosting.${name}.redisUrl | |
登錄密碼 | iot.hosting.${name}.redisPassword | ||
sqlserver | 數據庫用戶名 | iot.hosting.${name}.mssqlUser | |
數據庫密碼 | iot.hosting.${name}.mssqlPassword | ||
數據庫database | iot.hosting.${name}.mssqlDatabase | ||
redis | 服務地址 | iot.hosting.${name}.redisUrl | |
登錄密碼 | iot.hosting.${name}.redisPassword | ||
mysql-ha | 服務地址 | iot.hosting.${name}.mysqlHost | |
數據庫database | iot.hosting.${name}.mysqlDatabase | ||
數據庫密碼 | iot.hosting.${name}.mysqlPassword | ||
數據庫用戶 | iot.hosting.${name}.mysqlUser | ||
數據庫url | iot.hosting.${name}.mysqlUrl | jdbc:mysql://${name}:3306/${mysqlDatabase} | |
rabbitmq | 服務地址 | iot.hosting.${name}.rabbitmqHost | |
登錄賬戶 | iot.hosting.${name}.rabbitmqUsername | ||
登錄密碼 | iot.hosting.${name}.rabbitmqPassword | ||
mysql | 數據庫用戶名 | iot.hosting.${name}.mysqlUser | |
數據庫密碼 | iot.hosting.${name}.mysqlPassword | ||
數據庫database | iot.hosting.${name}.mysqlDatabase | ||
數據庫地址 | iot.hosting.${name}.mysqlUrl | jdbc:mysql://${name}:3306/${mysqlDatabase} | |
influxdb | 服務地址 | iot.hosting.${name}.influxdbHost | http://${name}:8086 |
數據庫database | iot.hosting.${name}.influxdbDatabase | ||
數據庫用戶 | iot.hosting.${name}.influxdbUser | ||
數據庫密碼 | iot.hosting.${name}.influxdbPassword |
參數說明:iot.hosting.${name}:指在應用配置中相應中間件的服務名稱。
多副本應用部署
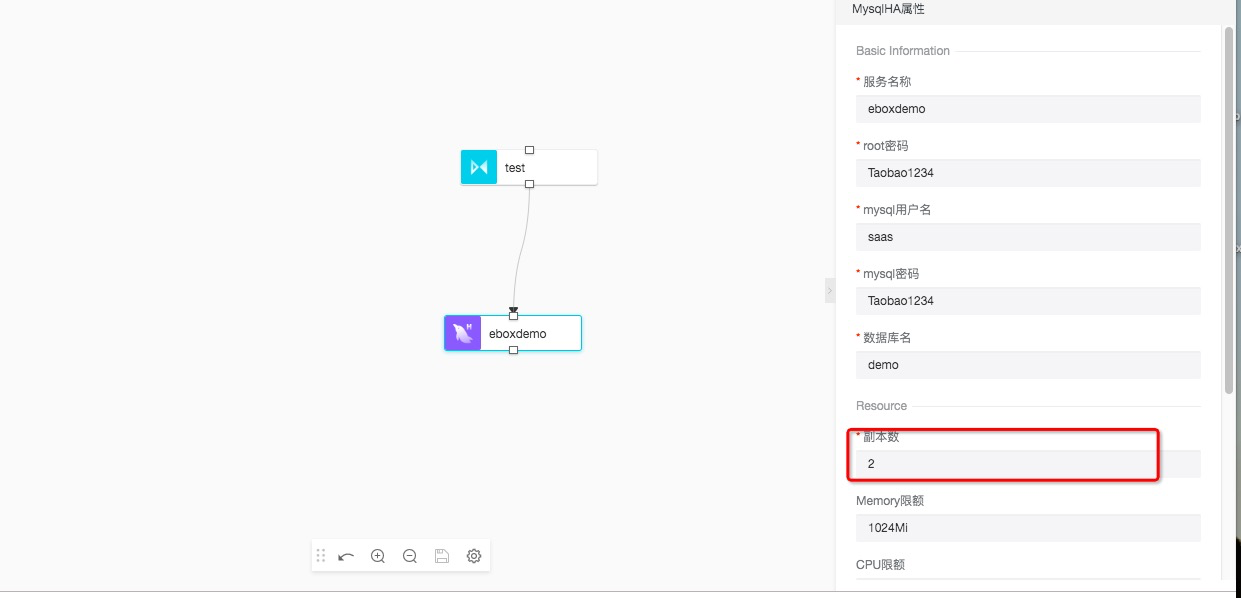
多副本部署目前僅支持RedisHA和MysqlHA的三方節點進行數據存儲,在應用配置可選擇副本數。如圖所示:
MysqlHA實現步驟
安裝MySQL應用
在兩個副本中創建slave同步賬戶,并授予對應的權限
grant replication slave on *.* to 'slave'@'%' identified by 'Abcd@1234';
flush privileges;
配置數據庫選項,參考配置如下:
實例1:
server-id=1
log-bin=mysql-bin
relay-log=mysql-relay-bin
log-slave-updates=on
auto-increment-increment=2
auto-increment-offset=1
實例2:
server-id=2
log-bin=mysql-bin
relay-log=mysql-relay-bin
log-slave-updates=on
auto-increment-increment=2
auto-increment-offset=2
啟動slave進程;
#實例1
CHANGE MASTER TO MASTER_HOST='192.168.99.118',MASTER_USER='slave',MASTER_PASSWORD='Abcd@1234';
#實例2
CHANGE MASTER TO MASTER_HOST='192.168.99.117',MASTER_USER='slave',MASTER_PASSWORD='Abcd@1234';
使用方式
初始化節點
與MySQL相同
JDBC連接
假設設置的mysql-ha服務名稱為 mysqlha端口為3306
JDBC URL
jdbc:mysql://mysqlha-0.mysqlha:3306,mysqlha-1.mysqlha:3306/mysqlha?characterEncoding=utf-8&autoReconnect=true&failOverReadOnly=false&useSSL=false注意:
需要填入兩個地址,分別為主地址
-0., 從地址-1.
設置屬性
autoReconnect=true&failOverReadOnly=false
JDBC連接池
建議使用JDBC連接池,示例代碼
public class DataSourceConfig {

    @Value("${datasource.url}")
    private String url;

    @Value("${datasource.username}")
    private String username;

    @Value("${datasource.password}")
    private String password;

    @Value("${datasource.max.active}")
    private int maxActive;

    @Value("${datasource.initial.size}")
    private int initialSize;

    @Bean(name = "dataSource")
    public DruidDataSource dataSource() {
        DruidDataSource novaDruidDataSource = new DruidDataSource();
        novaDruidDataSource.setUrl(url);
        novaDruidDataSource.setUsername(username);
        novaDruidDataSource.setPassword(password);
        novaDruidDataSource.setMaxActive(maxActive);
        novaDruidDataSource.setInitialSize(initialSize);
        novaDruidDataSource.setDriverClassName("com.mysql.jdbc.Driver");
        novaDruidDataSource.setValidationQuery("SELECT 1");
        novaDruidDataSource.setTestWhileIdle(true);
        novaDruidDataSource.setTimeBetweenEvictionRunsMillis(60000);
        return novaDruidDataSource;
    }

    @Bean(name = "sqlSessionFactory")
    public SqlSessionFactory sqlSessionFactory() throws Exception {
        WrapAndChangeConfigureSqlSessionFactory factory = new WrapAndChangeConfigureSqlSessionFactory();
        factory.setDataSource(dataSource());
        factory.setTypeHandlers(intEnumTypeHandlersFactory().getObject().toArray(new TypeHandler<?>[0]));
        return factory.getObject();
    }

    @Bean(name = "typeHandlerList")
    public IntEnumTypeHandlersFactoryBean intEnumTypeHandlersFactory() {
        IntEnumTypeHandlersFactoryBean typeHandlersFactoryBean = new IntEnumTypeHandlersFactoryBean();
        typeHandlersFactoryBean.setBasePackage("com.aliyun.iotx.bean");
        return typeHandlersFactoryBean;
    }

    @Bean(name = "dataSourceTransactionManager")
    public DataSourceTransactionManager dataSourceTransactionManager() {
        DataSourceTransactionManager dataSourceTransactionManager = new DataSourceTransactionManager();
        dataSourceTransactionManager.setDataSource(dataSource());
        return dataSourceTransactionManager;
    }

    @Bean(name = "jdbcTemplate")
    public JdbcTemplate jdbcTemplate() {
        JdbcTemplate jdbcTemplate = new JdbcTemplate();
        jdbcTemplate.setDataSource(dataSource());
        return jdbcTemplate;
    }
}
實例demo
下載地址: