您可以通過Serverless Devs開發工具快速將AI推理類的應用部署到函數計算控制臺,從而實現按需、自動擴展的AI模型推理,無需管理底層基礎設施,節省成本并快速迭代。
背景信息
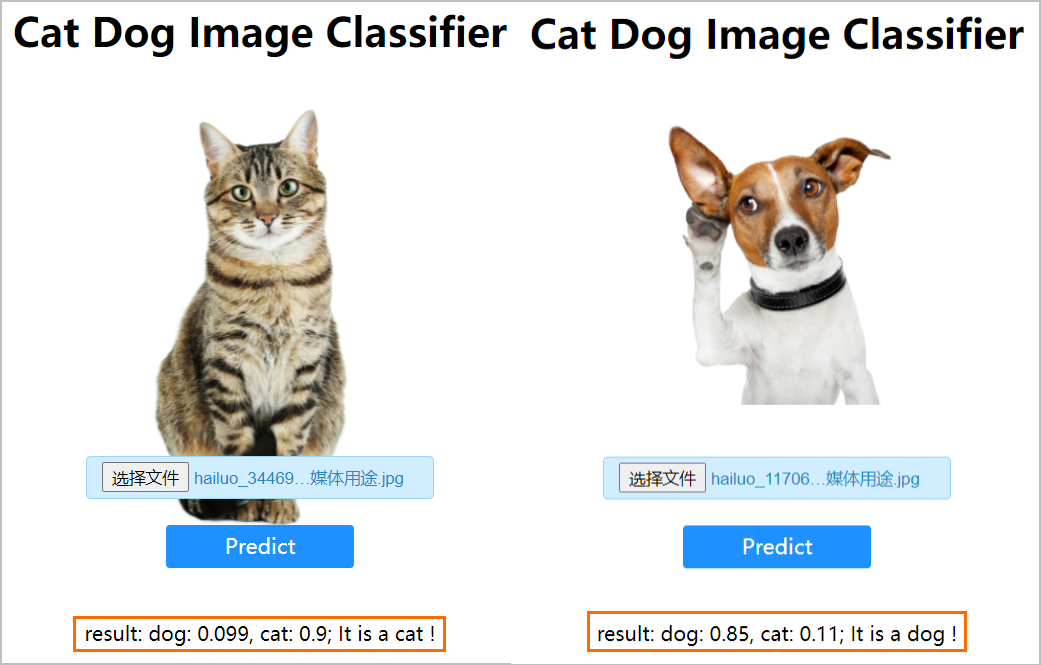
本文示例實現的能力是識別上傳的照片內的動物是貓還是狗。關于代碼詳情,請參見示例工程。
前提條件
操作步驟
執行以下命令,克隆項目。
git clone https://github.com/awesome-fc/cat-dog-classify.git安裝依賴。
執行以下命令進入項目目錄。
cd cat-dog-classify執行以下命令安裝依賴。
sudo s build --use-docker輸出示例:
[2021-12-09 07:26:39] [INFO] [S-CLI] - Start ...
[2021-12-09 07:26:40] [INFO] [FC-BUILD] - Build artifact start...
[2021-12-09 07:26:40] [INFO] [FC-BUILD] - Use docker for building.
[2021-12-09 07:26:40] [INFO] [FC-BUILD] - Build function using image: registry.<regionId>.aliyuncs.com/aliyunfc/runtime-python3.6:build-1.9.20
[2021-12-09 07:26:40] [INFO] [FC-BUILD] - begin pulling image registry.<regionId>.aliyuncs.com/aliyunfc/runtime-python3.6:build-1.9.20, you can also use docker pull registry.cn-beijing.aliyuncs.com/aliyunfc/runtime-python3.6:build-1.9.20 to pull image by yourself.
build-1.9.20: Pulling from aliyunfc/runtime-python3.6
f49cf87b52c1: Already exists
......
01ce50b4eb85: Already exists
02b807385deb: Pull complete
......
9b9fdb8de506: Pull complete
Digest: sha256:a9a6dab2d6319df741ee135d9749a90b2bb834fd11ee265d1fb106053890****
Status: Downloaded newer image for registry.<regionId>.aliyuncs.com/aliyunfc/runtime-python3.6:build-1.9.20
 builder begin to build
[2021-12-09 07:27:57] [INFO] [FC-BUILD] - Build artifact successfully.

Tips for next step
======================
* Invoke Event Function: s local invoke
* Invoke Http Function: s local start
* Deploy Resources: s deploy
End of method: build
執行完安裝依賴的命令后,Serverless Devs會自動安裝相關依賴包,并將第三方庫下載到.s/build/artifacts/cat-dog/classify/.s/python目錄內。
上傳依賴到NAS。
當您在安裝依賴時,函數計算引用的代碼包在解壓后可能會出現大于代碼包限制的情況,為了減少代碼包的體積,您可以將大體積的依賴和相對較大的模型參數文件存放在NAS中。
執行以下命令,初始化NAS。
sudo s nas init輸出示例:
[2021-12-09 07:29:58] [INFO] [S-CLI] - Start ...
[2021-12-09 07:29:59] [INFO] [FC-DEPLOY] - Using region: cn-shenzhen
[2021-12-09 07:29:59] [INFO] [FC-DEPLOY] - Using access alias: default
[2021-12-09 07:29:59] [INFO] [FC-DEPLOY] - Using accessKeyID: LTAI4G4cwJkK4Rza6xd9****
[2021-12-09 07:29:59] [INFO] [FC-DEPLOY] - Using accessKeySecret: eCc0GxSpzfq1DVspnqqd6nmYNN****
......
[2021-12-09 07:30:01] [INFO] [FC-DEPLOY] - Generated vpcConfig:
securityGroupId: sg-wz90u1syk2h1f14b****
vSwitchId: vsw-wz9qnuult4q5g4f7n****
vpcId: vpc-wz9x9bzs0wtvjgt6n****

......
[2021-12-09 07:30:15] [INFO] [FC-DEPLOY] - Checking Trigger httpTrigger exists
 Make service _FC_NAS_cat-dog success.
 Make function _FC_NAS_cat-dog/nas_dir_checker success.
 Make trigger _FC_NAS_cat-dog/nas_dir_checker/httpTrigger success.
[2021-12-09 07:30:25] [INFO] [FC-DEPLOY] - Checking Service _FC_NAS_cat-dog exists
[2021-12-09 07:30:25] [INFO] [FC-DEPLOY] - Checking Function nas_dir_checker exists
[2021-12-09 07:30:26] [INFO] [FC-DEPLOY] - Checking Trigger httpTrigger exists

There is auto config in the service: _FC_NAS_cat-dog
[2021-12-09 07:30:26] [INFO] [FC-DEPLOY] - Generated nasConfig:
groupId: 10003
mountPoints:
  - fcDir: /mnt/auto
    nasDir: /cat-dog
    serverAddr: 2bfb748****.cn-shenzhen.nas.aliyuncs.com
userId: 10003

cat-dog:
  userId:      10003
  groupId:     10003
  mountPoints:
    -
      serverAddr: 2bfb748****.cn-shenzhen.nas.aliyuncs.com
      nasDir:     /cat-dog
      fcDir:      /mnt/auto
執行以下命令,部署服務。
sudo s deploy service執行以下命令,上傳依賴到NAS。
sudo s nas upload -r .s/build/artifacts/cat-dog/classify/.s/python/ /mnt/auto/python輸出示例:
[2021-12-09 07:33:14] [INFO] [S-CLI] - Start ...
Packing ...
Package complete.
 Upload done

Tips for next step
======================
* Invoke remote function: s invoke
End of method: nas
執行以下命令,上傳模型到NAS。
sudo s nas upload -r src/model/ /mnt/auto/model輸出示例:
[2021-12-09 07:52:26] [INFO] [S-CLI] - Start ...
Packing ...
Package complete.
 Upload done

Tips for next step
======================
* Invoke remote function: s invoke
End of method: nas
執行以下命令,查看NAS目錄。
sudo s nas command ls /mnt/auto/輸出示例:
[2021-12-09 07:53:01] [INFO] [S-CLI] - Start ...
model
python


Tips for next step
======================
* Invoke remote function: s invoke
End of method: nas
執行以下命令,部署項目。
sudo s deploy輸出示例:
[2021-12-09 07:56:15] [INFO] [S-CLI] - Start ... [2021-12-09 07:56:16] [INFO] [FC-DEPLOY] - Using region: cn-shenzhen [2021-12-09 07:56:16] [INFO] [FC-DEPLOY] - Using access alias: default [2021-12-09 07:56:16] [INFO] [FC-DEPLOY] - Using accessKeyID: LTAI4G4cwJkK4Rza6xd9**** [2021-12-09 07:56:16] [INFO] [FC-DEPLOY] - Using accessKeySecret: eCc0GxSpzfq1DVspnqqd6nmYNN**** ...... [2021-12-09 07:56:19] [INFO] [FC-DEPLOY] - Generated logConfig: enableInstanceMetrics: true enableRequestMetrics: true logBeginRule: ~ logstore: fc-service-cat-dog-logstore project: 188077086902****-cn-shenzhen-logproject ...... There is auto config in the service: cat-dog Tips for next step ====================== * Display information of the deployed resource: s info * Display metrics: s metrics * Display logs: s logs * Invoke remote function: s invoke * Remove Service: s remove service * Remove Function: s remove function * Remove Trigger: s remove trigger * Remove CustomDomain: s remove domain cat-dog: region: cn-shenzhen service: name: cat-dog function: name: classify runtime: python3 handler: predict.handler memorySize: 1024 timeout: 120 url: system_url: https://188077086902****.cn-shenzhen.fc.aliyuncs.com/2016-08-15/proxy/cat-dog/classify/ custom_domain: - domain: http://classify.cat-dog.188077086902****.cn-shenzhen.fc.devsapp.net triggers: - type: http name: httpTrigger成功部署該項目后,您可以在執行輸出中查看到函數計算生成的臨時域名,通過該域名可以訪問剛部署的函數。生成的域名的格式為:
http://classify.cat-dog.<account_id>.<region_id>.fc.devsapp.net。使用瀏覽器訪問該域名,上傳圖片后識別到的結果如下:
 說明 臨時域名僅用作演示以及開發,具有時效性。如需用作生產,請綁定已經在阿里云備案的域名。詳細信息,請參見配置自定義域名。
使用預留消除冷啟動毛刺
函數計算具有動態伸縮的特性,根據并發請求量,自動彈性擴容出執行環境。在這個典型的深度學習示例中,加載依賴和模型參數消耗的時間很長,在您設置的1 GB規格的函數中,并發訪問的時間為10s左右,有時可能大于20s。
因此不可避免的會出現函數調用毛刺的情況,即冷啟動時間大于10s,在這種情況下,您可以使用設置預留的方式來避免冷啟動。您可以在項目目錄內執行以下命令消除冷啟動毛刺:
sudo s provision put --target 10 --qualifier LATEST同時,當您需要了解服務器的最大承受能力,實現更好地運行和開發時,您可以使用Serverless Devs的壓測命令對指定的函數進行壓測。詳細信息,請參見Serverless Devs操作命令。
您可以通過以下命令獲取預留實例詳情:
sudo s provision get --qualifier LATEST當您完成壓測后,請執行以下命令取消預留:
sudo s provision put --target 0 --qualifier LATEST
相關文檔
通過Serverless Devs工具進行函數構建/依賴安裝等操作,請參見構建函數或安裝依賴(s build)。
通過Serverless Devs工具進行預留配置的查看與更新等操作,請參見函數預留操作(s provision)。