本文主要演示如何在Kubernetes集群中安裝、注冊GitLab Runner,添加Kubernetes類型的Executor來執行構建,并以此為基礎完成一個Java源碼示例項目從編譯構建、鏡像打包到應用部署的CI/CD過程。
背景信息
本文以構建一個Java軟件項目并將其部署到阿里云容器服務Kubernetes集群中為例,說明如何使用GitLab CI在阿里云Kubernetes服務上運行GitLab Runner、配置Kubernetes類型的Executor,并執行Pipeline。
創建GitLab源碼項目并上傳示例代碼
創建GitLab源碼項目。
本示例中創建的GitLab源碼項目地址為:
http://xx.xx.xx.xx/demo/gitlab-java-demo.git執行以下命令獲取示例代碼并上傳至GitLab。
git clone https://github.com/haoshuwei/gitlab-ci-k8s-demo.git
git remote add gitlab http://xx.xx.xx.xx/demo/gitlab-java-demo.git
git push gitlab master
在Kubernetes集群中安裝GitLab Runner
獲取GitLab Runner的注冊信息。
獲取項目專用Runner的注冊信息。
登錄GitLab。
在頂部導航欄中,選擇。
在Your projects頁簽下,選擇相應的Project。
在左側導航欄中,選擇。
單擊Runners右側的Expand。
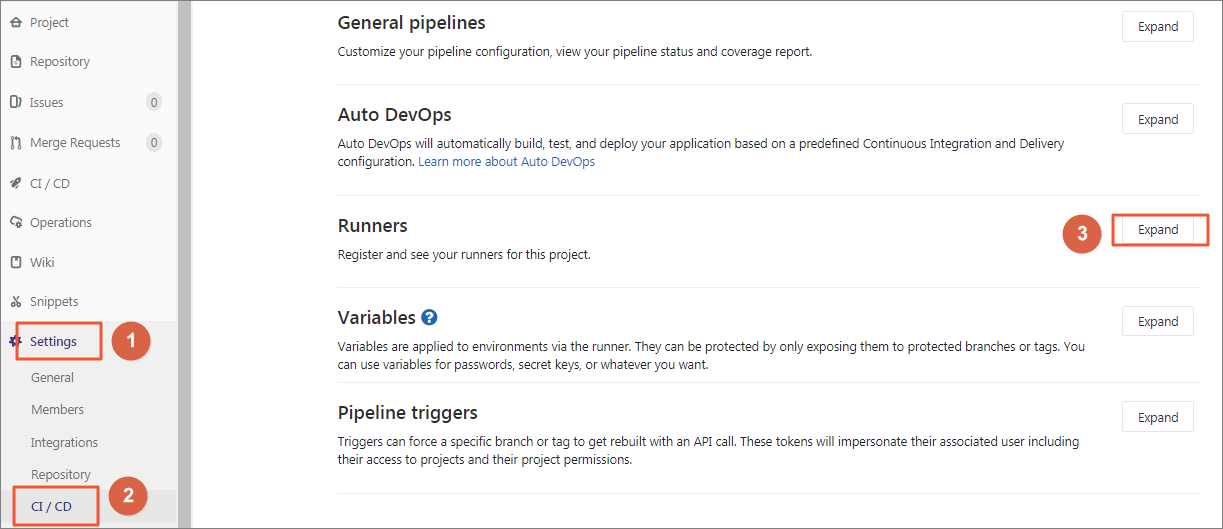
獲取URL和registration token信息。
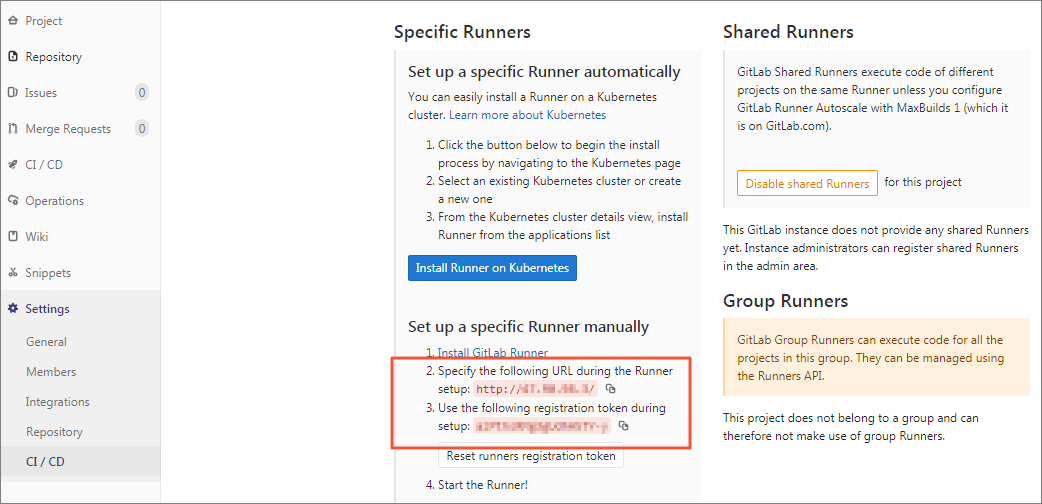
獲取Group Runners的注冊信息。
在頂部導航欄中,選擇。
在Your groups頁簽下,選擇相應的group。
在左側導航欄中,選擇。
單擊Runners右側的Expand。

獲取URL和registration token信息。
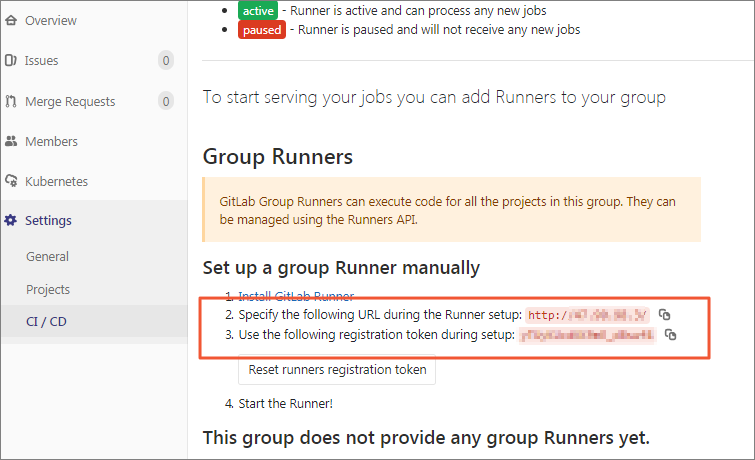
獲取Shared Runners的注冊信息。
說明只有管理員有權限執行此步操作。
在頂部導航欄中,單擊
 進入Admin Area頁面。
在左側導航欄中,選擇。
獲取URL和registration token信息。

執行以下命令獲取并修改GitLab Runner的Helm Chart。
git clone https://github.com/haoshuwei/gitlab-runner.git替換gitlabUrl和runnerRegistrationToken字段,示例如下:
## GitLab Runner Image
##
image: gitlab/gitlab-runner:alpine-v11.4.0

## Specify a imagePullPolicy
##
imagePullPolicy: IfNotPresent

## Default container image to use for initcontainer
init:
  image: busybox
  tag: latest

## The GitLab Server URL (with protocol) that want to register the runner against
##
gitlabUrl: http://xx.xx.xx.xx/

## The Registration Token for adding new Runners to the GitLab Server. This must
## be retreived from your GitLab Instance.
##
runnerRegistrationToken: "AMvEWrBTBu-d8czE****"
## Unregister all runners before termination
##
unregisterRunners: true

## Configure the maximum number of concurrent jobs
##
concurrent: 10

## Defines in seconds how often to check GitLab for a new builds
##
checkInterval: 30

## For RBAC support:
##
rbac:
  create: true
  clusterWideAccess: false

## Configure integrated Prometheus metrics exporter
##
metrics:
  enabled: true

## Configuration for the Pods that that the runner launches for each new job
##
runners:
  ## Default container image to use for builds when none is specified
  ##
  image: ubuntu:16.04

  ## Specify the tags associated with the runner. Comma-separated list of tags.
  ##
  tags: "k8s-runner"

  ## Run all containers with the privileged flag enabled
  ## This will allow the docker:dind image to run if you need to run Docker
  ## commands. Please read the docs before turning this on:
  ##
  privileged: true

  ## Namespace to run Kubernetes jobs in (defaults to the same namespace of this release)
  ##
  namespace: gitlab

  cachePath: "/opt/cache"

  cache: {}
  builds: {}
  services: {}
  helpers: {}

resources: {}
執行以下命令安裝GitLab Runner。
打包應用
helm package .預期輸出:
Successfully packaged chart and saved it to: /root/gitlab/gitlab-runner/gitlab-runner-0.1.37.tgz安裝應用
helm install --namespace gitlab gitlab-runner *.tgz
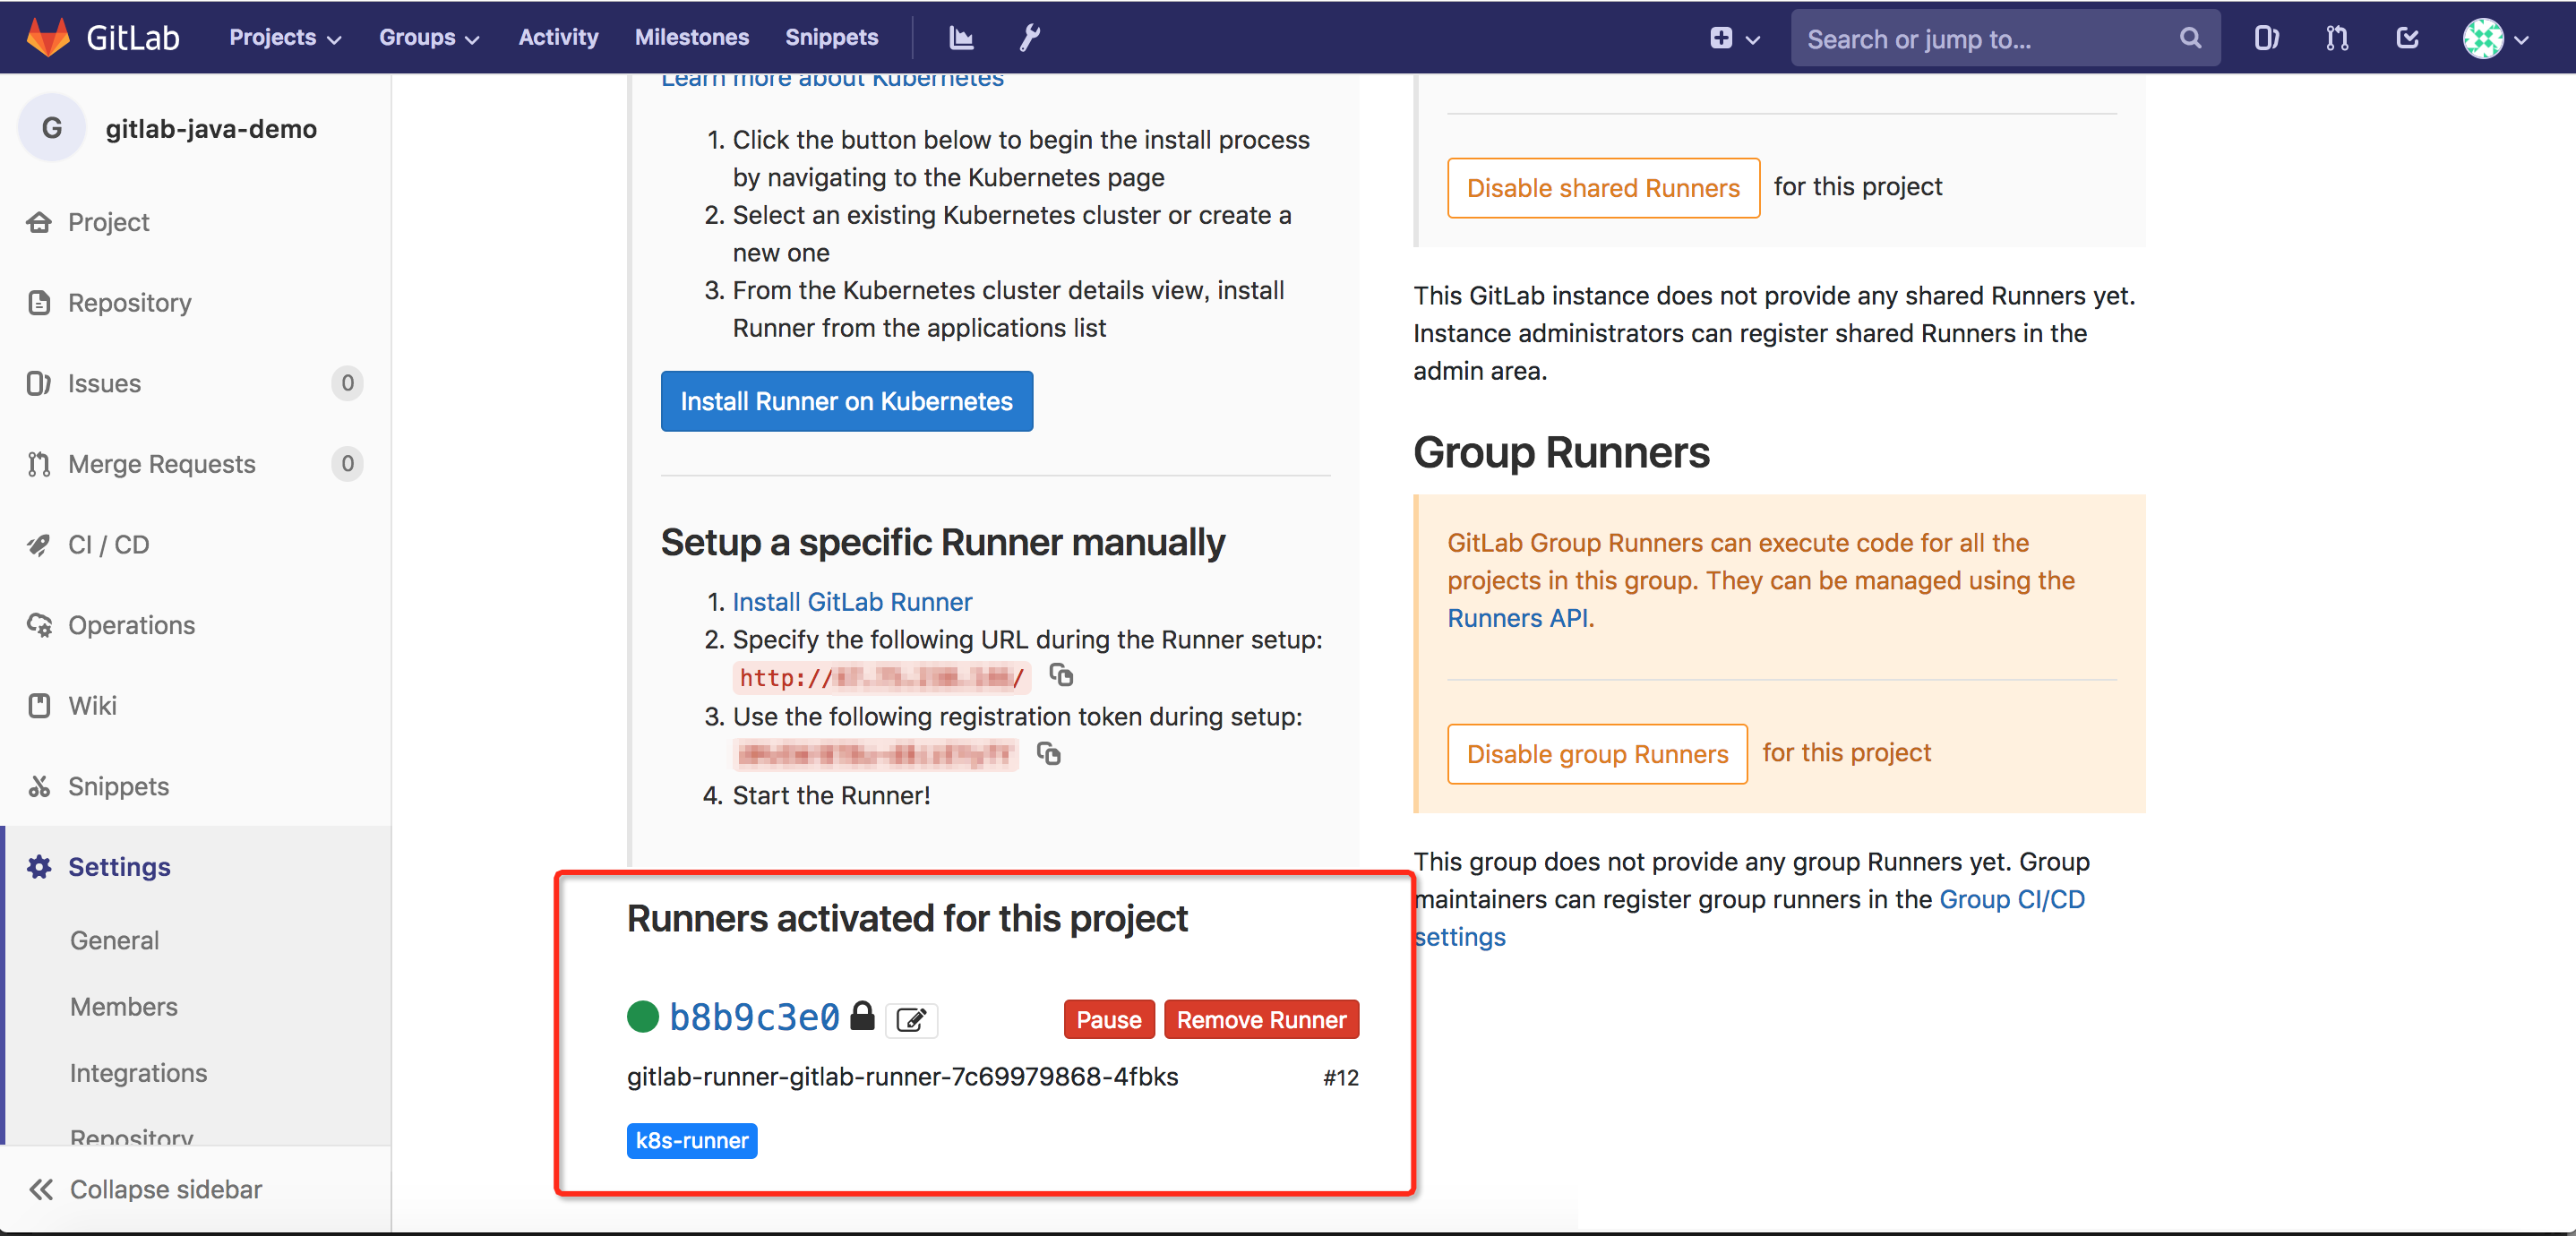
查看相關的deployment/pod是否成功啟動。若成功啟動,則可在GitLab上看到注冊成功的GitLab Runner,如下圖所示。
緩存配置
GitLab Runner對緩存方案的支持有限,所以您需要使用掛載Volume的方式進行緩存。在上面的示例中,安裝GitLab Runner時默認使用/opt/cache目錄作為緩存空間。您也可以通過修改values.yaml文件中的runners.cachePath字段修改緩存目錄。
例如,如需建立Maven緩存,您可以在variables下添加MAVEN_OPTS變量并指定本地緩存目錄:
variables:
  KUBECONFIG: /etc/deploy/config
MAVEN_OPTS: "-Dmaven.repo.local=/opt/cache/.m2/repository"修改templates/configmap.yaml文件中的以下字段掛載docker.sock和用于cache的volume。
cat >>/home/gitlab-runner/.gitlab-runner/config.toml <<EOF
            [[runners.kubernetes.volumes.pvc]]
              name = "gitlab-runner-cache"
              mount_path = "{{ .Values.runners.cachePath }}"
            [[runners.kubernetes.volumes.host_path]]
              name = "docker"
              mount_path = "/var/run/docker.sock"
              read_only = true
              host_path = "/var/run/docker.sock"
    EOF
設置全局變量
在GitLab的頂部導航欄中,選擇。
在Your projects頁簽下,選擇相應的Project。
在左側導航欄中,選擇。
單擊Variables右側的Expand。添加GitLab Runner可用的環境變量。本示例中,添加以下三個變量。
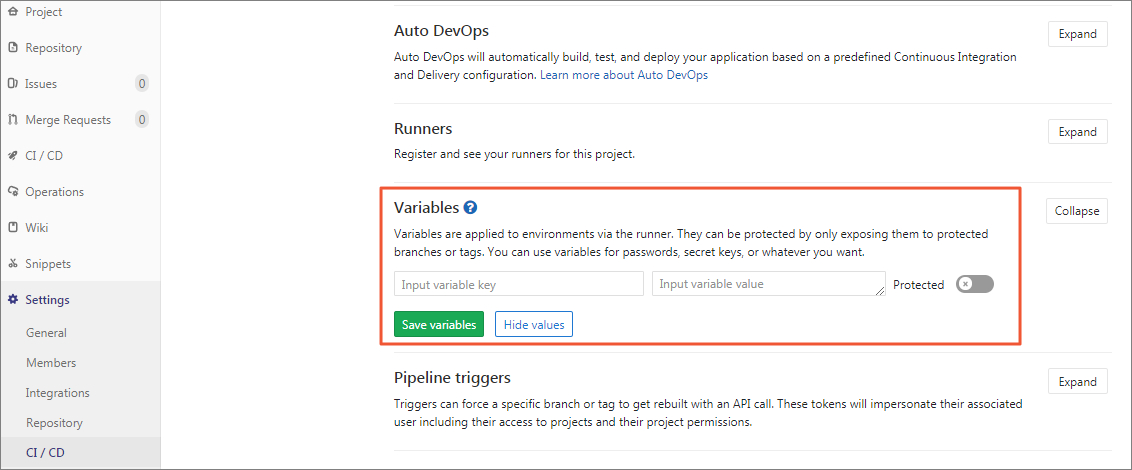
REGISTRY_USERNAME:鏡像倉庫用戶名。
REGISTRY_PASSWORD:鏡像倉庫密碼。
kube_config:KubeConfig的編碼字符串。
執行以下命令生成KubeConfig的編碼字符串:
echo $(cat ~/.kube/config | base64) | tr -d " "
編寫.gitlab-ci.yml
編寫.gitlab-ci.yml文件,完成Java Demo源碼項目的編譯構建、鏡像推送和應用部署(可參考gitlabci-java-demo源碼項目中的.gitlab-ci.yml.example)。
.gitlab-ci.yml示例如下。
image: docker:stable
stages:
  - package
  - docker_build
  - deploy_k8s
variables:
  KUBECONFIG: /etc/deploy/config
  MAVEN_OPTS: "-Dmaven.repo.local=/opt/cache/.m2/repository"
mvn_build_job:
  image: maven:3.6.2-jdk-14
  stage: package
  tags:
    - k8s-runner
  script:
    - mvn package -B -DskipTests
    - cp target/demo.war /opt/cache
docker_build_job:
  image: docker:latest
  stage: docker_build
  tags:
    - k8s-runner
  script:
    - docker login -u $REGISTRY_USERNAME -p $REGISTRY_PASSWORD registry.cn-beijing.aliyuncs.com
    - mkdir target
    - cp /opt/cache/demo.war target/demo.war
    - docker build -t registry.cn-beijing.aliyuncs.com/haoshuwei24/gitlabci-java-demo:$CI_PIPELINE_ID .
    - docker push registry.cn-beijing.aliyuncs.com/haoshuwei24/gitlabci-java-demo:$CI_PIPELINE_ID
deploy_k8s_job:
  image: registry.cn-hangzhou.aliyuncs.com/haoshuwei24/kubectl:1.16.6
  stage: deploy_k8s
  tags:
    - k8s-runner
  script:
    - mkdir -p /etc/deploy
    - echo $kube_config |base64 -d > $KUBECONFIG
    - sed -i "s/IMAGE_TAG/$CI_PIPELINE_ID/g" deployment.yaml
    - cat deployment.yaml
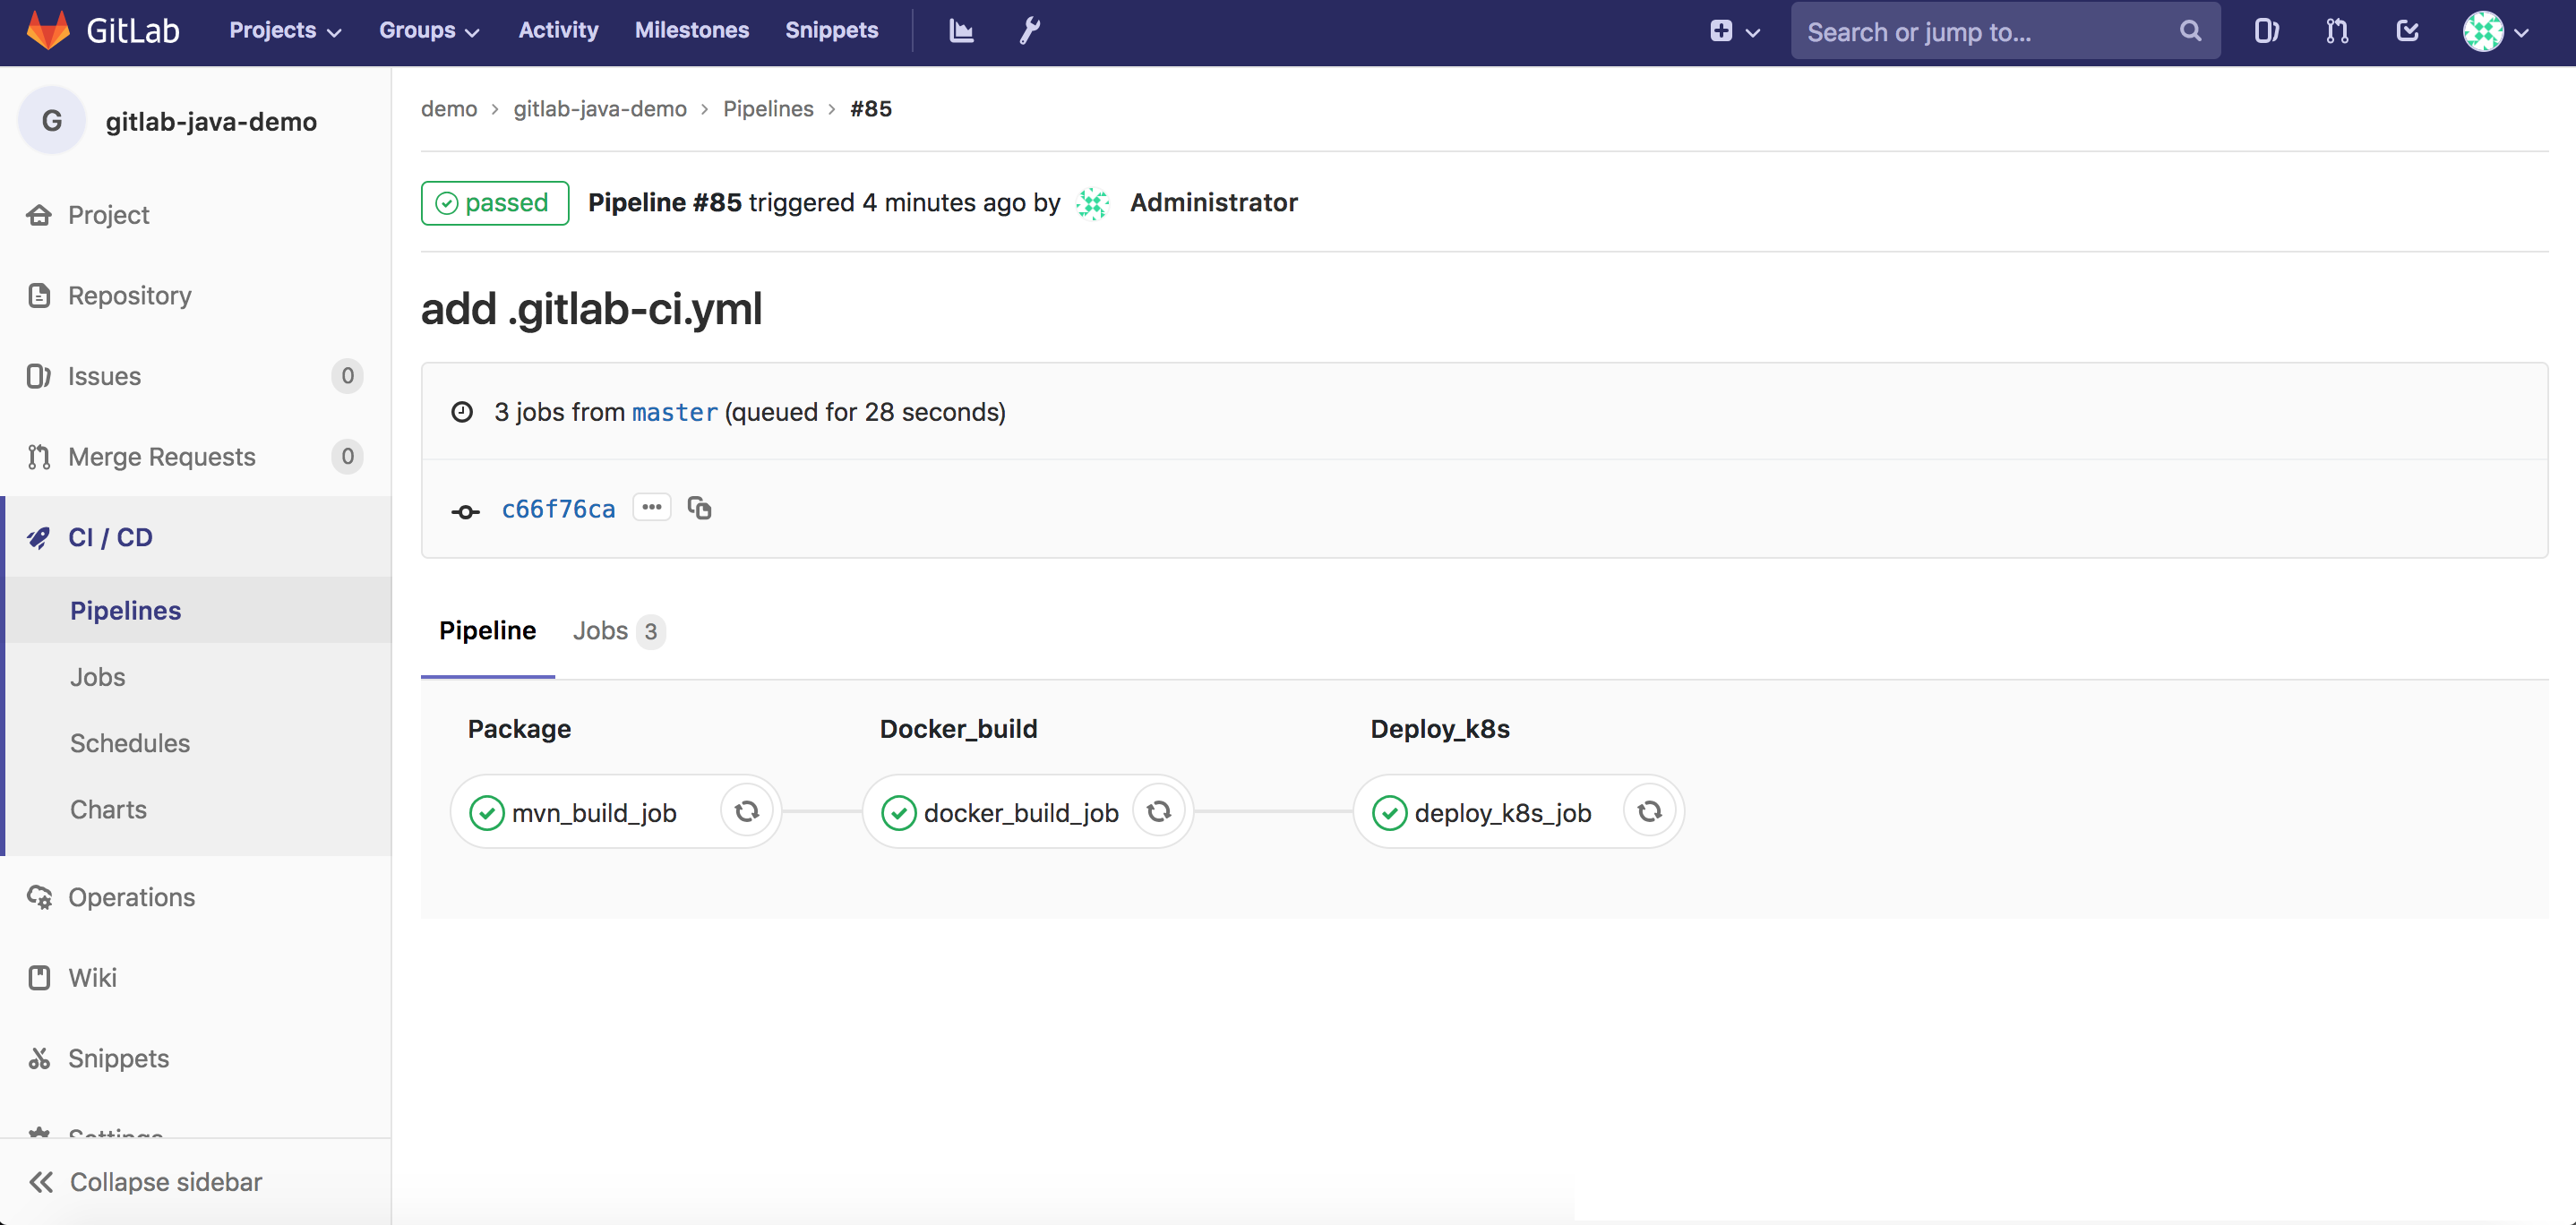
- kubectl apply -f deployment.yaml.gitlab-ci.yml定義了一個Pipeline, 分三個階段步驟執行:
image: docker:stable  # Pipeline中各個步驟階段的構建鏡像沒有指定時, 默認使用docker:stable鏡像
stages:
  - package                # 源碼打包階段
  - docker_build         # 鏡像構建和打包推送階段
  - deploy_k8s           # 應用部署階段
variables:
  KUBECONFIG: /etc/deploy/config   # 定義全局變量KUBECONFIG
maven源碼打包階段。
mvn_build_job:     # job名稱
  image: maven:3.6.2-jdk-14  # 本階段構建使用的構建鏡像
  stage: package      # 關聯的階段名稱
  tags:                     # GitLab Runner的tag
    - k8s-runner
  script:
    - mvn package -B -DskipTests  # 執行構建腳本
    - cp target/demo.war /opt/cache   # 構建物保存至緩存區
鏡像構建和打包推送階段。
docker_build_job:  # job名稱
  image: docker:latest # 本階段構建使用的構建鏡像
  stage: docker_build  # 關聯的階段名稱
  tags:                      # GitLab Runner的tag
    - k8s-runner
  script:
    - docker login -u $REGISTRY_USERNAME -p $REGISTRY_PASSWORD registry.cn-beijing.aliyuncs.com   # 登錄鏡像倉庫
    - mkdir target
    - cp /opt/cache/demo.war target/demo.war
    - docker build -t registry.cn-beijing.aliyuncs.com/haoshuwei24/gitlabci-java-demo:$CI_PIPELINE_ID .     # 打包Docker鏡像,使用的tag為本次Pipeline的ID
    - docker push registry.cn-beijing.aliyuncs.com/haoshuwei24/gitlabci-java-demo:$CI_PIPELINE_ID      # 推送Docker鏡像
應用部署階段。
deploy_k8s_job:   # job名稱
  image: registry.cn-hangzhou.aliyuncs.com/haoshuwei24/kubectl:1.16.6   # 本階段構建使用的構建鏡像
  stage: deploy_k8s   # 關聯的階段名稱
  tags:                      # GitLab Runner的tag
    - k8s-runner
  script:
    - mkdir -p /etc/deploy
    - echo $kube_config |base64 -d > $KUBECONFIG   # 配置連接Kubernetes集群的config文件
    - sed -i "s/IMAGE_TAG/$CI_PIPELINE_ID/g" deployment.yaml  # 動態替換部署文件中的鏡像tag
    - cat deployment.yaml
    - kubectl apply -f deployment.yaml
執行Pipeline
提交.gitlab-ci.yml文件后,Project gitlab-java-demo會自動檢測到這個文件并執行Pipeline, 如下圖所示。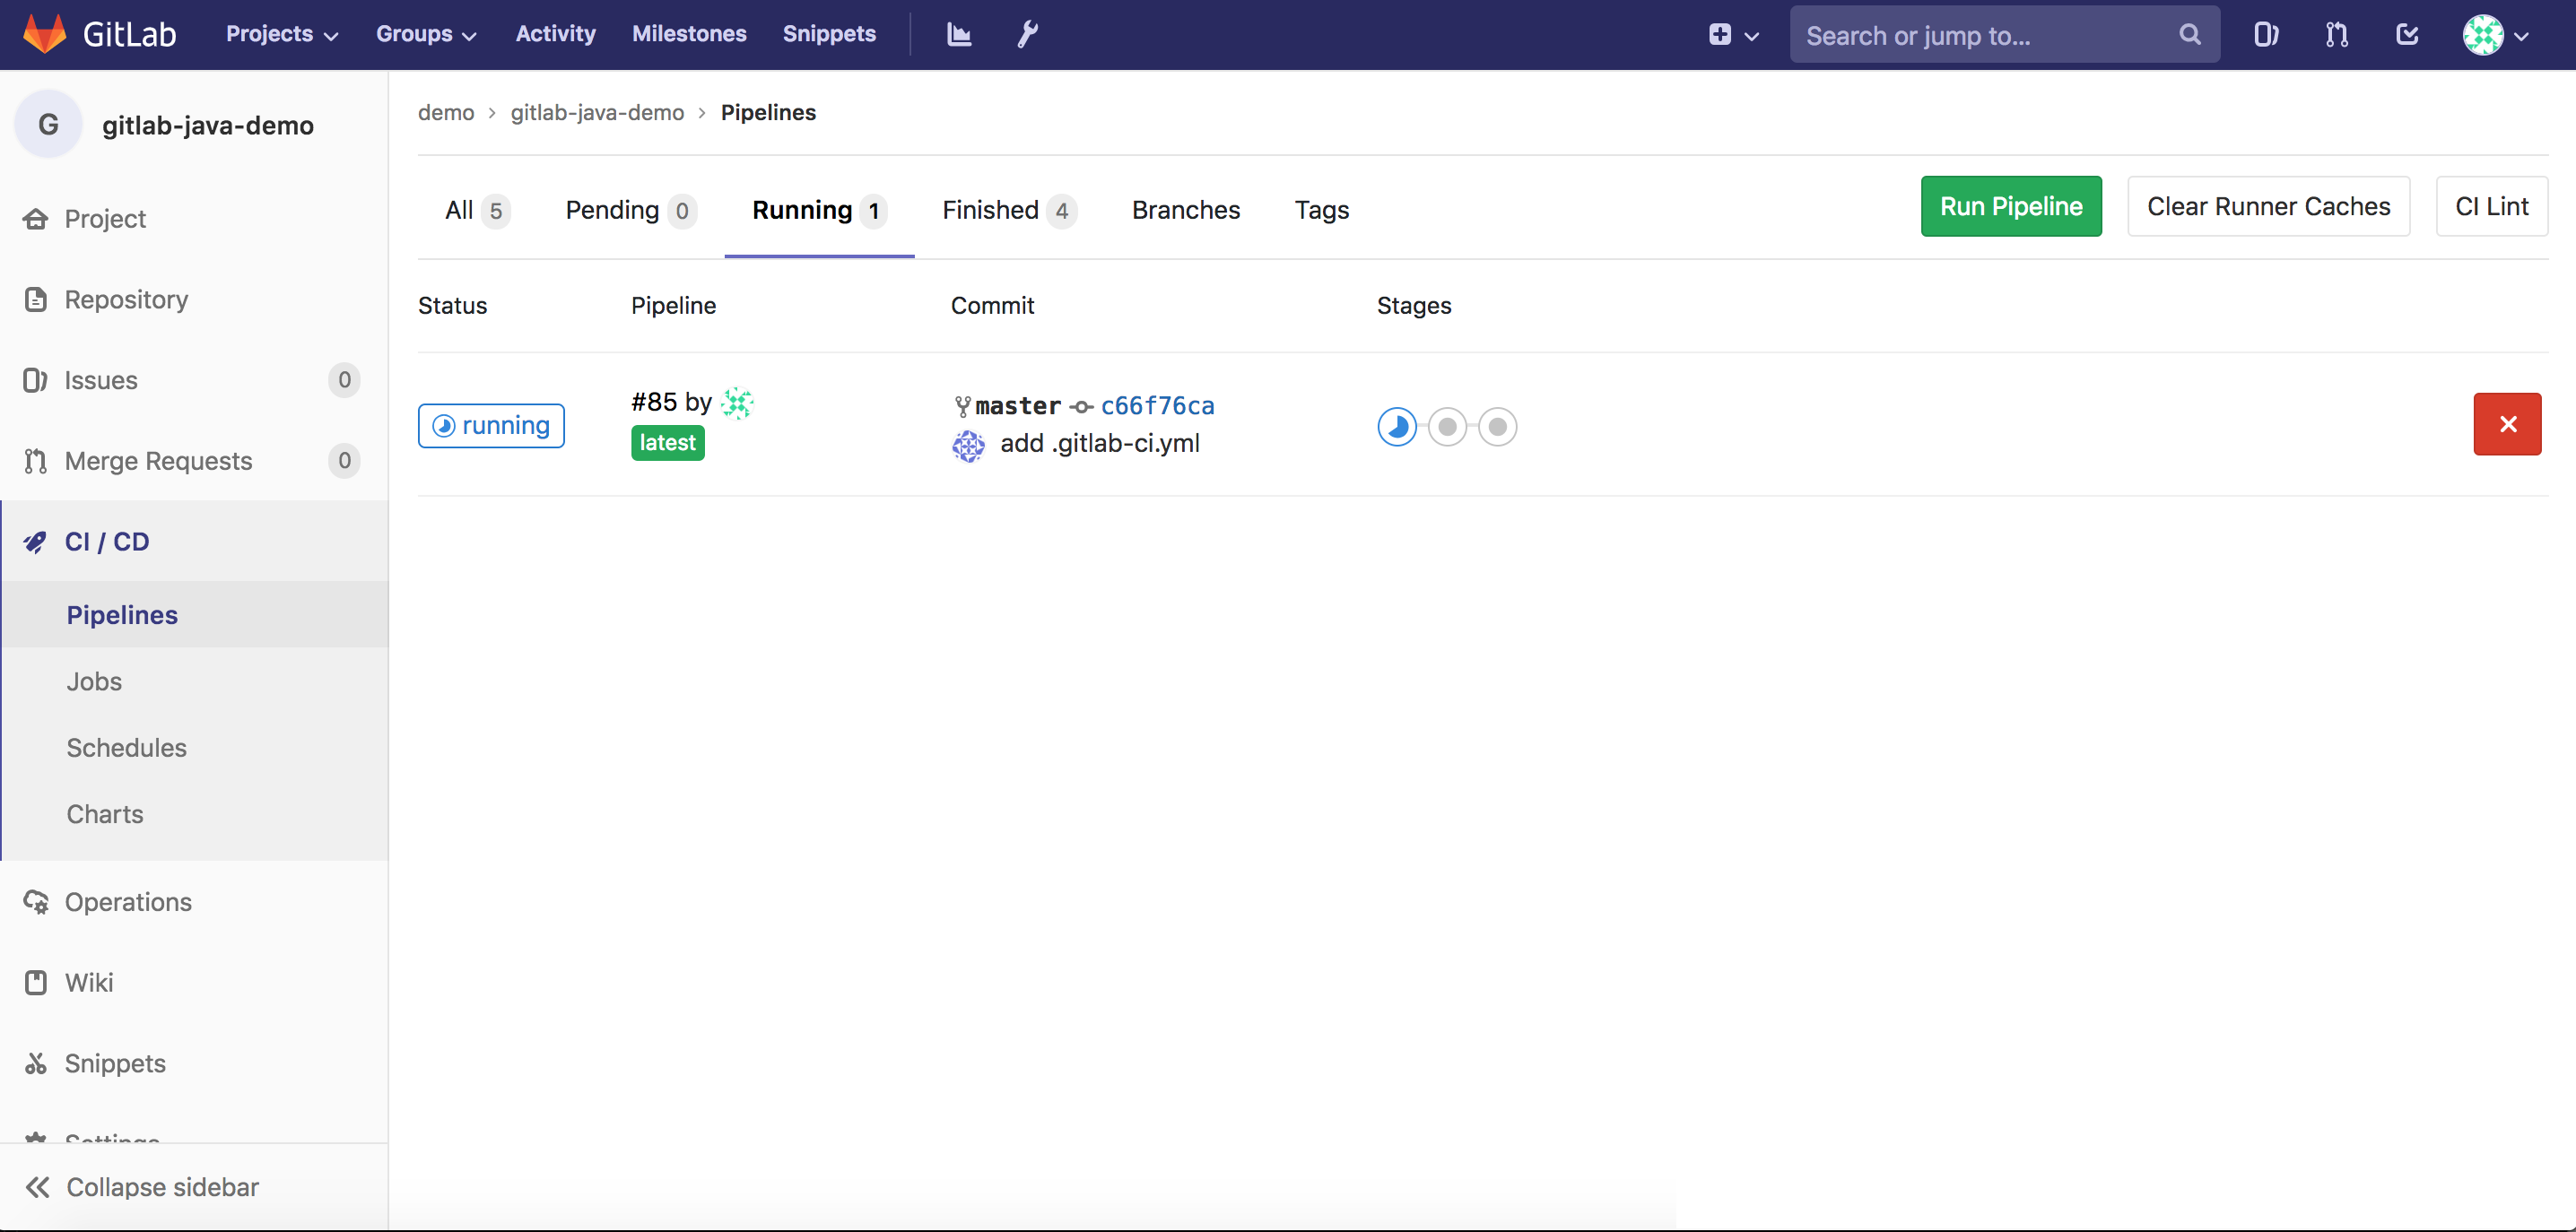
訪問服務
如果部署文件中沒有指定Namespace,則默認會部署到GitLab命名空間下:
kubectl -n gitlab get svc 預期輸出:
NAME        TYPE           CLUSTER-IP     EXTERNAL-IP      PORT(S)        AGE
java-demo   LoadBalancer   172.19.9.252   xx.xx.xx.xx   80:32349/TCP   1m
瀏覽器訪問xx.xx.xx.xx/demo進行驗證。
了解更多容器服務的相關內容,請參見容器服務。
了解更多GitLab CI的相關內容,請參見GitLab CI。