如何使用Fluid訪問線下存儲(chǔ)
Fluid是一個(gè)開源的Kubernetes原生的分布式數(shù)據(jù)集編排和加速引擎,主要服務(wù)于云原生場景下的數(shù)據(jù)密集型應(yīng)用,例如大數(shù)據(jù)應(yīng)用、AI應(yīng)用等。除了Fluid原生集成的存儲(chǔ)、緩存系統(tǒng)外,F(xiàn)luid還提供了ThinRuntime CRD。ThinRuntime CRD允許用戶描述任何自定義的存儲(chǔ)系統(tǒng),并將其對接到Fluid中。本文以Minio為例介紹如何在注冊集群中通過Fluid管理并訪問Minio存儲(chǔ)中的數(shù)據(jù)。
實(shí)現(xiàn)原理
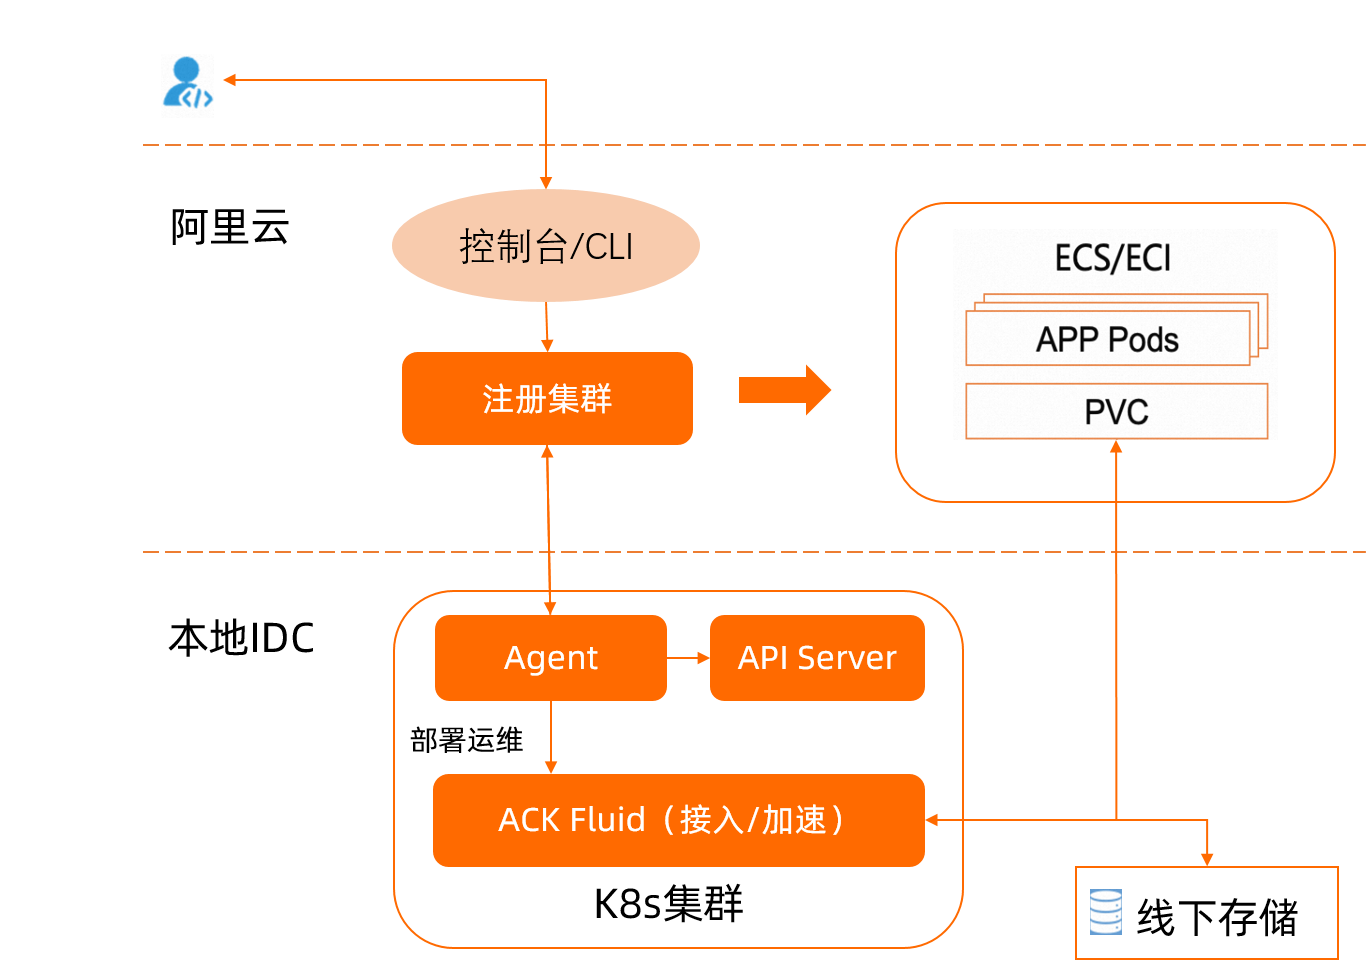
通過Fluid管理并訪問線下存儲(chǔ)的實(shí)現(xiàn)原理如下圖所示。

前提條件
已通過容器服務(wù)Kubernetes版接入一個(gè)注冊的Kubernetes集群。具體操作,請參見創(chuàng)建注冊集群。
已通過kubectl連接注冊集群。具體操作,請參見獲取集群KubeConfig并通過kubectl工具連接集群。
步驟一:安裝ack-fluid組件
通過onectl安裝
在本地安裝配置onectl。具體操作,請參見通過onectl管理注冊集群。
執(zhí)行以下命令,安裝ack-fluid組件。
onectl addon install ack-fluid --set pullImageByVPCNetwork=falsepullImageByVPCNetwork:為可選參數(shù),設(shè)置是否使用VPC網(wǎng)絡(luò)拉取組件鏡像。預(yù)期輸出:
Addon ack-fluid, version **** installed.
通過控制臺(tái)安裝
登錄容器服務(wù)管理控制臺(tái),在左側(cè)導(dǎo)航欄選擇。
在應(yīng)用目錄頁面,搜索并選中ack-fluid。
在頁面右上角,單擊一鍵部署。
在創(chuàng)建面板中,選擇集群,命名空間和發(fā)布名稱可保持系統(tǒng)默認(rèn),然后單擊下一步。
選擇Chart 版本為當(dāng)前最新版本,設(shè)置組件相關(guān)參數(shù),然后單擊確定。
步驟二:在集群中部署Minio
使用以下內(nèi)容,創(chuàng)建minio.yaml文件。
apiVersion: v1
kind: Service
metadata:
  name: minio
spec:
  type: ClusterIP
  ports:
    - port: 9000
      targetPort: 9000
      protocol: TCP
  selector:
    app: minio
---
apiVersion: apps/v1  # 1.9.0之前版本的k8s使用apps/v1beta2, 1.8.0之前的版本使用extensions/v1beta1
kind: Deployment
metadata:
  name: minio
spec:
  selector:
    matchLabels:
      app: minio
  strategy:
    type: Recreate
  template:
    metadata:
      labels:
        app: minio
    spec:
      containers:
      - name: minio
        image: bitnami/minio
        env:
        # 訪問Minio的Access key和Secret key。
        - name: MINIO_ROOT_USER
          value: "minioadmin"
        - name: MINIO_ROOT_PASSWORD
          value: "minioadmin"
        - name: MINIO_DEFAULT_BUCKETS
          value: "my-first-bucket:public"
        ports:
        - containerPort: 9000
          hostPort: 9000
執(zhí)行以下命令,在集群中部署Minio。
kubectl create -f minio.yaml以上Minio配置中,Minio的用戶名與密碼均為minioadmin,Minio在啟動(dòng)時(shí),將默認(rèn)創(chuàng)建一個(gè)名為
my-first-bucket的存儲(chǔ)桶。執(zhí)行以下命令,在my-first-bucket中存儲(chǔ)示例文件。
kubectl exec -it minio-69c555f4cf-np59j -- bash -c "echo fluid-minio-test > testfile"

kubectl exec -it minio-69c555f4cf-np59j -- bash -c "mc cp ./testfile local/my-first-bucket/"

kubectl exec -it  minio-69c555f4cf-np59j -- bash -c "mc cat local/my-first-bucket/testfile"
fluid-minio-test
步驟三:準(zhǔn)備包含Minio Fuse客戶端的容器鏡像
Fluid會(huì)把ThinRuntime中Fuse所需的運(yùn)行參數(shù)、Dataset中描述數(shù)據(jù)路徑的掛載點(diǎn)等參數(shù)傳入到ThinRuntime Fuse的Pod容器中。在容器內(nèi)部,用戶需要執(zhí)行參數(shù)解析腳本,并將解析完的運(yùn)行時(shí)參數(shù)傳遞給Fuse客戶端程序,由客戶端程序完成Fuse文件系統(tǒng)在容器內(nèi)的掛載。因此,使用ThinRuntime CRD描述存儲(chǔ)系統(tǒng)時(shí),需要使用特制的容器鏡像,鏡像中需要包括以下兩個(gè)程序。
Fuse客戶端程序:本示例選擇S3協(xié)議兼容的goofys客戶端連接并掛載minio存儲(chǔ)系統(tǒng)。
Fuse客戶端程序所需的運(yùn)行時(shí)參數(shù)解析腳本:您可以通過自定義如下Python腳本fluid-config-parse.py。
import json

with open("/etc/fluid/config.json", "r") as f:
    lines = f.readlines()

rawStr = lines[0]
print(rawStr)


script = """
#!/bin/sh
set -ex
export AWS_ACCESS_KEY_ID=`cat $akId`
export AWS_SECRET_ACCESS_KEY=`cat $akSecret`

mkdir -p $targetPath

exec goofys -f --endpoint "$url" "$bucket" $targetPath
"""

obj = json.loads(rawStr)

with open("mount-minio.sh", "w") as f:
    f.write("targetPath=\"%s\"\n" % obj['targetPath'])
    f.write("url=\"%s\"\n" % obj['mounts'][0]['options']['minio-url'])
    if obj['mounts'][0]['mountPoint'].startswith("minio://"):
      f.write("bucket=\"%s\"\n" % obj['mounts'][0]['mountPoint'][len("minio://"):])
    else:
      f.write("bucket=\"%s\"\n" % obj['mounts'][0]['mountPoint'])
    f.write("akId=\"%s\"\n" % obj['mounts'][0]['options']['minio-access-key'])
    f.write("akSecret=\"%s\"\n" % obj['mounts'][0]['options']['minio-access-secret'])

    f.write(script)
該P(yáng)ython腳本將按以下步驟執(zhí)行。
讀取
/etc/fluid/config.json文件中的JSON字符串,F(xiàn)luid會(huì)將Fuse客戶端掛載所需的參數(shù)存儲(chǔ)并掛載到Fuse容器的/etc/fluid/config.json文件。解析JSON字符串,從中提取Fuse客戶端掛載所需的參數(shù)。例如,上述示例中的
url、bucket、minio-access-key、minio-access-secret等參數(shù)。所需參數(shù)提取后,輸出掛載腳本到mount-minio.sh文件中。
使用如下Dockerfile制作鏡像。
此處選擇包含goofys客戶端程序的鏡像(例如cloudposse、goofys)作為Dockerfile的基鏡像。
FROM cloudposse/goofys

RUN apk add python3 bash

COPY ./fluid-config-parse.py /fluid-config-parse.py
執(zhí)行以下命令,構(gòu)建并推送鏡像到鏡像倉庫。
IMG_REPO=<your image repo>
docker build -t $IMG_REPO/fluid-minio-goofys:demo .
docker push $IMG_REPO/fluid-minio-goofys:demo
步驟四:創(chuàng)建ThinRuntimeProfile
ThinRuntimeProfile是一種Cluster-level的Fluid CRD資源,它描述了一類需要與Fluid對接的存儲(chǔ)系統(tǒng)的基礎(chǔ)配置(例如容器鏡像信息、Pod Spec描述信息等)。創(chuàng)建Fluid Dataset和ThinRuntime CR用于掛載Minio存儲(chǔ)系統(tǒng)之前,需要先創(chuàng)建ThinRuntimeProfile CR資源。
使用以下內(nèi)容,創(chuàng)建profile.yaml文件。
apiVersion: data.fluid.io/v1alpha1
kind: ThinRuntimeProfile
metadata:
  name: minio-profile
spec:
  fileSystemType: fuse
  fuse:
    image: $IMG_REPO/fluid-minio-goofys
    imageTag: demo
    imagePullPolicy: IfNotPresent
    command:
    - sh
    - -c
    - "python3 /fluid-config-parse.py && chmod u+x ./mount-minio.sh && ./mount-minio.sh"
執(zhí)行以下命令,創(chuàng)建ThinRuntimeProfile。
kubectl create -f profile.yaml
步驟五:創(chuàng)建Dataset和Runtime
執(zhí)行以下命令,將訪問Minio所需的訪問憑證存儲(chǔ)于Secret。
kubectl create secret generic minio-secret \
  --from-literal=minio-access-key=minioadmin \
  --from-literal=minio-access-secret=minioadmin
使用以下內(nèi)容,創(chuàng)建dataset.yaml文件。
此YAML文件包含創(chuàng)建Dataset和ThinRuntime CR,通過創(chuàng)建Dataset和ThinRuntime CR用于掛載訪問Minio存儲(chǔ)系統(tǒng)中的數(shù)據(jù)。
apiVersion: data.fluid.io/v1alpha1
kind: Dataset
metadata:
  name: minio-demo
spec:
  mounts:
  - mountPoint: minio://my-first-bucket   # minio://<bucket name>
    name: minio
    options:
      minio-url: http://minio:9000  # minio service <url>:<port>
    encryptOptions:
      - name: minio-access-key
        valueFrom:
          secretKeyRef:
            name: minio-secret
            key: minio-access-key
      - name: minio-access-secret
        valueFrom:
          secretKeyRef:
            name: minio-secret
            key: minio-access-secret
---
apiVersion: data.fluid.io/v1alpha1
kind: ThinRuntime
metadata:
  name: minio-demo
spec:
  profileName: minio-profile
類別
參數(shù)
說明
示例值
Dataset
mountPoint
指定所需訪問的數(shù)據(jù)桶。
my-frist-bucket
minio-url
指定Minio在集群中可訪問的URL。
http://minio:9000
ThinRuntime
profileName
指定已創(chuàng)建的ThinRuntimeProfile。
minio-profile
執(zhí)行以下命令,部署Dataset CR和ThinRuntime CR。
kubectl create -f dataset.yaml執(zhí)行以下命令,查看minio-demo狀態(tài)。
kubectl get dataset minio-demo預(yù)期輸出:
NAME         UFS TOTAL SIZE   CACHED   CACHE CAPACITY   CACHED PERCENTAGE   PHASE   AGE
minio-demo                    N/A      N/A              N/A                 Bound   2m18s
預(yù)期輸出中Dataset和Phase狀態(tài)變?yōu)锽ound,表明Dataset可正常掛載使用。
步驟六:創(chuàng)建Pod訪問Minio存儲(chǔ)系統(tǒng)中的數(shù)據(jù)
使用以下內(nèi)容,創(chuàng)建pod.yaml文件。
該P(yáng)od用于訪問Minio中的數(shù)據(jù)。
apiVersion: v1
kind: Pod
metadata:
  name: test-minio
  # 如果云上為ECI節(jié)點(diǎn),需要添加以下標(biāo)簽:
  # labels:
    # alibabacloud.com/eci: true
    # alibabacloud.com/fluid-sidecar-target: "eci"
spec:
  containers:
    - name: nginx
      image: nginx:latest
      command: ["bash"]
      args:
      - -c
      - ls -lh /data && cat /data/testfile && sleep 3600
      volumeMounts:
        - mountPath: /data
          name: data-vol
  volumes:
    - name: data-vol
      persistentVolumeClaim:
        claimName: minio-demo
使用以下內(nèi)容,部署Pod。
kubectl create -f pod.yaml執(zhí)行以下命令,查看數(shù)據(jù)訪問結(jié)果。
kubectl logs test-minio預(yù)期輸出:
total 512
-rw-r--r-- 1 root root 17 Dec 15 07:58 testfile
fluid-minio-test
預(yù)期輸出表明,名為test-minio的Pod可正常訪問Minio存儲(chǔ)系統(tǒng)中的數(shù)據(jù)。
(可選)步驟七:清理環(huán)境
當(dāng)不再需要訪問云下存儲(chǔ)時(shí),您需要執(zhí)行以下命令清理環(huán)境。
kubectl delete -f pod.yaml
kubectl delete -f dataset.yaml
kubectl delete -f profile.yaml
kubectl delete -f minio.yaml